What Is a V-Belt? Its Function, Noise, and Tensioner Pulley Failure
What is a V-belt and what does it do? How to diagnose belt noise, tensioner pulley failure, wear signs, and correct replacement in heavy commercial vehicles.
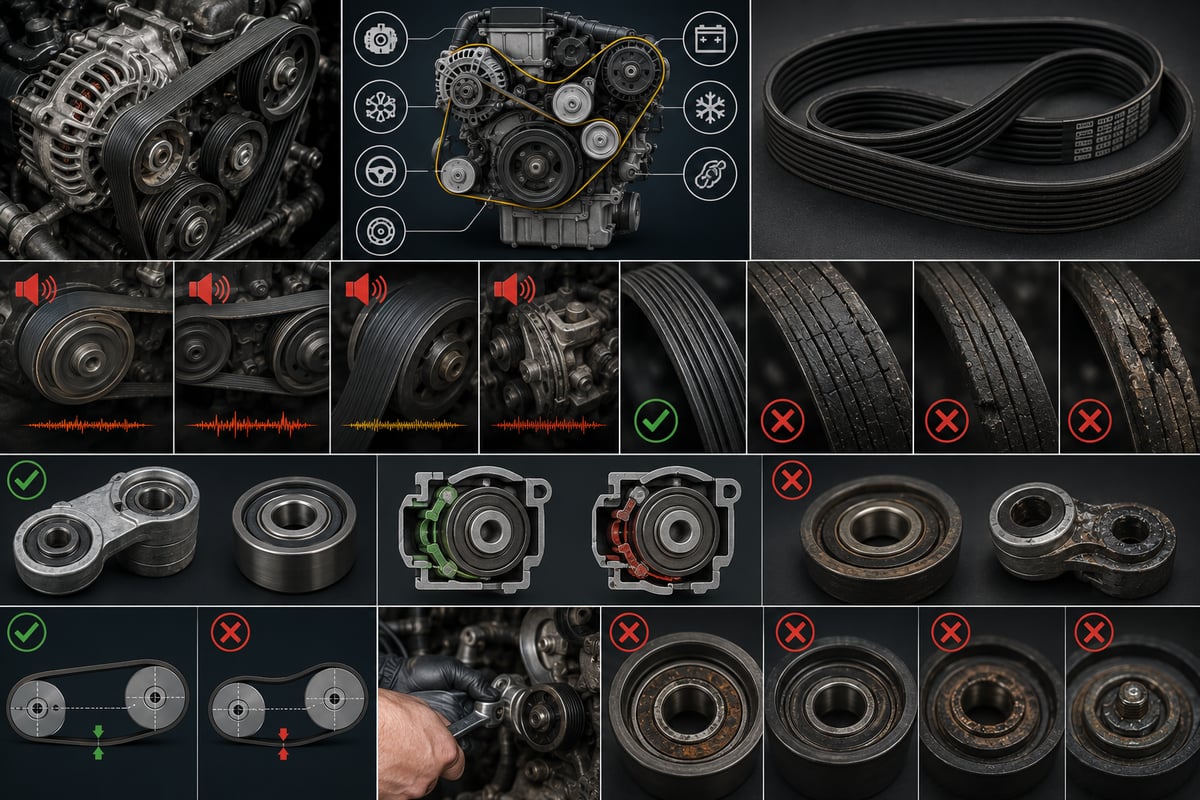
A short squeal from the engine bay on the first cold start rarely makes it into the maintenance log — most fleets write it off as "the belt squeaks until it warms up." Two weeks later the same truck lights up the coolant temperature and charge warning together on the road; under the hood there's a snapped belt and a water pump that's stopped turning. The belt had already announced it was slipping that first morning; nobody listened. This guide treats the V-belt not as a rubber part but as a power-transmission chain running from the crank pulley to the alternator, the water pump, and the fan.
What is belt drive, and what does a V-belt actually do in the engine?
A V-belt is a flexible drive element with a trapezoidal (wedge-shaped) cross-section that transmits power by friction against the two sloped sides of the pulley groove. It distributes the rotation the engine draws off the crankshaft to accessory units that have no drive of their own. The "V" in the name comes from the belt's cross-sectional shape; the belt is not meant to touch the bottom of the groove — it wedges between the groove's angled side walls.
Accessory units circulate coolant, generate electricity, cool the cab, and supply power-steering pressure — and every one of them needs a connection back to the crankshaft. In a heavy commercial vehicle that connection is made one of two ways: gear drive through the timing gear train, or belt drive off the crank pulley. Belt drive absorbs vibration and allows accessories to be mounted more freely, but because it relies on friction, it depends on correct tension, clean surfaces, and alignment.
Which components does a V-belt turn?
The chain always starts at the crank pulley. In a heavy commercial vehicle, the units typically driven by the belt are:
- Water pump: Circulates coolant between the block, cylinder head, and radiator; when the belt stops, so does circulation.
- Alternator: Covers the vehicle's electrical load and charges the battery; it's one of the largest resistance loads on the belt.
- Cooling fan: Pulls air through the radiator, usually engaging via a viscous or electromagnetic clutch.
- A/C compressor: The moment its clutch engages, the load on the belt jumps in a step.
- Power-steering pump and air compressor: Usually gear-driven in heavy commercial vehicles; on belt-driven applications, a stopped belt also means lost steering assist and lost air supply.
What is the difference between a V-belt and a ribbed (poly-V, serpentine) belt?
In the field, both belt types get called a "V-belt," but they work differently and fail differently. A classic V-belt is a single trapezoidal body that transmits power through its two side faces. A ribbed belt (poly-V or serpentine) is a thin, flexible band made up of many small V-shaped ribs side by side, giving far more contact surface across the same width.
| Feature | Classic V-belt | Ribbed (poly-V) belt |
|---|---|---|
| Cross-section | Single trapezoidal body, thick and rigid | Multi-ribbed, thin and flexible band |
| Power transfer | Wedge effect on the two side faces | Combined side-face area of many ribs |
| Pulley diameter & unit count | Needs a large diameter; usually drives one or two units | Wraps small-diameter pulleys; one belt drives the whole accessory group |
| Tensioning setup | Usually manual — sliding the unit on a bracket | Spring-loaded automatic tensioner arm is common |
| Wear pattern | Sinks deeper into the groove, bottoms out | Loses material, rib profile flattens |
| Typical noise & failure result | Slip squeal; only its own unit stops | Misalignment squeak; the whole accessory group stops at once |
Which type is used on which vehicle?
The classic V-belt is still common on older-generation trucks, buses, tractors, and construction equipment, especially on single-unit runs like the fan or A/C compressor. Under high load, two or three belts often run in parallel, and they must always be replaced as a matched set; belts that differ in length by even a few millimetres won't share the load evenly — the longer one rides loose while the shorter one is overloaded and fails early.
On modern Euro V and Euro VI engines, the ribbed belt is close to standard. A single belt runs off the crank pulley and loops around the alternator, water pump, fan clutch, A/C compressor, and tensioner pulley — which is where the name "serpentine" comes from. Its advantages are lower noise, longer life, and constant tension; the trade-off is that a single failure point takes down the whole drive.
How does a V-belt transmit power? Wedge effect, wrap angle, and slip
A V-belt's operating principle rests on the wedge effect. As the belt seats in the groove, the radial force created by belt tension is redirected by the angled walls into a much larger force pressing perpendicular to the side faces; the result is a friction force many times higher than a flat belt could produce at the same tension. On a classic V-belt, the pulley groove angle is generally held between roughly thirty and forty degrees; the narrower the angle, the stronger the wedge effect.
This has two critical consequences. First, the belt must never touch the bottom of the groove. The instant the base bottoms out, the clamping force on the side faces disappears and the belt starts floating instead of gripping; power transfer collapses even if tension reads correctly. This is the most commonly missed wear pattern on a classic V-belt — the belt looks intact but no longer pulls. Second, because power is transmitted only through the side faces, the condition of those faces is decisive; an oil film, a glazed surface, or a coating of dust all lower the coefficient of friction.
The second decisive factor is the wrap angle: how many degrees of the pulley the belt embraces. The larger the wrap, the more torque can be transmitted. The alternator pulley is often the most critical point in the chain, because it is both small in diameter and demands high torque; some of the idler pulleys built into ribbed-belt layouts exist purely to increase wrap on that one pulley. Slip is the belt falling behind the pulley's rotation: a small amount of slip happens on every drive and is normal — the problem is when slip becomes continuous. Friction generates heat, heat hardens and glazes the side face, and a glazed surface grips less and slips more. That self-feeding cycle is why a belt that has started squealing tends to become unusable within a short time.
Why is belt tension so critical?
A belt drive has exactly one correct tension window, and both sides of that window produce failure: too loose and the belt slips; too tight and it kills itself and the bearings it drives. The most common mistake is silencing a squealing belt by "cranking it down hard" — the noise stops, but the alternator and water pump bearings pay for it within a few months.
| Tension condition | Mechanism | Observed symptom | Long-term outcome |
|---|---|---|---|
| Too loose | Friction force falls below the torque that needs transmitting, belt slips | Squeal on start-off and in cold weather, dropping battery charge | Side faces glaze, belt heats and hardens, overheating risk |
| Marginally loose | Slips only at load steps | Brief noise when A/C engages or steering hits full lock | Localized wear, uneven stretch, early end of life |
| Correct window | Slip is momentary and minimal, no heat build-up | No noise, stable charging and coolant temperature | Belt and bearings reach their designed service life |
| Too tight | Radial load on the belt body and bearings increases | Constant hum, hot alternator housing | Shortened bearing life, shaft fatigue, belt plies separate |
| Fluctuating tension | Automatic tensioner arm can't damp oscillation | Visible arm chatter and rattling at idle | Belt flutters, jumps the groove, edges fray |
Tension also has a time dimension. A newly fitted belt seats into the grooves during its first hours of running and loosens by a measurable amount. On an automatic tensioner this is compensated for automatically; on a manual tensioner, tension must be rechecked after a short run. Most of the squeals that show up a few days after a belt change aren't a belt defect — they're this skipped second check.
How do the tensioner pulley, tensioner arm, and automatic tensioner work?
The tensioning assembly is what keeps tension constant, and it comes in two forms. On a manual tensioner, tension is set by sliding the driven unit — usually the alternator — along its mounting bracket. On an automatic tensioner, a spring-loaded arm presses the tensioner pulley at its end against the belt with constant force; as the belt stretches, the arm advances and tension is maintained on its own.
The automatic tensioner arm does two jobs at once: the spring generates tension, and a friction damper inside the arm body damps out vibration. Once the damper is worn out, the arm bounces back and forth with every firing pulse; tension momentarily drops and rises, the belt flutters in the groove, and the drive loses stability. Because the spring itself is still sound, tension feels normal when checked by hand, even though the system is unstable while running. For the detailed diagnostic flow on how the tensioner is checked and when it needs replacing, see Belt Tensioner: Failure, Replacement & Maintenance Guide.
How can tensioner pulley failure be recognized?
The tensioner pulley is the free-spinning wheel at the end of the arm. When its bearing grease runs out or takes on water, it announces itself first through noise, then through play. A sound pulley spins smoothly and has no side-to-side play when the belt is removed and it's turned by hand; a failing one gives a rattle or a gritty resistance when turned, with noticeable play in its axis.
The fan-side tensioner and its pulley carry a different load profile: fan mass is large, and inertial load hits suddenly the moment the clutch engages. Diagnostics and replacement details for that arm are covered separately in Fan Belt Tensioner: Failure, Replacement & Maintenance. The general rule is the same on both arms: pulleys are tested by hand at every belt change, and any that feel suspect are renewed along with the belt. Running a new belt against a tired pulley shortens the new belt's life from day one.
Diagnosing belt noise: what do squealing, chirping, and humming mean?
Noise from a belt drive is never random; every noise character is the signature of a specific event. Correct diagnosis starts with reading the noise type, the condition it appears under, and its relationship to engine speed together. As a rough rule: a squeal points to slip, a rhythmic chirp points to misalignment, and a steady hum points to a bearing.
| Noise character | When it's heard | Likely source | How to confirm |
|---|---|---|---|
| High-pitched squeal | Cold start, pull-away, A/C engaging, steering at full lock | Slip: low tension, glazed surface, or fluid contamination | Reproduce the noise by creating a load step, then inspect tension and surface |
| Short, rhythmic chirp | Usually at idle, in sync with engine speed | Misalignment: pulleys not in the same plane | Measure the pulley plane with an alignment tool or a straightedge |
| Steady hum or growl | Rises with engine speed, independent of load | Bearing: tensioner pulley, idler, alternator, or water pump bearing | Remove the belt and turn each pulley by hand, one at a time |
| Rattle, knocking | At idle and during speed changes | Tensioner damper worn out, arm hitting its stop, or a loose pulley | Watch arm movement at idle, check pulley bolts |
| No noise but a symptom exists | Low charge or rising coolant temperature tendency | Silent slip: not every slip makes noise | Monitor alternator output current and coolant temperature behaviour |
Does the water test help separate the noise source?
Spraying a light mist of water onto the back of the belt while the engine is running can help, if the result is read correctly. If the squeal stops the moment water hits it and then returns, the problem is a loss of friction: check tension, surface glazing, or contamination. If the noise gets more pronounced with water, misalignment is the likely cause. If the noise doesn't change at all, the source isn't the belt — it's a spinning bearing.
Further reading
For a plain-language technical overview of this subject, see the reference article on Wikipedia. Always confirm specific figures and procedures against the vehicle manufacturer service data.
Wear signs: cracking, glazing, edge fraying, and groove sinking
Every mark on a belt tells you something; the challenge is telling which mark signals end of life and which points to a separate fault. Modern materials have made that distinction harder: older chloroprene-based belts used to reach end of life with visible transverse cracks, but the EPDM-based belts common today have such high heat and ozone resistance that they can reach end of life without cracking at all. Instead of cracking, these belts lose material — the rib profile flattens, the belt sinks deeper into the groove, and it silently loses its grip. "No cracks means it's fine" is therefore a misleading test.
| Symptom | Appearance | Mechanism | Decision |
|---|---|---|---|
| Transverse cracks | Fine, closely spaced splits perpendicular to the ribs | Heat and ageing; the rubber has lost its elasticity | Replace if widespread, monitor if only occasional |
| Glazing on the side face | Glassy, mirror-smooth surface | Surface hardening from continuous slip | Replace, and also fix the cause of the slip |
| Groove sinking | Belt's back sits below the level of the pulley rim | Side-face wear has let the belt bottom out | Replace, and also measure the pulley groove |
| Edge fraying | Fibres pulling out and fuzzing on one edge | Misalignment or the belt rubbing against a pulley flange | Replace, and be sure to measure alignment |
| Longitudinal splitting, chunks missing from the ribs | Separation running along the length, or missing rib sections | Foreign object, grit or sand ingress, a burr on a pulley, severe misalignment | Replace, clean the pulleys, check the cover/guard |
| Swelling, softening | Body swollen, doughy when pressed by hand | Contamination with engine oil, hydraulic fluid, or coolant | Replace, but fix the leak source first |
Can an oil-contaminated belt be cleaned and reused?
No. Rubber that has been in contact with oil or coolant swells inward from the surface, and that change is irreversible; cleaning only dries the outer surface. More importantly, a contaminated belt isn't just a finding on its own — it's a symptom: there is a fluid leaking from the front cover, the water pump seal, the crank seal, or a hydraulic line. Replace the belt without finding the source and the new one will go the same way.
What happens if the belt breaks? The water pump and alternator stop at the same time
A belt failure is one of the fastest routes to a roadside breakdown in a heavy commercial vehicle, because the fault doesn't take out one unit — it disables several independent systems in the same second.
- Coolant circulation stops. Once the water pump stops turning, circulation between the block and the radiator ends; on a loaded vehicle, the temperature gauge climbs into the red within minutes, and continuing to drive brings cylinder head and gasket damage into play. For how the water pump's own failure symptoms are told apart from belt-caused ones, see Water Pump: Faults, Replacement & Maintenance Guide.
- Charging stops. With the alternator no longer turning, the vehicle's entire electrical load falls on the battery; in a heavy commercial vehicle that load is substantial, and headlights, telematics, and control units are affected within a short time.
- Radiator airflow drops. On vehicles with a belt-driven fan, overheating develops much faster, because coolant circulation and airflow are both lost at the same instant.
- Power-steering assist ends, and the loose belt can cause secondary damage. On belt-driven hydraulic pumps, steering becomes noticeably heavier; the freed belt can also whip around and tangle with a neighbouring belt, the wiring harness, or a sensor connector.
On the instrument cluster, the charge and coolant-temperature warnings lighting up together is the classic signature of a broken belt; since two unrelated systems failing at the same instant is unlikely, the common cause should be the first thing checked. Whenever this pair appears, stop the vehicle safely and check under the hood; continuing to drive with a coolant warning lit produces engine damage that costs far more than the belt ever would.
How is the belt and its tension checked?
Checks are always carried out with the engine off and cold. The visual inspection must cover the belt's entire circumference: the section between the crank pulley and the lower pulleys collects the most dirt and grit and is the least visible, so the belt should be turned by hand to bring the whole loop into view.
Three methods are used to measure tension. The deflection method presses the midpoint of the longest free span with a set force and measures how far it deflects; as a rough rule of thumb, expect deflection on the order of a few millimetres per hundred millimetres of span, though the exact figure depends on belt type and engine. The frequency method measures, in hertz, the vibration frequency produced when the free span is lightly struck, and gives the most repeatable result. The tension-gauge method reads tension directly in newtons. On automatically tensioned systems, measurement is often unnecessary — what matters there is the working-range marks on the tensioner arm. If the indicator mark has moved outside that range, especially against the stretch-side limit, the belt has reached end of life or the wrong-length belt has been fitted.
V-belt replacement step by step
Belt replacement is a quick job when done in the right order; skipped steps are what use up a new belt's life in its first weeks. The sequence below applies to both the classic V-belt and the ribbed belt.
- Park the vehicle on level ground, apply the parking brake, shut off the engine and switch off the ignition, and let the engine and exhaust area cool down.
- Record the belt routing diagram: read the label in the engine bay, or if there isn't one, take a clear photo before removal. On a ribbed belt, an incorrect routing is the most common mistake. Remove any cover, air duct, or under-tray that blocks access.
- Release tension. On an automatic tensioner, fit a wrench into the arm's square or hex socket and compress the spring; on a manual tensioner, loosen the alternator's pivot, slide, and adjustment bolts in sequence.
- Remove the belt and inspect it. The wear pattern points to the cause: fraying on one edge indicates misalignment, glazing on both sides indicates slip, and swelling indicates fluid contamination.
- Turn every pulley by hand, one at a time; flag any that don't spin freely, feel gritty, or show side play. Be sure to test the tensioner pulley and idler pulleys at this step.
- Clean the pulley grooves with a suitable brush and rag; don't use a stiff wire brush or sandpaper that would score the surface. Look for burrs, a wear step, or impact marks in the groove.
- If there's a fluid leak, fix the source; fitting a new belt while oil or coolant is still leaking brings the same failure back within a short time.
- Select the correct belt. On a ribbed belt, the number of ribs and effective length must match exactly; on a classic V-belt, the profile and length must match exactly. On multi-belt classic arrangements, belts are always replaced together as a matched set.
- Route the new belt according to the diagram. The last pulley to be loaded should be the tensioner pulley or whichever plain pulley is easiest to reach; don't force the belt over a pulley edge with a lever, as this damages the cord plies.
- Release the tensioner in a controlled manner and visually confirm at every pulley that the belt has fully seated in all the ribs; even one displaced rib will tear the belt apart within a short time. On a manual tensioner, set tension using the manufacturer's method and tighten the bolts to OE torque; on an automatic tensioner, confirm the arm indicator stays within its working range.
- Turn the crankshaft by hand through two full rotations and recheck the seating, then refit any covers that were removed. Start the engine and listen at idle, then bring on loads such as the A/C and steering to reassess the noise; watch from a distance to confirm the belt is running centred on each pulley.
- Recheck tension after a short road test. On manually tensioned systems, this second check is mandatory, because the belt loosens somewhat as it seats in.
How is belt tracking and alignment checked?
Alignment means every pulley rotates in the same plane. It's the most commonly overlooked fault in a belt drive, yet the one that consumes the most belts; misalignment doesn't cause a snap, it causes slow, steady wear. If a belt is dying before its time, alignment should be checked before tension.
Two types of misalignment are distinguished. In parallel (offset) misalignment, the pulleys sit at the same angle but in different planes; the belt is constantly pulled to one side and its edge frays against the pulley flange. In angular misalignment, one pulley sits tilted; the belt enters the groove at an angle and exits straight, one side face wears rapidly, and a rhythmic chirp appears. The most reliable measurement uses a laser alignment tool that seats in the pulley groove; without one, a rough check can be made with a straightedge, but that method won't catch small deviations. Acceptable deviation in general engineering practice is kept below one degree; the exact tolerance should come from the manufacturer.
Where does misalignment come from?
- A loose, bent, or cracked bracket on the alternator, compressor, or pump.
- A pulley not seating fully on its shaft, with a layer of dirt or rust trapped between them.
- The wrong part fitted: a pulley of the same diameter but a different offset is enough to shift the belt by a few millimetres.
- Play in the tensioner arm's bearing, or degradation of its vibration damper; once the damper's rubber hub separates, the outer ring shifts and changes the groove plane.
Technical values and reference checks
The table below gathers the figures most often referenced, as general guidance. These values are for initial assessment only; the current OE service manual for the vehicle's specific engine and chassis code is the binding source.
| Parameter | General reference | Note |
|---|---|---|
| Classic V-belt pulley groove angle | Roughly thirty to forty degrees | The narrower the angle, the stronger the wedge effect; pulley and belt angle must match |
| Belt sizing spec | Ribbed: rib count, profile code, and effective length; classic: top width and length | If any one figure doesn't match, the belt won't seat correctly |
| Alignment deviation | Below one degree in general practice | Exact tolerance is manufacturer-specific; laser-tool measurement is preferred |
| Deflection method | Measured at the midpoint of the longest span, under a set force | Measurement point and target deflection are manufacturer-specific |
| Frequency measurement | In hertz, with an acoustic tension gauge | The most repeatable method; target value comes from OE data |
| New-belt seating allowance | Measurable loosening during the first hours of running | A second check is mandatory on a manual tensioner |
| Inspection interval | Visual and hand check at every scheduled service | More frequent under severe duty |
Maintenance, service life, and the belt drive's place in the system
Mileage alone doesn't determine a belt's life. The same belt that runs trouble-free on a long-haul tractor unit can wear out far sooner on urban distribution, a construction site, or a refuse-collection duty cycle: frequent stop-start driving, long idling, high ambient temperature, dust exposure, and the A/C and fan constantly cycling on and off all fatigue the belt independent of mileage. Replacement intervals should therefore be set by weighing the manufacturer's stated period against the vehicle's actual duty profile.
- Visual check at every scheduled service: Turn the belt by hand around its full circumference and inspect for cracking, glazing, fraying, and groove sinking.
- Bearings tested by hand: Turn the tensioner pulley and idler pulleys, checking for grit, play, and signs of overheating.
- Tensioner indicator and leak check: On an automatic tensioner, confirm the arm mark stays within its working range; check whether the front cover, water pump, crank seal, or a hydraulic line is leaving fluid in the belt area.
- Log the noise: Record the noise type the driver reports together with the condition it's heard under in the vehicle's file; it's the single most valuable diagnostic input.
- Treat replacement as a set, and carry a spare: When the belt is replaced, the tensioner and any suspect pulleys are addressed at the same time; carrying a correctly sized spare belt on long-haul vehicles cuts downtime from hours to minutes.
From a systems perspective, the belt drive is the shared backbone of the cooling and charging chains. On the cooling side, the chain starts at the water pump and continues through the thermostat, radiator, and fan; the belt is that chain's source of motion, and once it stops, it doesn't matter how sound the downstream components are. The charging side carries the same dependency: even a perfectly healthy alternator turns slower when a belt is slipping, and the battery drains. That's why a belt-caused complaint so often arrives at the shop filed under "alternator fault."
The practical takeaway is this: nearly every belt-drive failure falls under one of three headings — incorrect tension, missed misalignment, and uncorrected fluid contamination. Keep all three under control and the belt reaches its designed service life; neglect any one of them and even the best belt goes from squealing to broken in short order. Whenever in doubt, the current OE service documentation for the vehicle's specific engine and chassis code is the reference to follow.
Shop this part: Engine
Main guide: Engine Overheating in Heavy-Duty Trucks: Causes & Fixes
Tags
Frequently Asked Questions
- What is a V-belt and what does it do?
- A V-belt is a flexible drive element with a trapezoidal (wedge-shaped) cross-section that transmits power by friction against the two sloped sides of the pulley groove. It distributes the rotation the engine draws from the crankshaft to accessory units such as the water pump, alternator, cooling fan, and A/C compressor. The belt isn't meant to touch the bottom of the groove — it wedges and grips between the groove's angled side walls.
- What's the difference between a V-belt and a poly-V (ribbed) belt?
- A classic V-belt is a single trapezoidal body that usually drives one or two units. A ribbed belt (poly-V or serpentine) is a thin, flexible band made up of many small V-shaped ribs side by side; because it can wrap small-diameter pulleys, one belt drives the entire accessory group. On a classic belt, a failure stays limited to its own arm, but when a ribbed belt breaks, every accessory on the engine stops at once.
- Why does a V-belt make noise, and what does squealing mean?
- A high-pitched squeal is almost always the sound of slip: tension has dropped, the belt's side face has glazed, or a fluid such as oil or coolant has contaminated it. The noise usually shows up on a cold start, at pull-away, when the A/C engages, or when the steering hits full lock. A short, rhythmic chirp instead points to misalignment, and a steady hum points to a bearing failure.
- How can you tell a tensioner pulley has failed?
- A sound tensioner pulley spins smoothly with no side-to-side play when the belt is removed and it's turned by hand. A failing one gives a rattle or a gritty resistance when turned, with noticeable play in its axis. While running, the symptom is a steady hum that rises with engine speed but is independent of load; if the tensioner arm's damper is also worn out, this comes with visible arm chatter and rattling at idle.
- What happens if a V-belt breaks — can you keep driving?
- No, you can't. Once the belt breaks, the water pump stops and coolant circulation ends; on a loaded vehicle the temperature gauge climbs into the red within minutes, and continuing to drive brings cylinder head and gasket damage into play. The alternator stops at the same time, so charging is lost too. The charge and coolant-temperature warnings lighting up together on the cluster is the classic signature of a broken belt, and the vehicle should be stopped safely.
- When should a V-belt be replaced, and what determines its life?
- Mileage alone doesn't determine belt life. Frequent stop-start driving, long idling, high ambient temperature, and dust exposure all fatigue a belt independent of mileage, which is why belts wear out far sooner on urban distribution, construction sites, or refuse-collection duty than on long-haul work. The replacement interval should be set by weighing the manufacturer's stated period against the vehicle's actual duty profile.
- How is belt tension adjusted and measured?
- On a manual tensioner, tension is set by sliding the driven unit along its mounting bracket; on an automatic tensioner, a spring-loaded arm maintains tension on its own and no adjustment is needed. Measurement uses the deflection, frequency (acoustic), or tension-gauge method, with the frequency method giving the most repeatable result. The target value and measurement point are vehicle-specific and should come from the current OE service manual for that engine and chassis code.
- If there are no cracks, is the belt still good?
- No — that reading can be misleading. The EPDM-based belts common today have such high heat and ozone resistance that they can reach end of life without cracking at all; instead of cracking, they lose material, the rib profile flattens, the belt sinks deeper into the groove, and it silently loses its grip. For that reason, glazing on the side face, edge fraying, and groove sinking need checking alongside cracking, not instead of it.
- Can an oil-contaminated belt be cleaned and reused?
- No. Rubber that has been in contact with oil or coolant swells inward from the surface, and that change is irreversible — cleaning only dries the outer surface. More importantly, a contaminated belt is a symptom, not just a finding on its own: there is a fluid leaking from the front cover, the water pump seal, the crank seal, or a hydraulic line. Replace the belt without fixing the source and the new one will fail the same way.
- Should the tensioner pulley be replaced along with the belt?
- The rule is that the tensioner pulley and any idler pulleys are tested by hand at every belt change, and any that feel suspect are renewed along with the belt. Running a new belt against a tired pulley shortens the new belt's life from day one. At the same service, the pulley grooves should be cleaned, alignment checked, and the source of any fluid leak fixed.
Related Articles

Oil Filter Cap and Housing: Leaks, Cracks and Seal Replacement
Truck engine oil filter cap and housing: why plastic caps crack, O-ring leak causes, bypass valve faults, and correct torque and seal replacement steps.
Piston Rings: Oil Consumption, Compression Loss and Replacement
Ring-related oil consumption and compression loss in truck diesel engines: how rings seal, blow-by and leak-down tests, ring gap and replacement.
Intake Manifold and Intake Pipe: Faults, Diagnosis, Repair
How the intake manifold and charge air pipe work on truck diesel engines, how to spot boost leaks, run a pressure test and fit them leak free.


