Burnt Cylinder Head Gasket: Symptoms and Causes
Symptoms, leak paths and root causes of a burnt heavy-duty head gasket, plus pressure testing, block testing, torque procedure and replacement steps.
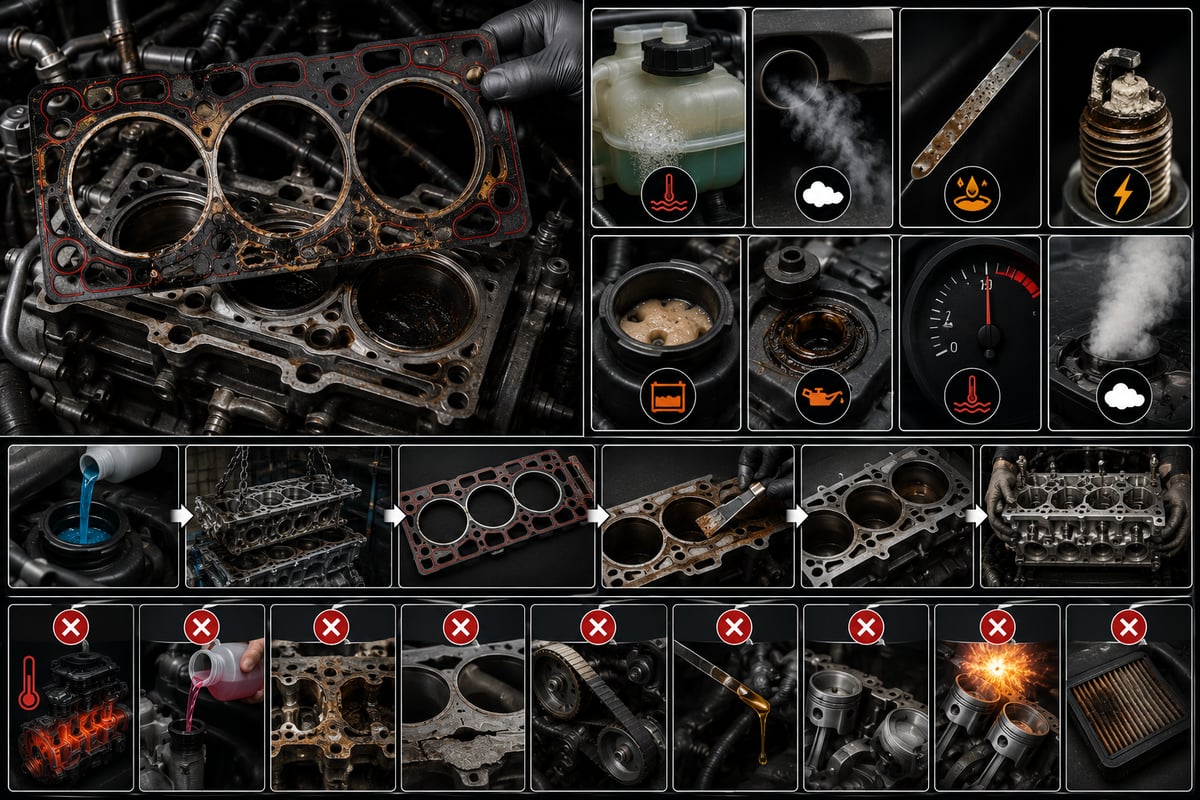
A loaded tractor unit is climbing a long grade with a full trailer behind it; the coolant temperature needle creeps up, the driver pulls onto the hard shoulder, and the coolant in the expansion tank is bubbling as if it's boiling. There's coolant in the radiator, the belt hasn't snapped, and the fan is turning. A few mornings later, the first start-up produces a stubborn cloud of white smoke, and the tip of the dipstick shows a brown, creamy sludge. These aren't three separate faults — they're three faces of the same one: the cylinder head gasket can no longer keep the circuits it's meant to separate, separate. This guide builds the diagnostic logic that runs from symptom to leak path, and from leak path to root cause.
What is a cylinder head gasket, and what does it do in the engine?
The cylinder head gasket is a multi-layer sealing component fitted between the cylinder head and the engine block that keeps three separate circuits — circuits that must never mix — sealed across a single plane, all at once. No other part in the engine separates so many different environments, in such a confined space, under such high load.
- Combustion chamber: the zone where peak pressure climbs past a hundred bar every cycle and gas temperature passes a thousand degrees. What the gasket holds back here isn't a liquid — it's hot gas that will find the smallest gap.
- Cooling circuit: pressurised coolant circulating between block and head; the water transfer ports pass straight through the gasket.
- Lubrication circuit: pressurised galleries feeding oil to the head and returning it to the sump.
In heavy-duty diesel engines this job is harder than in a passenger car: combustion pressure is higher, the engine spends most of the day under full load, and many of these engines use wet-liner architecture, so the surface the gasket seats against isn't a single machined casting — it's a composite plane formed by the block deck and the tops of the liners. A burnt gasket on these engines isn't a comfort issue; it's an event that stops the truck on the road and, if handled wrong, can write off the whole engine.
How does the gasket seal? Working principle and the loads it carries
Sealing doesn't come from the gasket itself — it comes from the clamp load created by the head bolts. Once the bolts are tightened, they generate a surface pressure across the gasket, and that pressure has to stay greater than the force of combustion pressure trying to lift the head, under every operating condition. The gasket does two jobs within that: it fills the microscopic irregularities in both surfaces so no gap is left open, and its spring-back keeps closing the gap that opens as loads shift.
That balance is disturbed and re-established continuously while the engine runs. On every firing stroke, combustion pressure pushes the head upward, the bolts stretch elastically, and surface pressure momentarily drops. Thermal effects stack on top of that: the head and block expand at different rates, the two surfaces creep laterally against each other by a tiny amount as they heat up, and the gasket has to absorb that movement without its surface wearing through.
The fire ring and how sealing pressure is distributed
Surface pressure isn't uniform across the gasket. Around the bore, where pressure and temperature peak, the gasket carries a fire ring — formed either by folding the layers or by fitting a separate steel ring — deliberately made thicker so most of the bolt load concentrates there. Around the water and oil ports, elastomer-coated beads carry the sealing instead.
Combustion always starts at one point on the fire ring. Wherever surface pressure locally drops, or the ring loses its material properties, a thin channel opens; hot gas passes through it, oxidises the surrounding material, and the channel grows. The process feeds itself: as the leak grows, local temperature rises, and as temperature rises, the material relaxes further. Saying "the gasket has burned" describes exactly this erosion — the gasket rarely tears outright; instead, a fingertip-sized pocket opens up somewhere on the fire ring.
Gasket types and head architecture in heavy-duty engines
Two architectures are common in heavy-duty engines. Some use a single head spanning every cylinder; many Mercedes-Benz, MAN and Scania engines instead use a separate head per cylinder. In the second layout, each cylinder's gasket can be replaced on its own — a real advantage, but one with a trap attached: if the condition of the neighbouring cylinders isn't checked at the same time, the same truck is back in the shop again shortly after.
| Type | Construction | Typical use | Critical point in service |
|---|---|---|---|
| Multi-layer steel (MLS) | Stacked spring-steel layers, elastomer coating, folded fire ring | Modern Euro V and Euro VI diesels | Very sensitive to surface finish — leaks on a rough surface |
| Composite / soft gasket | Fibre-reinforced body with metal reinforcement, metal eyelet around the bore | Older-generation engines | Higher crush allowance, different tightening procedure |
| Stepped-thickness gasket | Several thickness variants of the same gasket, coded by holes or notches | Engines where selection depends on protrusion | Thickness can't be chosen without measuring first |
Thickness stepping matters more in heavy-duty engines than almost anywhere else. On wet-liner engines, the liner is set to stand just slightly proud of the block deck; this liner protrusion is what lets the gasket apply the crush the fire ring needs. A gasket fitted without measuring protrusion first — and correcting it with a liner shim where needed — burns through at the same spot again in short order. For the full picture on the head assembly and overhaul logic, our engine cylinder head group guide lays out a detailed framework.
Symptoms of a burnt cylinder head gasket
The symptoms don't all show up together; which one dominates depends on where the gasket has opened. The first step of a correct diagnosis is mapping the symptom to the leak path, not to the gasket itself.
| Symptom | Likely leak path | Confirmation |
|---|---|---|
| Thick, faintly sweet-smelling white exhaust smoke that doesn't reduce once warm | Coolant is entering the combustion chamber | Track coolant level; borescope through the injector bore |
| Constant bubbling in the expansion tank, coolant spurting when the cap is released | Combustion gas is leaking into the cooling circuit | Chemical combustion-gas test; system pressure test |
| Unexplained overheating with an otherwise sound cooling system | Gas entering the circuit disrupts water flow and heat transfer | Pressure test; watch for the top hose going abnormally hard |
| Brown, creamy emulsion on the dipstick and under the filler cap | Coolant is entering the oil gallery or crankcase | Rising oil level; oil sample; coolant level check |
| Oil film on the coolant surface, an exhaust smell in the coolant | Oil or combustion gas is entering the cooling circuit | Surface sample from the tank; chemical gas test |
| Misfire on a single cylinder, pronounced vibration when cold | Leak between adjacent cylinders or into the water jacket | Cylinder leak-down test; compression comparison |
Does white smoke always mean a blown gasket?
No, and that distinction prevents expensive mistakes. White vapour from a cold exhaust is condensed water vapour and clears once the engine warms up. Gasket-related white smoke, in contrast, continues after the engine is fully warm, is denser, carries a faint sweet smell, and tracks with a falling coolant level. Grey-white smoke that smells of unburned diesel points to the fuel system and doesn't touch coolant level at all. The same picture can also come from entirely different sources: a cracked cylinder head, a cracked liner, or a charge air cooler leaking coolant into the boost air can look identical.
Reading water in the oil correctly
Cream-coloured foam under the oil filler cap isn't proof by itself — vehicles that only cover short distances and never reach full operating temperature can show the same foam from combustion moisture condensing into the crankcase. When coolant is genuinely passing through the gasket, the emulsion shows up on the dipstick and throughout the sump, oil level rises, and coolant level drops. Seeing both changes together is the most reliable field indicator.
Where does the gasket fail? Leak paths
Even though the sealing plane is a single surface, a leak can travel in different directions, and each direction produces a different fault picture; any repair attempted before the path is identified is just guesswork.
- Combustion chamber to cooling circuit: the most common path. Produces bubbling, rising pressure and unexplained overheating; because gas is pushing coolant out, level drops with no external leak visible anywhere.
- Cooling circuit to combustion chamber: the pressure balance reverses while the engine is stopped, and coolant fills the cylinder. Persistent white smoke, hard starting, and — in the worst case — hydraulic lock are the result.
- Combustion chamber to the oil gallery or crankcase: oil darkens and crankcase pressure rises; the contaminated oil shortens bearing life.
- Cooling circuit to the lubrication circuit: the classic emulsion picture. Additives in the coolant break down the oil's load-carrying capacity; continuing to run the engine on this path is the most expensive mistake available.
- External leak: soot staining or seepage along the joint line. It looks the most harmless but grows the fastest, since the escaping gas keeps eroding the gasket edge.
- Bridge between adjacent cylinders: the narrow material bridge between two neighbouring bores is the gasket's weakest point. Compression drops on both cylinders at once, and a leak-down test shows both leaking simultaneously.
Why does a cylinder head gasket burn? Root causes
A gasket doesn't wear out on its own like a normal consumable. Behind every burnt gasket is a condition that asked more of it than it could carry; leave that condition in place, and the replacement gasket opens at the same spot. Replacing the gasket without finding the root cause only postpones the failure.
| Root cause | Mechanism | Prevention / verification |
|---|---|---|
| Overheating | The head warps thermally, surface pressure drops locally, the fire ring loses its temper | Check thermostat, water pump, radiator, fan clutch and airlock |
| Coolant quality and mix ratio | A depleted additive package causes cavitation and corrosion, eroding the sealing surface | Correct coolant type, the manual's mix ratio, scheduled changes |
| Wrong tightening torque or sequence | Surface pressure ends up unevenly distributed across the plane, leaving one area weak | OE torque-angle procedure, calibrated torque wrench and angle gauge |
| Reused torque-to-yield bolts | The bolt has already stretched permanently and can't deliver the target clamp load | Renew the bolts, or verify bolt length against the limit |
| Warped head or block deck | Surfaces don't make full contact; the gasket leaks wherever the gap remains | Cross-check with a straightedge and feeler gauge; resurface if needed |
| Incorrect liner protrusion or gasket thickness | The fire ring is either under-crushed or over-crushed | Measure protrusion; select the correct thickness from the code |
| Knock, pre-ignition, excess combustion pressure | Peak pressure exceeds the design value, the fire ring takes impact loading | Check injectors and injection timing; avoid unauthorised power increases |
Why is overheating the number-one cause?
Overheating hits the gasket two ways at once. The first is a material effect: the fire ring's spring-back drops with temperature and, past a certain point, doesn't recover. The second is geometric: the head expands as it heats and contracts as it cools, and once that cycle is pushed past the limit even once, the head warps permanently. The critical point is this: once the overheating event has passed and the truck seems to be running normally again, the damage is already done — the gasket can open weeks later with no apparent trigger. An overheating event should never be treated as a closed case just because the gauge went back to normal.
Further reading
For a plain-language technical overview of this subject, see the reference article on Wikipedia. Always confirm specific figures and procedures against the vehicle manufacturer service data.
Diagnosis: which test proves what?
Pulling the cylinder head is an expensive decision, and the leak — and its direction — should be proven before making it. Three tests complement each other: a cooling system pressure test shows whether a leak exists at all, a chemical combustion-gas test shows whether the leak is coming from the combustion chamber, and a cylinder leak-down test shows which cylinder it's coming from.
Cooling system pressure test, step by step
- Leave the engine cold; never open the expansion tank or radiator cap on a hot engine.
- Note the fluid level, then check along every hose, clamp, the water pump weep hole and the heater line for an external leak.
- Connect a test pump with the correct adapter and pressurise the system without exceeding the pressure stamped on the cap.
- Hold the pressure for several minutes. If pressure drops with no wetness outside, fluid is escaping internally.
- With the system still under pressure, pull the injectors and inspect each cylinder bore with a borescope; fluid pooled at the bottom of a bore points straight to the leak path.
- Reverse the test: run the engine up to temperature and watch for continuous bubbling in the expansion tank, a sudden pressure spike, or the top hose going abnormally hard.
- Record the findings — what pressure, over what time, how much drop — so the same test can be repeated and compared once the repair is done.
Chemical combustion-gas (block) test
This test draws air from the space above the coolant through a reactive fluid. The fluid changes colour when it reacts with carbon dioxide present in combustion gas; when the blue test fluid turns yellow, combustion gas passing into the cooling circuit is proven directly. Its value is producing hard evidence without removing anything. Two mistakes to avoid: the sampling head must not touch the coolant itself, since the coolant can trigger a false colour change; and the test should be run once the engine is warm and has carried some load, since small leaks may not show at idle. A negative result doesn't rule out a gasket fault — a leak toward the oil side or an external leak puts no gas into the cooling circuit at all.
Cylinder leak-down test and compression comparison
In a leak-down test, the piston is set to top dead centre, controlled compressed air is fed into the cylinder, and where the air escapes from points to the fault: bubbles from the expansion tank suggest a leak into the water jacket, air from the crankcase breather points to the rings or liner side, air from the intake manifold suggests the intake valve, and air from the exhaust suggests the exhaust valve. A compression test is cruder but faster as a first screen; two adjacent cylinders dropping together and by a similar amount is the classic signature of a leak through the bridge between them. If the valve side looks suspect, the checklist in our engine valve train and adjustment shim guide narrows the diagnosis further.
Head flatness, surface finish and liner protrusion
A new gasket doesn't go on until the removed head has been cleaned and measured. Flatness is checked with a precision straightedge and a feeler-gauge set: the straightedge is placed lengthwise, crosswise and along both diagonals, and the thickest blade that will still pass under it is recorded. Tolerances sit within a band well under a tenth of a millimetre and vary from engine to engine; the result always has to be compared against that specific engine's own manual. Warping usually concentrates around the middle of the head and around the hottest-running cylinders.
The resurfacing limit is the second constraint. A warped head can be machined flat again, but every head has a minimum finished height; go below it and both compression ratio and valve-to-piston clearance shift, which makes the head unusable. MLS gaskets also need a specific roughness range on top of that: too rough a surface and the coating can't fill the gaps, too polished and it can't grip at all.
A crack check shouldn't be skipped, because a cracked head produces almost the same symptoms as a burnt gasket. Dye penetrant or a pressure test is used to check the bridges between valve seats, the area around the injector bore, and the water transfer ports. Liner protrusion is mandatory on wet-liner engines: a dial indicator measures how far each liner stands proud of the block deck at several points around it, and the result is checked against the manual's limits; if it's low, it's corrected with a liner shim underneath. Cavitation pitting on the block side also shows up at this stage, and a pitted seating surface won't seal properly even with a brand-new gasket.
Bolts and the tightening sequence: the most-skipped half of the job
The success of a gasket job is decided far more often by the bolts than by the gasket itself. Most modern heavy-duty engines use torque-to-yield (torque-angle) bolts: the bolt is first seated at a low initial torque, then rotated through a specified angle to stretch it in a controlled way. That gives every bolt a very consistent clamp load regardless of friction variation between them. The cost is that the bolt stretches permanently; on most engines it's single-use, and on the engines where reuse is stated to be acceptable, bolt length has to be measured and checked against the limit.
- Clean the bolt holes with compressed air, and re-tap if needed. Oil or coolant trapped in a hole creates hydraulic pressure during tightening, which throws off the torque reading and can crack the block.
- Inspect the bolts visually: don't reuse any that show stretching, necking, thread damage or corrosion.
- Follow the lubrication condition called for in the manual. Tightening a "dry" joint with oil on the threads produces a completely different clamp load at the same indicated torque.
- Fit the gasket dry, confirm its top/bottom orientation and any alignment marks, and make sure the locating dowels are in place.
- Lower the head straight down without sliding it across the surface. A head that slides scrapes the gasket coating, and that scratch becomes the start of a future leak.
- Start every bolt by hand, then tighten in the sequence the manual specifies — typically working outward from the centre in a spiral — over multiple stages.
- Apply the torque stages with a calibrated torque wrench and the angle stages with an angle gauge. Estimating the angle by eye is the same as skipping the procedure altogether.
- If the manual calls for a re-torque later, build that into the job as a scheduled step; if it doesn't, don't add one on your own initiative.
Replacement procedure: removal, preparation and installation
Replacing the gasket is closer to an overhaul than a parts swap. Once the head is off, everything that can be checked through that same access should be checked — a second teardown costs more than the first.
- Immobilise the vehicle, disconnect the battery, and drain the coolant into a clean container; note the timing marks and document where every cable and hose was routed.
- Remove the manifolds, turbo connections, injectors, fuel lines and rocker assembly; keep the injectors numbered as they come off.
- Loosen the head bolts in the reverse of the tightening sequence and over multiple stages; loosening them all at once can warp the head.
- Lift the head straight up, and inspect the old gasket as removed to see exactly where the leak opened.
- Clean the block deck and the head using methods that won't scratch either surface, and keep debris out of the cylinders and bolt holes.
- Measure flatness, surface finish, cracks and liner protrusion, and check each against the manual's values; don't move on to reassembly until any needed correction has been made.
- Select gasket thickness from the measurement result and the code on the gasket, prepare new bolts, seat the head, then tighten the bolts through the manual's sequence and stages before setting valve clearances.
- Refit the ancillaries, fill the cooling system using the correct bleeding procedure, and renew the oil and filter.
With the head off, it's not just the cylinder head gasket that gets renewed — every sealing component on that circuit does: manifold gaskets, the valve cover gasket, injector seals and water pipe seals. For how these components are coded together and the logic behind replacing them, our engine gasket set guide gives a practical checklist. Leaving an old manifold gasket in place is the most common way to turn a freshly finished job into a leaker within its first week.
First start-up and verification after replacement
The first hours after a new gasket goes in are what decide the quality of the job: the goal is to bring the engine up to temperature under control, purge all the trapped air, and prove the leak is actually closed.
- Before hitting the starter, recheck oil level, coolant level and that every connection is tight.
- Start the engine and let it idle; don't blip the throttle or put any load on it in the first few minutes.
- Watch temperature, level and movement in the expansion tank until the thermostat opens; complete the bleeding procedure and confirm the heater circuit has filled too.
- Check around the joint line, manifold connections, water pipes and injector bores for moisture, soot or dripping.
- Once the engine reaches full temperature, shut it down, let it cool, and recheck levels. A small drop can be normal as trapped air works its way out; a continuous drop is not.
- If the manual calls for a re-torque, apply it under the stated condition and after the stated distance or time.
- Run a loaded test drive; working at full load on a grade will expose a leak that never shows up idling in the workshop.
- After the test drive, repeat the gas leak and pressure tests, and log the results against the pre-repair record.
When coolant has been mixing into the oil, one oil and filter change isn't the end of it — the oil needs to come out again after a short running period. If the coolant circuit has picked up oil, it isn't just drained; it's flushed with a suitable method.
Technical reference values and inspection checklist
The table below summarises what gets measured on a gasket job, how it's measured, and what the result means. It deliberately carries no numeric limits — the decision threshold on every line is specific to the engine.
| Check item | Measurement method | What it means | Reference |
|---|---|---|---|
| Head surface flatness | Precision straightedge and feeler gauge; lengthwise, crosswise and diagonal | If the limit is exceeded, the surface is machined or the head is replaced | OE service manual for the engine code |
| Liner protrusion | Dial indicator, measured at multiple points | Determines whether the fire ring gets adequate crush | OE service manual |
| Gasket thickness step | Measurement result plus the hole/notch code on the gasket | The wrong step means either early burn-through or excessive crush | Code table and OE catalogue |
| Tightening torque and angle | Calibrated torque wrench and angle gauge | Ensures surface pressure is distributed evenly | OE service manual |
| Cooling system pressure hold | Test pump, below the cap's opening pressure | If there's no external leak, suspicion of an internal leak strengthens | Value stamped on the radiator cap |
Maintenance, service life, and its place in the engine's sealing chain
A correctly fitted cylinder head gasket is engineered to run trouble-free for the engine's entire design life. Nearly every gasket that fails early traces back to one of two things: an unmanaged heat event, or an installation that didn't follow procedure.
- Cooling system discipline: check level and look for leaks on a routine schedule; keep the radiator core, charge air cooler and fan area clean. The most common cause of overheating isn't a failed part — it's dirt blocking airflow.
- The right coolant: use the type of coolant the OE calls for, at the ratio in the manual, and change it on schedule. Coolant with a depleted additive package cuts cavitation pits into the liner and block surface, and that damages the very surface the gasket sits on.
- Logging heat events: every overheating incident, with its duration and severity, gets written into the vehicle record; on the next gasket failure, that record can explain the root cause on its own.
- The combustion side: an injector with a bad spray pattern, or injection timing that's drifted, raises peak pressure and puts extra load on the gasket.
- Installation records: the gasket thickness code used, the bolt batch, the torque and angle stages applied, and the measurement results all get written down; the next intervention starts from that record.
The gasket doesn't stand alone in the engine's sealing chain. Above it sit the valve train and the head casting; below it sit the liner, the block and the ring pack, and a fault in any one of these can look like a symptom of another. Compression loss can come from the rings, the valves or the gasket; coolant loss can come from a cracked head, a liner seal or a charge air cooler. That's why "the gasket has burned" is a starting point, not an endpoint: a replacement carried out without proving the leak path, measuring the head and block, and removing the root cause brings the same fault back within a few thousand kilometres. Whenever in doubt, the current OE service documentation for that vehicle's specific engine and chassis code is the governing reference.
Shop this part: Cylinder Head
In-depth technical guide: For fault diagnosis, step-by-step replacement and service intervals: Engine Cylinder Head Group: Faults, Replacement & Maintenance
Main guide: What Is a Crankshaft? Function, Failure Symptoms and Maintenance
Tags
Frequently Asked Questions
- How can you tell if a head gasket is blown?
- The most reliable signs are thick white exhaust smoke that doesn't clear once the engine is fully warm, constant bubbling in the expansion tank, unexplained overheating with an otherwise sound cooling system, and a brown, creamy emulsion on the dipstick. No single sign is conclusive on its own; a falling coolant level together with a rising oil level is much stronger evidence. Confirm it with a chemical combustion-gas leak test and a cooling system pressure test.
- Can a truck keep running with a blown head gasket?
- No. Once coolant is mixing with oil, glycol and coolant additives strip the oil film's load-carrying capacity, and the main bearings, big-end bearings and turbo bearing can fail within a very short distance. If water is suspected to have pooled inside a cylinder, don't crank the starter either, since liquid doesn't compress and can bend a connecting rod. Have the vehicle towed to a workshop instead.
- What causes a cylinder head gasket to burn?
- The number-one cause is overheating: it kills the fire ring's spring-back and permanently warps the cylinder head. Other frequent causes are incorrect torque or tightening sequence, reused torque-to-yield bolts, a warped head or block deck, incorrect liner protrusion or gasket thickness, and knock-type excess combustion pressure. Replacing the gasket without removing the root cause means the new one fails at the same spot.
- Does white smoke from the exhaust always mean a blown head gasket?
- No. White vapour that appears in cold weather and disappears once the engine warms up is just condensation, and that's normal. Grey-white smoke that smells of unburned diesel points to the fuel system and doesn't touch coolant level at all. Gasket-related smoke keeps going after the engine is fully warm, has a faint sweet smell, and tracks with a falling coolant level. A cracked cylinder head, a cracked liner, or a charge air cooler leaking coolant into the intake can produce the exact same picture.
- If there's water in the oil or oil in the coolant, is the head gasket always to blame?
- Most likely, but it isn't proof on its own. In vehicles that only run short trips and never reach full operating temperature, cream-coloured foam under the oil filler cap can come from combustion moisture condensing into the crankcase. When coolant is actually passing through the gasket, the emulsion shows up throughout the sump, oil level rises, and coolant level drops. A cracked head or a failed oil cooler can produce the same symptom.
- Which test proves for certain that a head gasket has failed?
- Three complementary tests are used. A cooling system pressure test shows whether a leak exists at all; a chemical combustion-gas (block) test shows whether the leak is coming from the combustion chamber; a cylinder leak-down test shows which cylinder it's coming from and where it's going. In the chemical test, the blue test fluid turning yellow is direct proof that combustion gas is entering the cooling circuit.
- Does the cylinder head have to be resurfaced when the gasket is replaced?
- Not necessarily — it depends on the measurement. Head flatness is checked with a precision straightedge and feeler gauges, lengthwise, crosswise and diagonally; if the result is within the manual's tolerance, resurfacing isn't needed. If the limit is exceeded, the surface can be machined, but every head has a minimum finished height, and a head machined below that limit can no longer be used.
- Can cylinder head bolts be reused?
- Most modern heavy-duty engines use torque-to-yield (torque-angle) bolts, and these stretch permanently during tightening. On most engines they're single-use; where reuse is stated as acceptable, bolt length has to be measured and compared against the manual's limit. A stretched bolt can't deliver the target clamp load and sets the gasket up to burn again at the same spot.
- How long does a cylinder head gasket last, and is it a scheduled service item?
- It isn't a scheduled maintenance item. Correctly fitted and run under design conditions, it's engineered to last for the life of the engine. Nearly every early failure traces back to an unmanaged overheating event or an installation that skipped the procedure. Its service life is better measured by cooling-system discipline and installation quality than by mileage.
- What should you check the first time you start the engine after a head gasket replacement?
- Run the engine at idle, don't blip the throttle or load it in the first few minutes, and watch temperature, coolant level and movement in the expansion tank until the thermostat opens. Fill the system using the manual's bleeding procedure and confirm the heater circuit has filled too. Once the engine has cooled, recheck the levels, run a loaded test drive, then repeat the gas leak and pressure tests and compare the results against the pre-repair record.
Related Articles
Low Engine Oil Pressure: Causes, Symptoms and the Lubrication System Explained
Low engine oil pressure in heavy-duty trucks: causes, warning signs, a step-by-step diagnostic order, gauge testing and how the lubrication system works.
What Is an EGR Valve? Failure Symptoms and Cleaning (Heavy Commercial Vehicles)
What is an EGR valve? How it works, why it clogs, failure symptoms, diagnosis steps, and cleaning limits for heavy commercial vehicles.
What Is a Turbocharger? Turbo Failure Symptoms in Diesel and Heavy-Duty Vehicles
What is a turbocharger and how does it work? Turbo failure symptoms, VGT vane sticking, and the oil habits that determine service life in heavy-duty diesels.


