Air Disc Brake Caliper: Faults, Replacement & Maintenance Guide
On truck and trailer axles a seized caliper, uneven pad wear or pulling to one side traces to the guide pins or cam mechanism: diagnosis, repair or replacement.
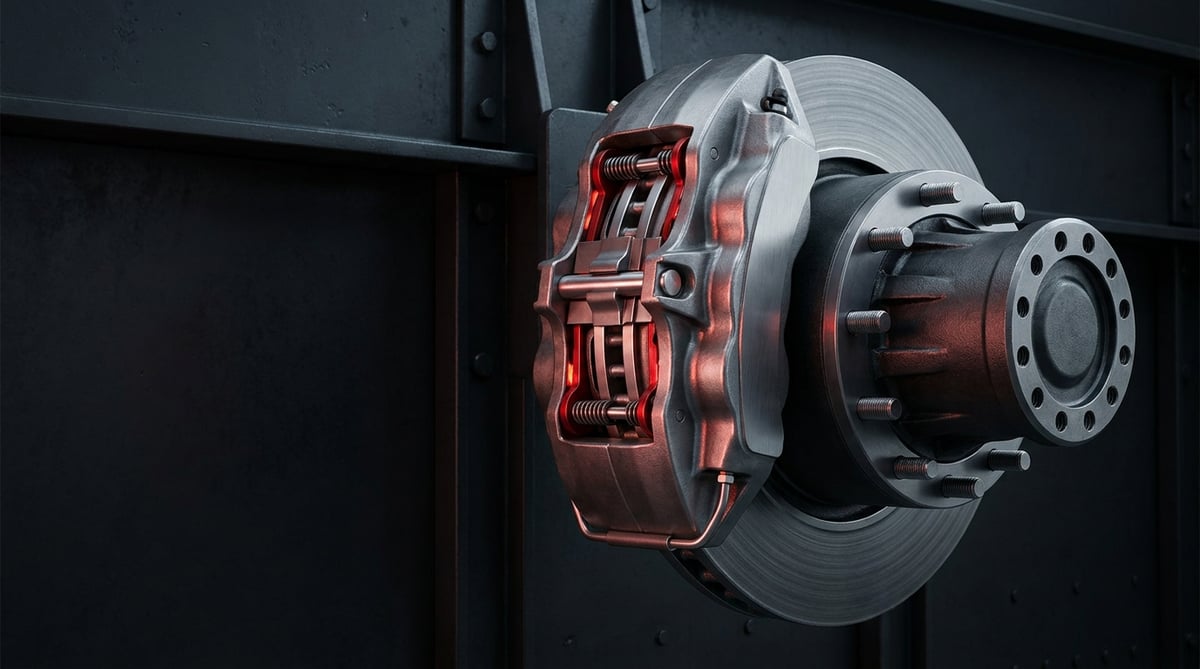
The air disc brake caliper (ADB — Air Disc Brake) is a critical safety part on heavy commercial vehicles that transfers the mechanical force from the brake chamber to the disc and directly determines the braking performance of a single wheel. Floating caliper architectures such as the Knorr-Bremse SN6/SN7/SK7, WABCO PAN 19/22 and Meritor ELSA/EX+ are standard on trucks, tractors and buses. Caliper seizing, single-wheel drag and guide-pin corrosion cause a chain of problems from fuel consumption to tyre wear, from disc warping to brake imbalance. This guide addresses field-applicable diagnosis, correct replacement and the "recondition or replace" decision at an expert level.
What Is a Brake Caliper (Air Disc Brake)? Its Function and Operating Principle
The air disc brake caliper is a floating-body unit that, when the brake pedal is pressed, multiplies the compressed-air force from the front/rear axle brake chambers via a mechanism inside the caliper and transmits it to the pads and from there to the disc. On heavy diesel vehicles the caliper typically uses a single-piston (mono-block) or twin-tappet internal mechanism; because air pressure (usually around 8–10 bar system pressure) cannot by itself provide sufficient clamping force, an internal rotary-cam / eccentric bridge (lever/bridge) mechanism mechanically multiplies the force many times over.
The operating principle can be summarised in these steps:
- Force input: The chamber push rod presses on the internal operating lever at the rear of the caliper.
- Force multiplication: The eccentric bridge converts the small air force into a high clamping force and presses the inner pad against the disc through the tappets.
- Floating movement: The caliper body slides parallel to the axle on the guide pins; once the inner pad contacts the disc, the body slides in the opposite direction and pulls the outer pad onto the disc too. Thus both faces of the disc are clamped equally with a single-sided piston.
- Automatic adjustment (adjuster): As the pad wears thin the clearance increases; the internal automatic adjuster mechanism advances the tappets in small steps at every brake application, keeping the running clearance constant. It does NOT require manual slack adjustment.
- Return: When pressure is released, the return spring moves the pad slightly away from the disc and the caliper returns freely to its centre.
The floating disc brake caliper works as a whole together with the associated brake disc, brake pad and brake chamber; when one of these parts weakens, the load falls on the caliper. For this reason a caliper fault should not always be assessed in isolation.
How Much Better Does an Air Disc Brake Stop Than a Drum Brake?
Compared with a drum brake of the same class, a floating-caliper air disc brake typically provides a 10–15% shorter emergency stopping distance and markedly faster recovery after thermal fade. In practice this corresponds to a difference of a few metres in an emergency stop from 80 km/h; on a heavy tractor this distance can be the difference between stopping and a collision. Thanks to its large open surface, the disc brake also dissipates heat faster, reducing the risk of pad glazing and fade on long downhill descents. (Values vary with vehicle load, tyres and road conditions; this is a general comparison.)
In truck applications this system also allows easier and faster pad replacement. However, the floating architecture is entirely dependent on the guide pins being able to slide freely — pin corrosion is the weak link of the whole system.
Fault Symptoms and Diagnosis
Most caliper faults start at a single wheel and first show themselves as "pulling" or "overheating". The table below is a quick reference for field diagnosis; see the subheadings under it to distinguish the symptoms.
| Symptom | Possible Cause | Check Method |
|---|---|---|
| Vehicle pulls to one side under braking | One caliper seized / pin sticking; the opposite caliper clamping weakly | Compare disc temperatures on an axle basis with a non-contact thermometer (difference between wheels) |
| One wheel constantly drags, overheats, smell of burning | Caliper not returning from the disc (pin seizure or adjuster-mechanism sticking) | Turn the free wheel by hand; look for constant drag + abnormal heat |
| Pads worn on one face/at an angle (tapered wear) | Guide pin seized on only one side; caliper offset from its axis | Measure pad thicknesses inner/outer and leading/trailing, and record the difference |
| Caliper does not slide / slides with difficulty when pushed by hand | Guide-pin corrosion, torn boot, dry pin | Remove the pads and push the caliper by hand in the axle direction |
| Pad finished very early / unevenly | Continuous light drag, over-advanced automatic adjuster | Wind the adjuster-mechanism gear back and check its freedom |
| Poor brake performance, long distance | Adjuster not advancing, excessive clearance; pad glazing | Measure the running clearance; observe the chamber stroke |
| Grease/water leak from the caliper area, rusty trace | Pin boot or tappet boot torn; moisture/salt has entered | Inspect the boots; look for tears, swelling, hardening |
| Pad-wear / EBS brake warning on the dashboard | Wear sensor has reached the limit or the circuit is broken; EBS reading axle imbalance | Read the fault code with a diagnostic tool (EBS); check the sensor socket and cable integrity |
How Do I Tell Pulling to One Side from Suspension/Steering Pull?
Brake-related pulling becomes evident only when braking and is generally toward the side of the seized caliper. Pulling that occurs while the steering is free (no braking) is more likely due to tracking, tyre pressure or axle misalignment. For a definitive distinction, compare the temperatures of the two discs on the axle: a difference of more than 30–50 °C is a sign of drag/seizing.
Is the Caliper Seized, or Is the Automatic Adjuster Faulty?
When you remove the pad and push the caliper by hand on the guide pins, if it slides freely and over the full stroke, the pins are sound. If it does not slide/there is sticking, the problem is on the guide-pin/boot side. If the pins are sound but the tappets do not return and the adjuster gear cannot be wound back by hand, the problem is in the internal adjuster/return mechanism, and this generally requires caliper replacement.
What Does Tapered (Angled) Pad Wear Tell You?
A noticeable thickness difference between the leading and trailing ends of the pad shows that the caliper is not seating parallel to the disc; that is, a guide pin is seized or the caliper bridge is deformed. In tapered wear, not only the pad but the underlying pin/caliper must be inspected; replacing only the pad will cause the problem to recur.
ABS/EBS and Electronic Wear Sensor Integration
Modern air disc calipers work together with the ABS/EBS system and use two types of pad-wear sensor: the threshold type — when the pad drops to a certain thickness it closes the circuit and gives a single warning; and the continuous/analog type — which reports the remaining pad life to the EBS progressively. The EBS balances the braking response and timing of the two wheels on an axle; when one caliper is weak or clamps late, the system can generate a code as axle imbalance / brake difference. For this reason, after caliper work, EBS fault codes must be read with a diagnostic tool, the sensor socket connected correctly, and the cable routing checked against chafing/breakage. Always renew the wear sensor cable at pad replacement; a crushed or oxidised socket is the most common cause of "phantom" brake warnings.
For how the two sensor types are told apart, the wiring and connector faults behind false readings and what to watch during replacement, see the brake pad wear sensor guide.
The bushing, pin and bracket causes behind a seized slide are covered in detail in the caliper carrier and guide pins guide, which picks up where this check ends.
Standards and further reading
This subject is governed by the equipment rules for air-braked commercial vehicles. In the United States the federal air brake standard, FMVSS 121 (49 CFR 571.121) defines the reservoirs, protection and timing a compliant system must provide, and Europe applies the equivalent limits of UNECE Regulation No. 13. For further detail, see the on-road braking performance requirement in 49 CFR 393.52. Always confirm specific figures against the current regulation and the vehicle manufacturer service data.
Outside the United States the equivalent duties sit in national law. In the United Kingdom, regulation 18 of the Road Vehicles (Construction and Use) Regulations 1986 requires every part of the braking system to be maintained in good working order. In Canada, air brake systems fall under the Motor Vehicle Safety Regulations, which contain CMVSS 121.
Replacement / Installation Steps
The steps below are a general flow for a heavy diesel tractor/truck (22.5" wheel, air disc axle). Always rely on the torque and procedure values in the manufacturer's service manual for the vehicle and the caliper (Knorr SN, WABCO PAN, Meritor ELSA/EX+).
- Make the vehicle safe: Park on level ground, chock it, safely exhaust the air pressure from the system, switch off the ignition, and mechanically release the parking brake (spring chamber) or wind it back with the caging bolt.
- Remove the wheel and support the axle: Remove the wheel and place the axle on an appropriately rated jack stand. Never trust the axle weight to a single jack.
- Remove the pads: Remove the pad retaining spring/pin and take out the old pads. Inspect the disc surface for cracks, blue heat marks and minimum thickness.
- Wind back the automatic adjuster: To draw the tappets in, carefully wind the adjuster gear back in the manufacturer's direction with the correct wrench. Do not force it; if there is sticking, replace the caliper.
- Release the chamber connection: Separate the brake chamber from the caliper carrier (on a spring chamber, always wind it back first). Mark and disconnect the air and, if fitted, the wear-sensor socket.
- Remove the caliper from the carrier: Loosen the caliper/carrier bolts. These bolts are high-torque and generally single-use; do not reuse those removed, prepare new ones.
- Clean the spindle/carrier surface: Clean rust and dirt from the seating surfaces and check the disc hub. A dirty surface throws the caliper off its axis.
- Install the new/reconditioned caliper: Seat the caliper, fit new bolts and tighten gradually according to the manufacturer's torque + angle (torque-angle) sequence. Verify by hand that the guide pins slide freely.
- New pads and hardware: Always fit new pads, a new retaining spring and, if fitted, a new sensor. Apply suitable high-temperature grease to the pad-back contact points (only where the manufacturer permits); NEVER get grease on the disc and pad friction surface.
- Connect the chamber and set the adjustment: Fit the chamber, establish the running clearance by the manufacturer's procedure (usually several hand applications/adjuster turns). Fit the wear sensor.
- Axle-based replacement: Evaluate both calipers on the same axle together; if one side has been renewed, it is critical for brake balance that the other side is at similar performance.
- Fit the wheel, torque it: Tighten the wheel nuts to the manufacturer's torque in a crosswise sequence; plan a re-torque check after a short distance.
- Function test: Start the engine, build up air pressure (no leak/pressure drop), apply the brakes several times; check disc temperatures and free rotation, clear/read EBS fault codes, and carry out a low-speed road test.
Points to Watch (Common Mistakes)
- Refitting old boots/pins/dust boots: A torn or hardened boot lets in moisture and the pin soon rusts again. Always use a new repair kit (boots, guide-pin bushes, seals) when servicing a caliper.
- Wrong grease: Ordinary lithium grease runs/chars at high temperature. Only the high-temperature synthetic grease specified by the manufacturer, and only at the permitted points.
- Forcing the adjuster back: Turning the automatic adjuster gear in the wrong direction/with excessive force permanently damages the internal mechanism.
- Renewing one side and leaving the other: A performance difference between the two calipers on the same axle leads to brake pull and one-sided overheating.
- Skipping the disc condition: Fitting a new caliper to a disc with excessive grooving, heat cracks, below-minimum thickness or high runout brings back the problem and vibration.
- Getting grease on the friction surface: Grease on the pad or disc surface seriously reduces braking power and is dangerous.
Technical Values and Check Points
The values below are general/safe references for air disc brake systems. The exact torque, running clearance, disc minimum thickness and runout tolerance are MODEL-SPECIFIC (Knorr SN6/SN7, WABCO PAN 19/22, Meritor ELSA/EX+ give different values) and must always be taken from the relevant manufacturer's service manual.
- Running clearance: Typically the total gap between pad and disc is in the range of about 0.6–1.2 mm. If the measured clearance is below the lower limit (about 0.6 mm), the caliper is dragging and the caliper is generally renewed; if it is above the upper limit, the automatic adjuster is not advancing.
- Pad minimum thickness: The friction material should generally be replaced when it drops to about 2 mm excluding the backing plate (varies by model; the wear sensor/marking line is the reference). Metal-to-metal contact with the disc is absolutely not acceptable.
- Disc (rotor) minimum thickness: On heavy ADB discs the nominal thickness is typically in the ~45 mm class, and the minimum service thickness varies by model (e.g. ~37 mm class on many products — rely on the model stamp). The value is cast onto the disc.
- Disc lateral runout: The typical upper limit is about 0.1–0.15 mm over one full turn (up to a total of 0.5 mm tolerance in some procedures). High runout causes pedal judder and uneven wear.
- Disc heat cracks: Fine surface heat lines (heat checking) are normal to a degree; however, radial cracks that cut the friction surface edge-to-edge or are noticeably wide require disc replacement.
- Caliper free sliding: When correctly installed, the caliper should slide freely on the guide pins by hand force alone and over the full stroke.
- Guide-pin axial play: If the bush–pin clearance exceeds the manufacturer's tolerance, the relevant bearing/bush is renewed with a service kit.
- Torque values: The caliper carrier bolts are high-torque and generally tensioned by the torque+angle method; the wheel-nut torque (typically ~550–700 Nm class) and the chamber-nut torque are also model-specific. A calibrated torque wrench is mandatory; tightening "by feel" is not acceptable.
Example Comparison Values by Popular Models
The table below is for a quick reference in field diagnosis. The values are typical/example ranges and vary by variant; for the final value, rely on the service manual for the relevant model.
The function and terminology of the air disc brake caliper are defined within the scope of ECE R13 (UN braking regulation) and ISO 611 (braking terminology for road vehicles). The binding reference is the vehicle's current OE service manual.
| Model (common) | Typical running clearance | Disc nominal / min. thickness | Carrier bolt tightening |
|---|---|---|---|
| Knorr-Bremse SN7 | ~0.6–1.1 mm | ~45 mm / ~37 mm class | Torque + angle (single-use); verify the value from the manual |
| WABCO/ZF PAN 19-1 / 22-1 | ~0.7–1.1 mm | ~45 mm / ~37 mm class | Torque + angle (single-use); verify the value from the manual |
| Meritor ELSA 195/225 (ELSA2) | ~0.6–1.0 mm | ~45 mm / ~37 mm class | Torque + angle (single-use); verify the value from the manual |
Should You Recondition or Replace?
There are three options in the field: (1) in-place maintenance with a repair kit (renewing boots/pins/bushes), (2) a factory reman (remanufactured) caliper, (3) a new caliper. If it is an early seizure caused by the guide pin/boot and the body is sound, an appropriate repair kit makes sense. However, if the internal adjuster mechanism, bridge or tappet is damaged, or there is corrosion/cracking in the body, a complete caliper (reman or new) should be preferred; "hand-rebuilt" calipers may have markedly shorter lives because they have not gone through the OE pre-tension and testing processes. Whichever route is chosen, the decision should be made on an axle basis and the two sides matched in performance.
Maintenance and Service Life
The life of an air disc brake caliper depends largely on boot integrity and regular inspection. The caliper itself is mechanically durable; most early deaths begin with moisture and road salt entering through a torn boot and rusting the guide pin.
- At every pad replacement: Check that the automatic adjuster is working correctly, that the caliper slides freely over the full stroke, the soundness of the tappets and boots, and the condition of the adjuster cap and seals.
- Periodic (annually / more often in heavy use): Inspect the running clearance, guide-pin play, and the condition of the boots and caps. An additional check is recommended after the winter salt season.
- The boot is the first line of defence: Renew the boot immediately at the slightest tear/swelling — this is the cheapest maintenance that prevents an expensive caliper replacement.
- Think of it together with the disc: At pad replacement, measure disc thickness and runout; planning disc life in sync with the pad avoids a second disassembly. See the product page for the relevant brake disc dimensions.
- Driving effect: Using the engine brake/retarder on long descents lowers brake temperature; continuous light braking causes glazing and early wear.
- Keep records: Recording disc temperature and pad thickness measurements on an axle basis catches a seizing caliper before major damage.
Sources and Verification
The technical values in this guide have been cross-checked against the following manufacturer service literature and OE documentation. For model-specific exact values, always rely on the current version:
- Knorr-Bremse — SB6/SB7 and SN6/SN7 pneumatic disc brake service manuals and technical bulletins.
- ZF/WABCO — PAN 17/19/22 pneumatic disc brake installation and maintenance documents.
- Meritor — ELSA 195/225 (ELSA2) and EX+ air disc brake maintenance/service manuals.
- Vehicle manufacturer (OEM) axle and brake service manual; wheel-nut and caliper carrier torque-angle tables.
For problems such as caliper seizing, single-wheel drag and guide-pin corrosion, the correct part choice is the key to preserving axle balance and brake safety. The VADEN Brake Caliper (Air Disc Brake) product family offers, for Knorr SN6/SN7, WABCO PAN and Meritor ELSA equivalent applications, repair-kit (boot, guide pin, bush and seal) options suited to OE dimensions, providing a reliable solution for workshops aiming at long-lived and balanced brake performance on heavy diesel vehicles. Renew the brake system as a whole by evaluating it together with the related brake disc, brake pad and brake chamber products.
Shop this part: Air Disc Brake Caliper
All our technical guides on this topic
- Brake Caliper Repair Kits: Bringing Heavy Vehicle Brake Systems Back to Life
- Air Brake Caliper: Air Disc Brake Systems Explained
- Brake Pad Wear Sensor: Function, Faults & Replacement Guide
- Caliper Pad Retainer & Pad Plate: Faults, Replacement, Care
- Caliper Cover, Gasket & Plate: Faults, Replacement, Care
- Brake Caliper Rubber Repair Kit: Failure & Replacement Guide
- Brake Caliper Mechanism: Camshaft, Bearings, and Return Spring
- Caliper Guide Pin, Bushing & Bolt: Faults, Repair, Care
- Brake Caliper Overhaul Kit: Guide Pins, Boots & Adjuster
- Caliper Carrier & Guide Pins: Faults, Replacement, Care
- Caliper Tappet & Dust Boot: Function, Failure, Replacement
VADEN ORIGINAL products
- Air Disc Brake Caliper — 1802 products
- Brake Caliper Pins — 511 products
- Brake Caliper Mechanisms — 382 products
- Brake Caliper Shafts — 128 products
Tags
Frequently Asked Questions
- On a truck, is a single caliper replaced or both?
- Even if the fault is on one side, the decision should be made on an axle basis. A pressure/performance difference between the two calipers on the same axle leads to brake pull and one-sided overheating. If one side is seriously worn or has been renewed, make sure the other side is in a similar condition.
- Is greasing a seized caliper to save it a permanent solution?
- No. If the guide pin is seized with corrosion, temporary grease works for a short while, but if the boot is torn, moisture enters again and the pin rusts anew. The permanent solution is service with a repair kit that includes a new boot and pin/bush, and caliper replacement if necessary.
- Why did my pad wear at an angle from one end to the other?
- Tapered wear shows the caliper is not seating parallel to the disc; usually a guide pin is seized or the caliper bridge is strained. Replacing only the pad causes the problem to recur; the underlying pin and caliper must be checked.
- Is manual clearance (slack) adjustment done on an air disc brake?
- No. On modern air disc calipers the running clearance is maintained by the internal automatic adjuster mechanism at every brake application. At pad replacement the adjuster is wound back, then re-established by procedure; continuous manual "clearance adjustment" is not needed. If the adjuster holds/does not advance, the mechanism is faulty.
- The disc is cracked but I renewed the caliper — should the disc be replaced?
- Fine surface heat lines are normal up to a certain limit; however, if there are radial cracks that cut the friction surface edge-to-edge, below-minimum thickness, or above-tolerance runout, the disc must be replaced. Fitting a new caliper to a sound disc brings back vibration and early wear.
- What is the difference between the pad wear sensor and the EBS warning?
- The wear sensor only monitors pad thickness; the threshold type gives a single warning, the continuous type gives progressive life information. The EBS, on the other hand, balances the braking response of the two wheels on an axle and can generate an "axle imbalance" code when one caliper is weak/late. After caliper work, renew the sensor and read and clear the EBS codes with a diagnostic tool.
- Should I buy a reman caliper or a new caliper?
- If the caliper body and internal mechanism are sound, an OE-equivalent repair kit is needed; if the internal adjuster/bridge/tappet is damaged, a complete caliper is required. A quality reman caliper, having been brought to OE dimensions and tested, is far more reliable than a "hand-rebuilt" caliper. On cheap, uninspected equivalents, the casting alloy and dimensional precision may be low; take care to match both sides for axle balance.
- The truck pulls to one side when I brake. How do I know it is the caliper and not the suspension?
- Brake-related pull shows up only while the pedal is applied and is generally toward the side with the seized caliper. Pull that continues with the steering free, without braking, points more to tracking, tyre pressure or axle misalignment. To settle it, compare the two disc temperatures on the axle with a non-contact thermometer: a difference above 30-50 °C indicates drag or seizing.
- If the clamping force comes from one side only, how are both faces of the disc pressed equally?
- Through the floating body. The chamber force is multiplied by the eccentric bridge and pushes the inner pad onto the disc through the tappets; the moment the inner pad makes contact, the caliper body slides the opposite way on the guide pins and pulls the outer pad onto the disc as well. That is why free pin movement is essential, and pin corrosion is the weak link.
- Can I refit the caliper carrier bolts I have just removed?
- No. On most products these bolts are single-use: they are tensioned by the torque-angle method and stretch permanently as they are tightened. Reusing them can lead to loosening and the caliper breaking away from the carrier. Have new bolts ready before disassembly and tighten them progressively in the manufacturer's torque plus angle sequence, with a calibrated torque wrench rather than by feel.
Related Articles
Brake Caliper Repair Kits: Bringing Heavy Vehicle Brake Systems Back to Life
Which brake caliper repair kit level fits a given fault, when repair is banned, and how a heavy truck workshop proves it afterward.
Air Brake Caliper: Air Disc Brake Systems Explained
Fixed and floating air disc brake calipers on trucks and trailers: how each turns air pressure into clamping force, core parts and why fade resistance matters.

Fifth Wheel & King Pin: Faults, Replacement & Maintenance Guide
A hard clunk when a tractor unit takes up trailer load usually traces to fifth wheel jaw or king pin wear: sizing, diagnosis, replacement and lubrication.


