Crankshaft Seal Oil Leak: Symptoms and Causes
Why does a crankshaft seal leak on a truck engine? Front and rear seal symptoms, diagnosis, the role of crankcase ventilation and replacement steps.
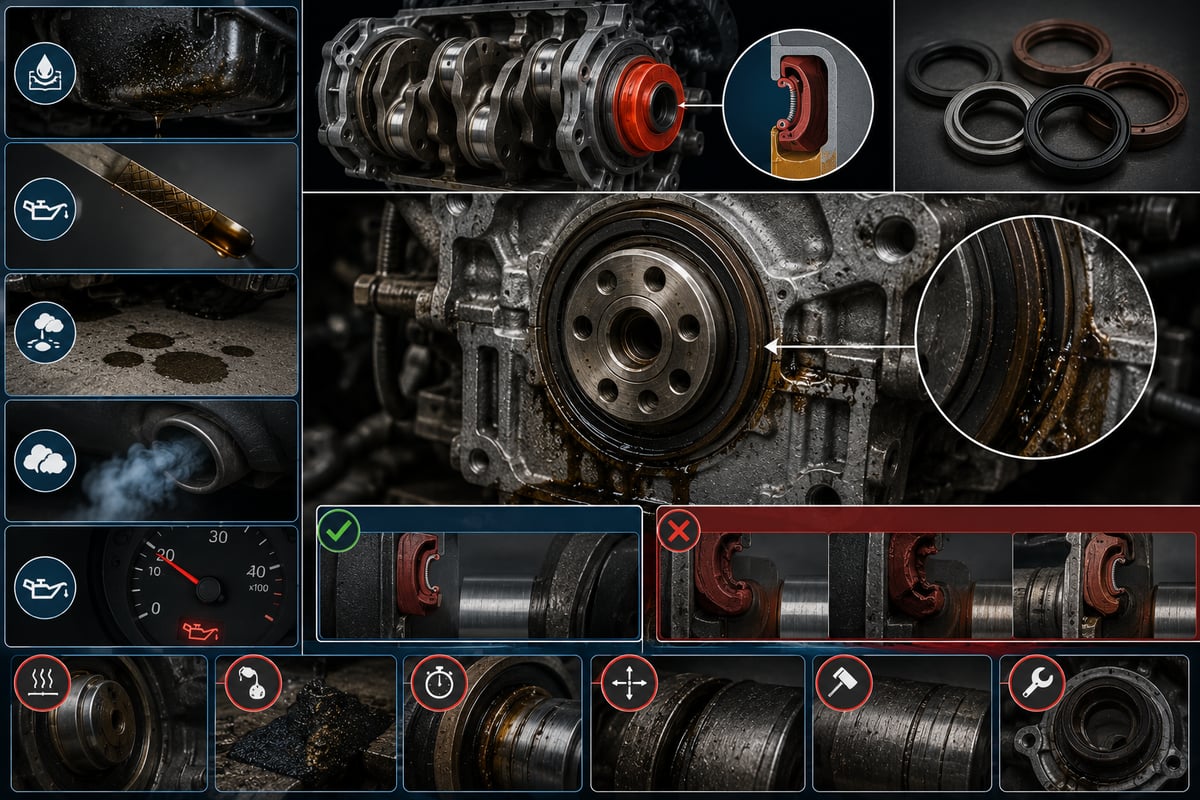
The note that lands on a fleet manager's desk is usually a single line: "the truck is leaving oil where it's parked." What's underneath the tractor once it's up on the lift rarely points to one clean spot, though — the slipstream carries the drip from the front of the engine all the way back to the bell housing. The first move isn't to order a part; it's to clean the underside thoroughly, run the truck a short loop, and look again. Does the fresh wetness start behind the pulley, or is it dripping from the drain hole at the bottom of the flywheel housing? Those two answers describe two completely different jobs, in both labour and cost. This guide treats the crankshaft seal not as a simple rubber ring, but as an indicator for a chain that runs from crankcase ventilation to the shaft surface, and from the flywheel housing to the clutch lining.
What Is a Crankshaft Seal? Function, Structure and Position in the Engine
A crankshaft seal is a lipped, usually spring-loaded radial shaft seal fitted where the rotating crankshaft exits the engine block, and its job is to keep engine oil in while keeping dust, water and road salt out. In technical literature it's called a radial shaft seal; on the shop floor it's simply the "crank seal" — the front one is often called the "pulley seal", the rear one the "flywheel seal".
An engine has two crankshaft seals, and they don't work under the same conditions. The front crankshaft seal sits at the end of the shaft that carries the pulley and vibration damper, usually inside the front cover or the oil pump housing. The rear crankshaft seal sits at the other end, where the flywheel bolts on, in the bore between the block and the rear cover. The difference isn't only location — access, labour, and where the leak ends up are all completely different.
What Parts Make Up a Crankshaft Seal?
A simple-looking ring actually combines several functions. The outer case anchors the seal in its bore and provides the static seal; it can be metal-cased, rubber-coated, or fully elastomeric. The sealing lip is the thin-section part that rides on the shaft, and it's where all the real work happens. A garter spring sits behind the lip, maintaining the radial force the elastomer would otherwise lose as it hardens and loses its recovery over time. Many designs also carry a secondary dust lip on the outside; it isn't there to hold oil in, it's there to keep dirt out, and it runs dry.
Material dictates lifespan. Nitrile rubber (NBR) is standard, fluorocarbon (FKM) is used where higher temperatures and modern oil additives demand it, and a large share of heavy-duty diesel engines now use PTFE-lipped seals. A PTFE seal behaves differently: the lip is stiffer, and in most applications it's fitted dry, using a protective mounting sleeve. The "wet the lip with oil" reflex that's second nature with elastomer seals will spoil this installation; not knowing which type of seal you're fitting is one of the most common causes of an early leak.
How Does the Seal Actually Seal? Oil Film, Lip and Spring
The operating principle sounds contradictory the first time you hear it: a seal that's working properly is not dry. A microscopically thin oil film sits between the lip and the shaft; it carries the friction so the lip doesn't burn, and it's also what actually forms the seal. If that film disappears completely, the lip runs dry, overheats quickly, and starts leaking soon after.
The lip's geometry is what keeps that balance. The angle on the oil side of the lip differs from the angle on the air side, and that asymmetry creates a pumping-back effect that carries oil inward again as the shaft turns. On seals with a directional lip pattern, rotation direction is part of the design; a seal made for the wrong direction pushes oil outward even when it's brand new. For the crankshaft's general health — bearing condition, end play and the like — see the crankshaft guide; on an engine that keeps chewing through seals, the real problem is sometimes not the seal at all but the play the shaft is carrying.
What's the Difference Between a Crankshaft Seal and a Camshaft Seal?
Both are radial shaft seals and work on the same principle; what differs is the load and the location. The camshaft seal sits on the front face of the cylinder head and runs at a lower surface speed. The crankshaft seal runs on the largest-diameter shaft in the engine and is directly exposed to pressure swings inside the crankcase. The two get mixed up often during diagnosis; the tell is height. A camshaft seal leak starts at cylinder-head height and runs downward, while a front crankshaft seal leak starts at shaft-centreline height and gets flung outward as the pulley turns.
Front and Rear Crankshaft Seal: Two Seals, Two Different Jobs
Reaching the front seal is usually as simple as removing the belt, tensioner, pulley and vibration damper; the engine stays in the chassis and the transmission stays put. Reaching the rear seal means dropping the propshaft, the transmission, the clutch assembly and the flywheel. The part itself is cheap either way, but the labour gap between the two jobs is enormous, and that asymmetry is what should drive the decision.
| Criterion | Front crankshaft seal (pulley side) | Rear crankshaft seal (flywheel side) |
|---|---|---|
| Location | Inside the front cover or oil pump housing, behind the pulley | In the bore between the block and rear cover, behind the flywheel |
| What has to come off | Belt, tensioner, fan and pulley with vibration damper | Propshaft, transmission, clutch assembly, flywheel |
| Labour load | Relatively low, can be done on the vehicle | High, requires dropping the transmission |
| Where the leak first shows | Behind the pulley, along the belt line, lower edge of the front cover | Drain hole at the bottom of the flywheel housing |
| Secondary damage risk | Belt slip and premature failure, tensioner bearing fouling | Clutch slip and judder, lining rendered unusable |
| How fast it's noticed | Quickly — oil is flung into a visible area | Slowly — it collects inside the housing before it drips |
What Actually Kills the Seal: Crankcase Ventilation and Internal Pressure
A significant share of crankshaft seal replacements leak again within a short time, and the first explanation people reach for is a bad part. In reality, the most common cause behind a repeat leak isn't the seal itself: it's pressure building up inside the engine because the crankcase ventilation system is blocked.
Every diesel engine passes some combustion gas past the piston rings into the crankcase — that's blow-by. The ventilation system separates the oil from that gas and routes it away, keeping crankcase pressure close to atmospheric. When the oil separator saturates, the filter element fouls, condensation in the hose freezes in winter, or a valve sticks shut, the relief path closes. With nowhere left to vent, the gas looks for the weakest sealing point available — and crankshaft seals, the cover gasket, the sump gasket and the dipstick tube sit at the top of that list.
That mechanism explains two things. First, why replacing the seal alone doesn't fix it: as long as the pressure source stays in place, the new lip gets pushed out with the same force as the old one. Second, why leaks often show up at more than one point at once — it isn't several gaskets failing independently, it's one shared pressure problem. There's a quick field check for crankcase pressure: if loosening the oil filler cap at idle produces a noticeable puff, or the dipstick keeps popping out of its tube, pressure is building inside the crankcase. A proper reading needs the manufacturer's procedure and a gauge.
The second mechanical cause is an overfilled sump. Too much oil in the pan means the crank throws are hitting the oil, the oil foams, and oil vapour density inside the crankcase rises; that saturates the ventilation system earlier and increases the oil load right at the seal. Topping up "a bit extra, just to be safe" is one of the quiet habits that shortens seal life.
What Are the Symptoms of a Crankshaft Seal Oil Leak?
A crankshaft seal leak doesn't announce itself the same way twice; which seal is leaking, how long it's been leaking, and the truck's duty cycle all change what it looks like. The table below lists the most common symptoms, the likely mechanism behind each one, and the first check to run to confirm it.
| Symptom | Likely mechanism | First check |
|---|---|---|
| Oil flung around the pulley and vibration damper | Front seal lip is leaking, the spinning pulley throws the oil outward | Clean the area, run the engine briefly, look for a fresh trace |
| Belt glazing, squealing, premature wear | Front seal leak has reached the belt and pulley surface | Check the belt surface and tensioner bearing for oil |
| Dripping from the drain hole at the bottom of the flywheel housing | Rear seal or rear cover is leaking, oil is collecting in the housing | Clean the hole, watch for a fresh drip after a run |
| Clutch slip, judder on pull-away | Rear seal oil has reached the lining, friction coefficient has dropped | Remove the housing cover to inspect the lining and flywheel face |
| Oil level keeps dropping within the service interval | An ongoing leak with no visible drip | Mark the level and re-check after a set distance |
| Dipstick pushed out of its tube, puff at the filler cap | Crankcase ventilation is blocked, internal pressure is high | Check the filler neck and dipstick tube at idle |
| Oil pressure warning flickering intermittently | Loss has brought the level down to a critical point | Measure the level, watch pressure on live data |
Reading these symptoms comes with two traps. First, none of them are unique to the crankshaft seal — the cover gasket, sump gasket and turbo oil return line can all produce the same picture. Second, where the oil shows up is almost never where it comes from; gravity and wind carry it. The rule is simple: look for the highest point of the wet area, not the widest one.
Front Seal or Rear Seal? Telling Them Apart by Where It's Dripping
This is where the most time gets lost on the shop floor, and the right answer sets the scope of the job. The most reliable way to tell them apart is to thoroughly clean the underside of the engine and the point where it meets the transmission, run the vehicle in a controlled way, and watch where the wetness starts.
| Drip or trace location | Prime suspect | Accompanying symptom | Verification method |
|---|---|---|---|
| Oil behind the pulley, along the belt line and on the belt itself | Front crankshaft seal | Belt squeal, tensioner bearing fouling | Remove belt and pulley, inspect the seal lip directly |
| Even wet line along the lower edge of the front cover | Front cover gasket or sealant | Area behind the pulley stays dry, trace starts at the cover line | Clean the cover line, watch it reappear |
| Trace running down from cylinder-head height | Camshaft seal or rocker cover gasket | Trace clearly starts above the shaft centreline | Track cover line and camshaft seal separately |
| Drip at the drain hole in the flywheel housing | Rear crankshaft seal or rear cover | Buildup around the hole, film inside the housing | Remove housing cover to view the inner face and flywheel |
| Wetness spreading both ways at the engine-to-transmission joint | Rear crankshaft seal or transmission input shaft seal | Oil colour, smell and consistency can differ | Check both fluid levels, distinguish the two oils |
| Straight-line seep along the lower edge of the sump | Sump gasket or sump bolts | Leak sits well clear of either shaft end | Clean the sump line, check bolt torque and gasket condition |
The most commonly confused row is the rear crankshaft seal versus the transmission input shaft seal — both drip from the same drain hole. The tell is the oil itself: used engine oil darkens and smells of soot, while transmission fluid usually runs lighter, thinner, and has its own distinct smell. The definitive check is to remove the housing cover and see whether the wetness starts at the centre of the flywheel or around the input shaft.
Telling a Crankshaft Seal Leak Apart From Other Oil Leaks
When oil shows up outside the engine, the crankshaft seal is far from the only suspect. The table below gathers the most common sources of engine oil leaks on a heavy-duty vehicle and the tell that separates each one — getting the diagnosis right is the one step that avoids pulling the wrong part.
| Source | Typical trace | Distinguishing mark |
|---|---|---|
| Front crankshaft seal | Oil flung outward from behind the pulley | Trace starts at shaft-centreline height, spreads in the direction of rotation |
| Rear crankshaft seal | Oil collecting in the flywheel housing, dripping from the drain hole | Inside of housing wet, outside of the engine largely dry |
| Rocker (valve) cover gasket | Oil running down from the cover line, dripping onto the exhaust | Burnt smell and light smoke off a hot exhaust |
| Sump gasket and sump bolts | Straight-line seep along the lower edge of the sump | Leak sits at the lower edge, well clear of either shaft end |
| Oil cooler and heat exchanger gasket | Wetness where oil and coolant show up together | Oil film in the expansion tank, or a trace of oil in the coolant |
| Turbo oil feed and return line | Wetness around the turbo, bluish smoke from the exhaust | High oil consumption, leak traced to the turbo housing |
| Transmission input shaft seal | Dripping from the flywheel housing | Oil colour, smell and transmission fluid level are decisive |
Sump-side leaks are especially deceptive, because the sump surface is large and wind spreads oil across the whole underside. For gasket surface, bolt torque, distortion and replacement details on the pan itself, the oil pan group guide is a detailed reference. On many engines the rear crankshaft seal and the front sump gasket joint sit very close together, and a misdiagnosis in that area leads straight to pulling the wrong part.
How to Pin Down the Source of the Leak on the Shop Floor
The most expensive mistake in oil leak diagnosis is making a call on a dirty engine. The sequence below is the simplest field method for proving the source by eye, and it doesn't call for any special equipment.
- Wash and dry the underside of the engine, the front cover and the joint between the engine and transmission with a suitable cleaner; an observation made on a dirty surface tells you nothing.
- Open the drain hole at the bottom of the flywheel housing and clean out any buildup inside it; a blocked hole lets a rear seal leak progress for a long time before anyone notices.
- Check and record the oil level — write the mark on the dipstick, the mileage and the date on the work order. The size of the leak can only be judged from a measured loss.
- Coat the suspect areas with a thin layer of white talc powder or a suitable dye developer spray; the first wet spot shows up clearly against it.
- Check the crankcase ventilation: at idle, loosen the oil filler cap and watch for a puff, and check whether the dipstick gets pushed out of its tube.
- Run the vehicle under whatever load the manufacturer allows, ideally including a short loaded run. Observation at idle alone won't catch a leak that only opens up under load.
- Inspect the area again. What you're looking for isn't the width of the wet patch, it's the highest wet point — oil runs downward from there.
- If the source still isn't clear, remove the housing cover and look directly at the flywheel and clutch area; that's where you'll see whether the wetness starts at the centre of the shaft or around its edge.
- If the manufacturer allows it, add a tracer dye suited to the oil and search with a UV lamp; this method is decisive on engines with more than one suspect leak at once.
- Once the source is confirmed, log the measured oil loss, the mileage and the observation; that record becomes the baseline for comparison after the repair.
Further reading
For a plain-language technical overview of this subject, see the reference article on Wikipedia. Always confirm specific figures and procedures against the vehicle manufacturer service data.
When a Rear Seal Leak Reaches the Clutch and Flywheel
A rear crankshaft seal leak is treated more seriously not because of the oil lost, but because of where that oil ends up. Right behind the seal sits the flywheel, and right behind that sits the dry-friction clutch lining; in this area, oil gets flung onto rotating surfaces well before it ever reaches the outside of the engine.
Oil that reaches the lining lowers its friction coefficient. The first symptom is usually slip under load: engine speed climbs but road speed doesn't keep pace. That can be joined by judder on pull-away, a shifting bite point, and a change in pedal feel. A dry clutch lining is a porous material — oil doesn't stay on the surface, it soaks in. An oil-soaked lining can't be cleaned back to usable condition; it has to be replaced.
The flywheel face is affected too. On a dual-mass flywheel, oil reaching the internal mechanism is a separate risk; on a single-mass flywheel, the surface has to be properly resurfaced, because fitting a new lining against an oil-soaked surface just brings the same complaint back in short order. That chain is why a rear seal leak's cost escalates so quickly: caught early, the job is nothing more than a seal; left alone, it pulls in the lining, the pressure plate, the release bearing, and in some cases the flywheel too.
When Should a Crankshaft Seal Be Replaced? Where the Line Sits
There's no mileage- or calendar-based interval for a crankshaft seal. Its life is set by the environment it operates in — crankcase pressure, oil condition, shaft surface health and installation quality. That's why the call is made by observation, not by a service schedule.
In practice, three stages are worth telling apart. Sweating is a damp film around the seal with no drop forming — there's no measurable oil loss, and monitoring is usually enough. Seeping means a build-up that collects dirt but hasn't yet reached the ground, and calls for a planned repair. Dripping means oil is marking where the truck parks and the level is falling noticeably — that doesn't get postponed.
Location adds weight to the decision too. On the front seal, acting even at the seeping stage is reasonable — the labour is limited, and once the leak reaches the belt it causes secondary failures of its own. On the rear seal, dropping the transmission just for a sweating seal isn't justified, but if the transmission is already coming out for another job, the seal gets replaced at the same time. Once oil loss passes a critical threshold, the location argument is over — a falling level threatens the entire lubrication system. For the relationship between oil pressure, level and the oil pump, the low engine oil pressure guide lays out a detailed framework.
Business reasons play into the decision too: a truck leaking oil creates a mess at the yard, causes problems at inspection, and oil dripping onto a hot exhaust is a fire risk.
Replacing a Crankshaft Seal: Step-by-Step Procedure
Replacing a crankshaft seal isn't technically difficult, but it does demand discipline. Most early repeat leaks trace back not to the part but to a scored shaft surface, a seal fitted at an angle, or a bore that wasn't cleaned thoroughly enough. The sequence below covers the common backbone for both the front and rear seal; the parts that come off, torque figures and any special tools depend on the engine code and come from the OE manual.
- Secure the vehicle, let the engine cool, and disconnect the battery the way the manufacturer specifies.
- Confirm the leak source visually before starting the job — replacing the wrong part on a guess only adds cost.
- Check the crankcase ventilation system; clean or renew the oil separator, the valve and the hose run. Skip this step and the new seal's life will match the old one's.
- For the front seal, remove the belt, the tensioner and the fan assembly if needed, then pull the pulley and vibration damper with a proper puller. The centre bolt is torqued high, so a tool that holds the shaft from turning is essential.
- For the rear seal, remove the propshaft, the transmission, the clutch assembly and the flywheel. Confirm the flywheel bolt sequence and whether the bolts can be reused from the OE manual.
- Remove the old seal without scoring the shaft surface or the bore; use a proper seal puller, or a screw-extraction method if the manufacturer allows it.
- Clean the bore completely of old gasket material and carbon buildup; even one leftover fragment will stop the new seal from sitting square.
- Inspect and measure the shaft surface: look for the groove the old lip wore in, scoring, corrosion or impact damage. If the surface is damaged, a new seal on its own won't be enough.
- Confirm the new seal's type, size and direction; the lip faces into the engine, and on a directional-pattern seal, rotation direction has to be checked too.
- Prepare it per the manufacturer's instructions: elastomer seals are usually lightly wetted with engine oil on the lip, while PTFE-lipped seals are mostly fitted dry, guided over the shaft end with a protective sleeve.
- Drive the seal home square and to the specified depth using the correct-diameter installation tool or sleeve. Hitting it directly with a hammer ovalises the case and damages the lip.
- After installation, confirm by eye that the garter spring is seated and the lip isn't folded anywhere.
- Reassemble the removed parts, cleaning them as you go; torque the flywheel and pulley bolts to the OE value, in the specified sequence, using the angle method where called for. Single-use bolts get replaced, not reused.
The Most Common Mistakes When Replacing a Seal
When a freshly fitted seal starts leaking again in short order, it's almost always down to the installation. The mistakes below come up again and again on the shop floor, and every one of them is preventable.
- Fitting the seal backwards: The sealing lip has to face into the engine. A reversed seal meets the pressure from the wrong side, and its pumping action carries oil outward instead of in.
- The garter spring popping out of position: If the spring jumps its groove while the seal is being guided over the shaft end, the lip won't press evenly; spring position should be confirmed by eye after installation.
- Seating the seal at an angle: A seal pushed in from one side only won't sit square in the bore, and the result is poor contact around part of the circumference and a localised leak.
- Wrong seating depth: Sitting deeper or shallower than specified puts the lip on the wrong part of the shaft. A depth that lands right in the groove the old seal wore produces a leak outright.
- Skipping the lubrication instructions: A dry installation can burn an elastomer lip in the first few seconds, while an oiled installation can upset the intended behaviour of a PTFE lip. Follow the instructions from the part manufacturer and the OE manual.
- Reusing single-use bolts: Bolts torqued by the angle method take a permanent stretch and won't deliver the intended clamp load a second time.
- Ignoring the crankcase ventilation: Leave the pressure source in place and even the best installation won't reach its expected life.
- Using a part that doesn't match the size or type: Inner diameter, outer diameter and width can look identical while the lip design and material are different; the part has to be selected by engine code.
Shaft Surface Wear and the Repair Sleeve
A seal that's been running a long time wears a thin, polished band into the shaft. Over time that band deepens into a wear groove you can feel with a fingernail. Once that groove exists, a new seal fitted at the same depth sits its lip on that uneven surface and, in most cases, starts leaking within days. In a large share of jobs where a new seal leaks quickly, this is the real reason.
There are three ways to handle it. The first, where the manufacturer allows it, is to fit the seal at a different seating depth so the lip lands on virgin surface outside the groove; the limit here is whatever depth range the bore allows, and it can't be applied arbitrarily. The second is a repair sleeve: a thin-walled, precision-ground sleeve fitted over the shaft end that creates a new running surface over the worn area. The third, when the damage is too large for a sleeve to cover, is machining or replacing the shaft itself.
A repair sleeve has its own discipline. It has to be sized to match both the shaft diameter and the seal's bore, and it has to be installed square and in the correct position using a tool that prevents it from cocking. Some sleeves ship with a break-off flange, and that flange has to be removed without marking the running surface. A sleeve isn't always the fix, though: if the shaft's axial runout has increased, or there's impact damage at the shaft end, the seal will keep leaking no matter what surface it runs on — and at that point the crankshaft's general condition and bearing health need evaluating too.
Post-Installation Checks and Maintenance That Extends Seal Life
How well the job went isn't clear the moment the seal goes in — it's clear from the result a few weeks later. The first check happens after the engine has idled for a while; because the area was just cleaned, any new wetness shows up immediately. Next comes a short test drive, followed by another inspection once the engine has cooled — a leak that only opens up under load may not show at idle. The final check happens at the first service visit, comparing the oil level against the loss recorded before the repair; without that comparison, there's no way to prove the job succeeded.
- Crankcase ventilation discipline: Check the oil separator and ventilation line at the manufacturer's specified interval, and watch for condensation and freezing inside the hose in winter.
- Correct oil, correct level: Don't stray from the engine's required viscosity and specification, and don't run the level either low or high — extra oil just adds load onto the seal.
- Acting on a leak early: A leak logged at the sweating stage can often be resolved at a planned service before it ever reaches dripping.
- Keeping the flywheel housing drain hole clear: A blocked hole is what lets a rear seal leak progress unnoticed for a long time.
- Level and work logging: Record the amount of oil added and the mileage at every top-up; note the seal type fitted, seating depth, any sleeve used and the torques applied in the vehicle file.
Technical Values and General Reference Ranges
The table below brings together the figures and acceptance criteria most often needed on a crankshaft seal job. These rows aren't meant to make the decision for you — they're meant to sanity-check the result you get; exact values always come from the OE documentation for that engine and chassis code.
| Value or topic | General reference or criterion | What it means |
|---|---|---|
| Seal replacement interval | No calendar- or mileage-based interval | Life is set by crankcase pressure, oil condition and installation quality |
| Seal material | NBR, FKM or PTFE lip | Manufacturer selects based on the engine's temperature and oil specification |
| Installation direction | Sealing lip faces into the engine | A reversed seal will leak even brand new |
| Lip lubrication | Usually light lubrication for elastomer, mostly dry for PTFE | Follow the part manufacturer's and OE manual's instructions |
| Seating depth | Value specified in the OE manual | A different depth is only used to avoid a wear groove, and only where permitted |
| Shaft surface condition | No groove, scoring, corrosion or impact damage | A defective surface means the seal alone won't be enough |
| Repair sleeve | Sized to match shaft and seal, installed square | Doesn't fix a bearing clearance or runout problem |
| Flywheel and pulley bolts | OE torque, specified sequence, angle method where required | Single-use bolts are not reused |
| Crankcase internal pressure | Must stay within the manufacturer's limit | High pressure is the most common cause of a repeat leak |
The table's underlying rule is this: no dimension, torque or depth value for a crankshaft seal can be used independently of the engine code. Two engines from the same manufacturer, at the same displacement, can call for a completely different seal size and seating depth simply because of a different emissions level or a different rear cover design.
The crankshaft seal is one of the cheapest parts on the engine, but the information it carries isn't cheap at all. When it leaks, it isn't only announcing that its own life is up — it can also be reporting that the crankcase ventilation has clogged, or that the shaft surface has worn out. The order matters: confirm the leak's source by eye first, then assess crankcase pressure and oil condition, then measure the shaft surface — the seal gets replaced last. In every case, the current OE service documentation for that engine and chassis code is the final authority.
For the duty of the shaft this seal runs on, its wear symptoms and what maintenance looks at, see the crankshaft guide.
The rear seal works in the area of the flywheel and its housing; the flywheel housing (bell housing) guide explains in detail which parts the oil traces found there can point to.
Shop this part: Engine
In-depth technical guide: For fault diagnosis, step-by-step replacement and service intervals: Engine Gasket Set: Failure, Replacement and Maintenance Guide
Main guide: Low Engine Oil Pressure: Symptoms, Causes, and the Role of the Oil Pump
Tags
Frequently Asked Questions
- What is a crankshaft seal?
- A crankshaft seal is a lipped, usually spring-loaded radial shaft seal fitted where the rotating crankshaft exits the engine block; it keeps engine oil in and keeps dust and water out. An engine has two of them: a front seal on the pulley side and a rear seal on the flywheel side. The seal is created by a microscopically thin oil film between the lip and the shaft.
- What are the symptoms of a crankshaft seal oil leak?
- On the front seal, oil is flung onto the pulley and belt line, and the belt starts glazing and squealing. On the rear seal, oil drips from the drain hole at the bottom of the flywheel housing, wetness shows up at the engine-to-transmission joint, and the clutch may start slipping. In both cases, a falling oil level within the service interval and a stain where the truck parks are shared symptoms.
- How can you tell if it's the front seal or the rear seal leaking?
- Clean the underside of the engine and the engine-to-transmission joint thoroughly, run the truck a short loop, then check where the wetness starts. If the trace begins behind the pulley, at shaft-centreline height, the front seal is the suspect; if it's dripping from the drain hole in the flywheel housing, look at the rear seal. The definitive check is removing the housing cover and seeing whether the wetness starts at the centre of the flywheel.
- What actually causes a crankshaft seal to fail?
- The most common cause of a repeat leak isn't the seal itself — it's pressure building up inside the engine because the crankcase ventilation system is blocked. Once the relief path closes, the gas looks for the weakest sealing point and pushes the seal lip outward. An overfilled sump, degraded oil and wear on the shaft surface are the other leading causes.
- How do you tell a crankshaft seal leak apart from a sump or valve cover gasket leak?
- The rule is to look for the highest point of the wet area, not the widest — oil is carried downward by gravity and wind. A sump gasket leak forms a straight-line seep along the lower edge of the pan, well clear of either shaft end. A valve cover gasket leak starts at the cover line and drips onto a hot exhaust, giving off a burnt smell.
- Can a rear crankshaft seal leak damage the clutch?
- Yes. Right behind the seal sits the flywheel, and right behind that sits the dry-friction clutch lining. Oil reaching the lining lowers its friction coefficient, causing slip under load and judder on pull-away. The lining is porous, so oil soaks into it rather than sitting on the surface; it can't be cleaned back to usable condition, it has to be replaced.
- If a crankshaft seal is sweating, does it need to be replaced right away?
- Sweating is a damp film with no drop forming, and if there's no measurable oil loss, monitoring is usually enough. Seeping calls for a planned repair, and dripping shouldn't be postponed. On the front seal, early action is reasonable because the labour is limited; on the rear seal, the decision usually waits until the transmission is already coming out for another job.
- Why does a newly fitted crankshaft seal start leaking again quickly?
- The most common causes are skipping the crankcase ventilation check, fitting the seal backwards or at an angle, and the garter spring popping out of position during installation. A seating depth that lands right in the groove the old seal wore into the shaft will produce a leak even with a brand-new part. Micro-scratches left on the shaft surface during removal produce the same result.
- What is a repair sleeve, and when is it used?
- A repair sleeve is a thin-walled, precision-ground sleeve fitted over the shaft end that creates a new running surface over the groove worn by the old seal's lip. It's sized to match both the shaft diameter and the seal's bore, and it's installed square using a tool that prevents it from cocking. If the shaft's axial runout has increased or there's impact damage at the shaft end, a sleeve won't solve the problem.
- How do you tell a camshaft seal leak apart from a crankshaft seal leak?
- Both are radial shaft seals and often get confused because they leak in the same general area at the front of the engine. The tell is height: a camshaft seal leak starts at cylinder-head height and runs downward, while a front crankshaft seal leak starts at shaft-centreline height and gets flung outward as the pulley turns. Cleaning the area fully and running the engine briefly makes the starting point obvious.
Related Articles

Oil Filter Cap and Housing: Leaks, Cracks and Seal Replacement
Truck engine oil filter cap and housing: why plastic caps crack, O-ring leak causes, bypass valve faults, and correct torque and seal replacement steps.
Piston Rings: Oil Consumption, Compression Loss and Replacement
Ring-related oil consumption and compression loss in truck diesel engines: how rings seal, blow-by and leak-down tests, ring gap and replacement.
Intake Manifold and Intake Pipe: Faults, Diagnosis, Repair
How the intake manifold and charge air pipe work on truck diesel engines, how to spot boost leaks, run a pressure test and fit them leak free.


