What Is a Starter Motor? Failure Symptoms and Brush Replacement
What a starter motor does, common failure symptoms, battery-vs-starter diagnosis, voltage drop testing and brush replacement for heavy-duty trucks.
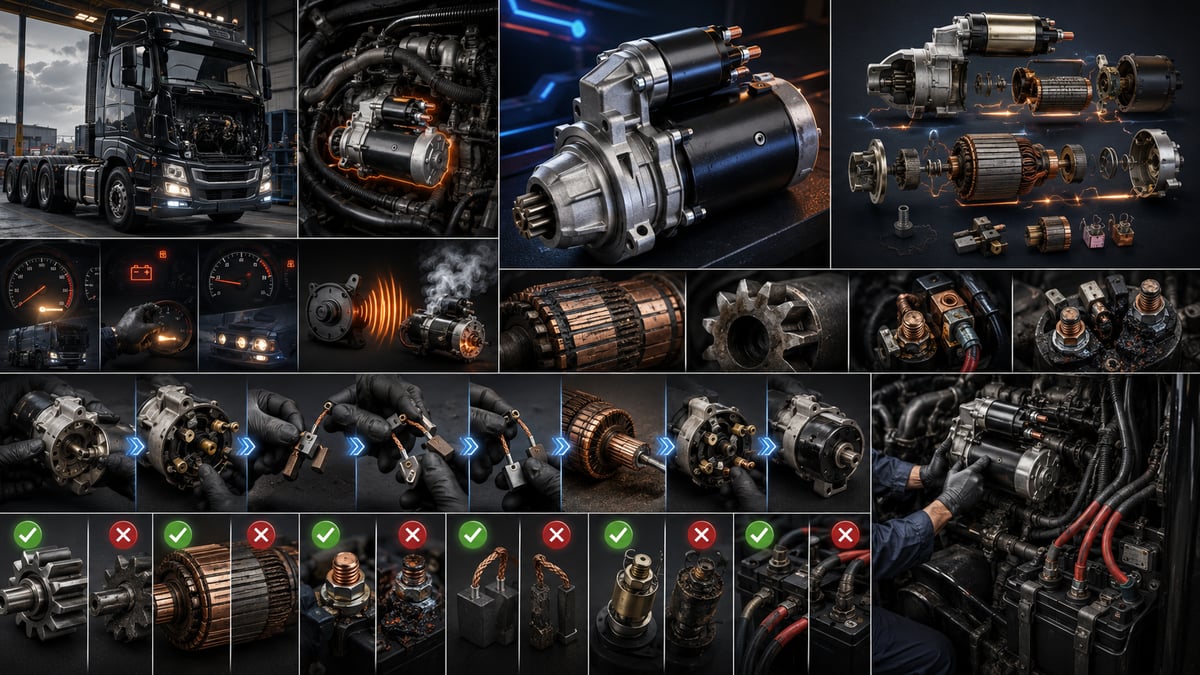
A cold morning in the yard. The driver switches on the ignition, the dash lights come up, the key goes to the crank position, and from under the cab comes a single flat "thunk". Nothing turns. Most people watching that scene blame the starter motor on the spot. Yet the same symptom is produced just as easily by a loose ground strap, a corroded terminal, a tired battery pair, or a burned-out contact disc. The starter motor is not responsible for the quality of the current it receives — it only suffers the consequences. This guide treats it not as a single part but as the highest-loaded link in a cranking chain that starts at the battery pack and ends at the ring gear.
What is a starter motor? Its job and its place in the cranking chain
A starter motor is an electric motor that takes direct current from the battery pack and converts it, for a short burst, into very high mechanical torque that turns the flywheel ring gear, spinning the engine fast enough that it can carry on running by itself. Its job is not to start the engine — it is to create the condition under which the engine can start itself. The moment that condition is met, the starter drops out of the circuit and stays silent until the next crank.
A diesel engine has no spark to trigger combustion; the air being compressed has to reach a temperature high enough to ignite the fuel on its own, and that only happens if the crankshaft is turning fast enough. In a slowly turning engine, the heat generated by compression bleeds away into the cylinder wall before it reaches the ignition threshold. The starter motor's real job is therefore not to turn the engine over but to turn it over fast enough; a starter that cranks slowly is barely more useful than one that does not crank at all.
Cranking draws more current than every electrical load on the vehicle combined, hitting the battery pack with a hard, sudden demand. That is why the starter circuit uses the thickest cables and the tightest resistance tolerance on the whole vehicle — the smallest wiring fault shows up here first. Indirectly, the starter does the work for the whole engine through the crankshaft: the flywheel sits on the end of the crank, and the pinion, engaging the ring gear, drags the crankshaft, the pistons and everything driven off them into motion together.
| Component | Job | What its fault looks like at the starter |
|---|---|---|
| Battery pack (two 12V batteries in series for 24V) | Stores and delivers cranking current | Slow cranking, rapid clicking, no crank at all |
| Main positive cable and terminals | Carries high current with no loss | Voltage drop at oxidised joints, heat, power loss |
| Battery master switch, relay and ignition switch | Uses a small current to command a large one | Command never arrives, intermittent or no operation |
| Solenoid (starter relay, magnetic switch) | Pushes the pinion in and closes the main contacts | Single click with no crank, burned contact disc |
| Armature, commutator and brushes | Converts current into rotary motion | Slow cranking, intermittent running, heating, smoke |
| Bendix drive and one-way clutch | Engages the pinion, releases it once the engine runs | Free-spinning, grinding noise, failure to disengage |
Is a "starter dynamo" the same thing as a starter motor?
What some drivers still call a "starter dynamo" and what the workshop calls a "starter motor" are the same part. The old name is a hangover from the days when the other rotating electrical machine on the vehicle really was a dynamo — a DC generator — before it was replaced by the charging alternator. The two machines do opposite jobs: the starter turns electricity into motion, the alternator turns motion into electricity. The distinction matters for diagnosis, because on a vehicle that will not start in the morning, the part at fault is often not the starter at all, but the charging side that failed to top the battery up the day before. When charging is weak, the starter works with low voltage every morning, and its brushes and contact disc wear out early.
How a starter motor works: the chain from key to ring gear
The starter circuit has two layers. On top sits the light-gauge control circuit that the driver closes with the key; underneath sits the heavy-gauge power circuit that runs straight off the battery terminal. The control circuit carries only a small current, just enough to energise a magnetic coil; the high current is what that coil's contact then lets through.
On modern heavy-duty vehicles, a set of safety interlocks sits in front of the control signal: the gearbox must be in neutral, the clutch pedal depressed, the parking brake applied, and the immobiliser satisfied. If any one of them is not met, no command ever reaches the starter, and the fault gets blamed on the starter motor when the real problem is upstream. On a "nothing happens at all" complaint, the command itself is the first thing worth checking.
The solenoid carries two windings. The strong pull-in winding moves the iron plunger; the weaker hold-in winding keeps the plunger held in position once it has moved. As the plunger travels, a lever arm pushes the bendix pinion forward into the ring gear, and the contact disc behind it bridges the two main terminals, sending battery current into the starter. The order matters: the pinion engages first, current follows second.
Current travels through the brushes onto the commutator, then into the armature windings, where it interacts with the magnetic field of the field windings to spin the rotor; the commutator mechanically selects which winding is energised as it turns. A series-wound starter motor has a defining characteristic: it draws the highest current, and produces the highest torque, exactly when standing still — the moment the most torque is needed — and both current and torque fall as speed rises.
What do the bendix drive and one-way clutch do?
The instant the engine fires and starts turning under its own power, the ring gear tries to spin the starter pinion at a speed far above anything the starter itself can survive, and an unprotected starter would tear itself apart within seconds. Protection comes from the one-way clutch behind the pinion: it transmits torque from starter to ring gear in one direction only, and freewheels in the other. When the key is released, a return spring pulls the plunger back and disengages the pinion from the ring gear. If the clutch slips internally, the starter spins audibly but cannot turn the flywheel; if the return spring weakens or the plunger sticks, the pinion stays meshed after the engine has already started, and the starter is destroyed within seconds.
24V heavy-duty starters versus passenger car starters
A heavy-duty starter system is not simply a scaled-up passenger-car unit. The most visible difference is system voltage: heavy commercial vehicles run on 24V, obtained from two 12V batteries wired in series. Carrying the same power at a higher voltage means lower current, which means less heating and fewer losses. But the series connection has a price: once one of the two batteries is tired, cranking quality drops even though the other battery is perfectly healthy. Keeping the pair matched — same age, same capacity — is a rule, not a preference.
The second difference is the resistance that has to be overcome. A heavy-duty diesel has far more displacement and a higher compression ratio; it holds more oil, which behaves like a brake when the engine is cold. Torque demand on the starter is several times higher, so the machine grows and the cable cross-sections grow with it. A third difference is the service model: a passenger-car starter is usually replaced complete, while a heavy-duty unit is designed so its brushes, solenoid, bendix drive and bushings can be renewed individually.
| Criterion | Heavy-duty vehicle | Passenger car |
|---|---|---|
| System voltage | 24V, two 12V batteries in series | Usually 12V, single battery |
| Battery logic | Matched pair required, one weak battery drags the system down | Single battery, single decision |
| Cable, terminal and master switch | Heavy gauge, bolted terminals, master switch common | Light gauge, clamp connections, switch usually absent |
| Starter motor construction | Wound-field, geared-reduction designs common | Compact, mostly permanent-magnet |
| Service approach | Rebuild common: brushes, solenoid, bendix, bushings | Usually replaced as a complete unit |
Direct-drive versus reduction-gear starter motors
In a direct-drive design, the armature shaft and the pinion share the same axis; the construction is simple and rugged, but the machine has to grow physically to produce the required torque. In a reduction-gear design, a spur or planetary gear set sits between them; the armature can spin at higher speed in a smaller, lighter frame, and the gear set multiplies torque by its ratio — at the cost of introducing a new wear surface in the gears and their bearings. On the field side, wound-field construction remains common on heavy-duty starters for its durability, while permanent-magnet construction is lighter but more sensitive to heat and shock.
Starter motor failure symptoms and what each one means
In a starter complaint, the sound speeds up the diagnosis. No sound at all points to the control circuit, or a solenoid never energised. A single click means the command arrived and the plunger moved, but the motor itself never turned. Fast, repeated clicking means the plunger is being pulled in and released over and over, almost always a sign of insufficient supply.
Symptoms have to be read together. Headlights dimming, or the instrument cluster dropping out, during cranking points to the supply side rather than the starter; if nothing dims and nothing happens either, current isn't reaching the starter at all.
| Symptom | Likely mechanism | First check |
|---|---|---|
| Single click, engine does not turn | Solenoid pulls in, but the contact disc is burned or the starter itself is faulty | Check for supply at the solenoid output, measure voltage drop |
| Fast repeated clicking | Hold-in winding cannot hold voltage, weak battery or connection | Battery load test, clean terminals and ground straps |
| Engine turns heavily and slowly | Low battery capacity, connection resistance, brush wear | Measure voltage and drop across the circuit under load |
| No sound at all, lights normal | Control circuit open: relay, switch or a safety interlock | Check for command at the solenoid's light-gauge terminal |
| Starter keeps spinning after the engine has started | Contact disc stuck, or a weak return spring | Stop the engine immediately, open the battery master switch |
Battery or starter motor? A practical way to tell them apart
The single most expensive field mistake is replacing a perfectly good starter because of a battery or cable fault. A new starter can carry slightly more load, so the vehicle runs for a while, but since the root cause is still there, the same complaint returns within weeks. Measuring under load is what breaks that cycle.
The underlying rule: resistance only reveals itself once current is flowing. Voltage measured across the battery terminals with the key off can look fine; the moment the starter cranks, an oxidised terminal drops most of that voltage across itself, and only what's left reaches the starter. Reading battery voltage alone is misleading — what matters is behaviour under load.
| Symptom | Battery/supply likelihood | Starter motor likelihood | How to tell them apart |
|---|---|---|---|
| Fast repeated clicking | Very high | Low | If the headlights dim noticeably while cranking, it's the supply side |
| Single click, no crank at all | Moderate | High | If voltage is present at the solenoid output terminal, suspect the starter itself |
| Slow, heavy cranking | High | Moderate | Try a known-good battery pack; if speed improves, it's the battery side |
| Starter turns, engine does not | Almost none | Very high | Noise comes from the starter housing; check pinion engagement |
| Starts with a jump, not on its own battery | Very high | Low | Battery load test and charging circuit efficiency |
| Same symptom persists despite a jump | Low | High | Measure cable and ground voltage drop, then remove the starter |
Further reading
For a plain-language technical overview of this subject, see the reference article on Wikipedia. Always confirm specific figures and procedures against the vehicle manufacturer service data.
Voltage drop testing: catching a bad cable or terminal in the act
Voltage drop testing is the most direct way to find hidden resistance in the starter circuit. A sound connection passes almost the entire voltage through to the other side even under heavy current. Where a connection has oxidation, looseness or broken strands, part of that voltage turns into heat right there; placing the meter's leads on either side of the joint reads that lost voltage directly.
The measurement has to be taken while the starter is actually cranking, with real current flowing through the circuit. The acceptable drop limit is given in the vehicle manufacturer's manual; the general principle is that a clean, sound connection keeps the drop small enough to be barely measurable. If the limit isn't known, compare different points on the same circuit — whichever link stands out clearly from the rest is the culprit.
- Secure the vehicle, put the gearbox in neutral, apply the parking brake and chock the wheels. If you don't want the engine to actually start, disable the injection using the method the manufacturer describes; never break the circuit by pulling a random cable.
- Inspect the battery connections and ground points visually. Note any white or green corrosion, cracked insulation and loose bolts; fixing these before you measure resolves most cases on its own.
- Set the meter to the correct DC voltage range. Touch one lead to the battery positive post and the other to the starter's main input terminal; the leads must contact bare metal surfaces, not the cable insulation.
- Have a helper crank the starter and read the value. What you read is the voltage lost across the whole positive lead; if it's significant, narrow it down by re-measuring each connection on the line one at a time.
- Repeat the same test on the negative side: one lead on the battery negative post, the other on the starter housing, while cranking. Losses on the ground side are at least as common as on the positive side, and far less often suspected.
- Disconnect, clean and, if necessary, renew the terminal that measured badly, then tighten it to the torque the manufacturer specifies. Apply protective grease after tightening, never between the mating surfaces themselves.
- Repeat the measurement to confirm the improvement and log the values in the vehicle's file. If the symptom persists after the circuit has been cleaned up, removing the starter is now justified — and a starter removed at this point is far more likely to actually be faulty.
Solenoid failures: contact disc, pull-in and hold-in windings
The solenoid is the most failure-prone part of a starter motor, and most of its failures are contact-related. The entire cranking current passes through a copper disc on the moving plunger, pressing against two fixed terminals. Every crank cycle arcs and pits the surface; the pitted surface raises its own resistance, the extra resistance generates more heat, and the process feeds on itself until the disc, even while making contact, can no longer pass enough current. The symptom is classic: a single solid thud, because the plunger did move, but the motor never turns.
The second common failure sits in the hold-in winding. The pull-in winding grabs the plunger, but once current flows and voltage sags for a moment, the hold-in winding can't hold it and it drops out, then pulls in again once voltage recovers. The cycle repeats several times a second and produces the fast clicking. Behind it is usually not the solenoid, but a tired battery or a high-resistance connection. A third failure mode is mechanical sticking: corrosion builds up in the plunger bore, or the return spring weakens, so the contact never opens once the key is released, and the starter stays powered and suffers permanent damage within seconds. The only correct response is to stop the engine immediately and open the battery master switch.
On heavy-duty starters, the solenoid is usually available as a separate service part. When it's renewed, check the lever arm, pivot pin and return spring at the same time; a worn lever puts a brand-new solenoid back in the same state in short order. Clean oxidation off the terminals, renew the cable lugs, and tighten terminals to the manufacturer's torque — over-tightening shears the terminal stud out of the housing.
Brush wear, the commutator and the armature: what wears out inside a starter
The only sliding electrical contact inside a starter motor is between the brushes and the commutator. Brushes are carbon blocks pressed against the commutator by small springs, carrying current onto the rotating part through that contact. They shorten a little with every crank, spring pressure drops, and contact quality falls with it. A starter approaching the brush wear limit doesn't die all at once — it turns unreliable first: it cranks sometimes and not others, and when it does, it's not as fast as before. This is easy to mistake for a battery fault; the distinguishing sign is that with worn brushes the supply is healthy — headlights and the instrument cluster don't dip more than expected — yet the engine still turns heavily. What's dropping under load isn't the battery, it's the starter's own internal resistance.
The surface the brushes run on, the commutator, wears too. Carbon dust, oil vapour and moisture combine to fill the insulating gaps between its segments, bridging current across a path it was never meant to take, while the surface itself gets scored and stops the brushes seating properly. A commutator can be skimmed and refaced up to a certain limit; below that limit, the armature has to be renewed as a complete unit.
The armature itself has two typical failure modes. If the winding insulation breaks down and shorts, the starter draws high current, overheats, and gives off a burning smell and smoke. The second is mechanical: once the bushings carrying the rotor shaft wear, the rotor runs off-centre and rubs against the field poles or magnets; the rubbing drags down torque, raises heat, and in an advanced case cracks the magnets. The play and scraping felt when a removed starter is turned by hand is an early warning of exactly this failure.
Replacing starter motor brushes step by step
- Open the battery master switch, disconnect the negative terminal and secure the loose lead so it cannot touch the chassis. The main cable on the starter can still carry voltage even with the master switch open.
- Remove the starter from the vehicle, clean the housing from the outside, and mark the reference positions you'll need for reassembly; a housing pulled apart without marks gets reassembled at the wrong angle.
- Remove the solenoid and the end cover. The sequence depends on the design; springs and washers under the cover can fly out, so lift it off flat and carefully.
- Take out the brush holder and inspect the brushes: check length, how evenly the wear surface has worn, the condition of the shunt wire, and spring pressure. The acceptable limit is given in the OE manual.
- Inspect the commutator surface: look for discoloration, stepping, filled-in gaps between segments and scoring; clean the surface properly and undercut the segment gaps to the correct depth. Do not use sandpaper or a wire brush.
- Check the armature's winding insulation and short-circuit condition with the correct tester; skip this step and the brush replacement only postpones the failure. Also check the bushings carrying the rotor shaft, and renew them if there's play.
- Fit the new brushes into the holder; confirm the springs seat correctly and that the brushes move freely in their channels without binding. Make sure the brush leads cannot contact any rotating part.
- Reassemble the housing to your reference marks, renew gaskets and seals, and tighten the fasteners to the torque the manufacturer specifies. On the bench, a free-spin test should show smooth rotation, clean pinion movement and a fast return spring.
- Refit the starter to the vehicle, connect the main cable last, seat the insulating boots back in place, and repeat the voltage drop measurement, logging the result.
Distinguishing bendix drive, one-way clutch and ring gear damage
A metallic grinding sound during cranking doesn't say by itself which part is at fault — it can come from the starter's own pinion just as easily as from the flywheel's ring gear. Telling them apart matters for planning the job: the pinion is replaced together with the starter, while the ring gear is a much bigger job requiring the flywheel housing to be opened and, in most cases, the gearbox dropped.
The first rule is how the damage is spread. Damage on the starter pinion is spread around its whole circumference, because the pinion meshes with a different tooth each attempt. Damage on the ring gear is localised, concentrated in a narrow arc matching the few positions the engine tends to stop at. Looking through the inspection cover, if part of the ring is sound and part visibly battered, the ring gear is the culprit. The second rule is repeatability: a vehicle that starts fine sometimes and grinds at the same point other times is showing the signature of localised damage.
A one-way clutch fault can show up without any noise at all. If the clutch is slipping, the starter spins freely at high speed while the flywheel never moves, and the driver typically describes it as "the starter is just spinning". On a removed starter, the pinion should turn freely by hand in one direction and lock solid in the other; if it turns freely both ways, the clutch is finished, and if it locks solid both ways, it has seized and will drag the starter along once the engine is running.
| Finding | Likely source | Action |
|---|---|---|
| Tooth rounding spread evenly around the pinion | Starter pinion and drive assembly | Renew the pinion or drive assembly |
| Battered teeth in a narrow arc of the ring gear | Flywheel ring gear | Plan ring gear renewal; don't replace the starter unnecessarily |
| Starter spins freely and loudly, engine doesn't turn | One-way clutch slipping | Renew the clutch or the complete starter |
| Starter fails to disengage after the engine starts | Stuck contact disc, weak return spring, sticking plunger | Stop immediately, isolate the circuit, remove the starter |
Cold weather, oil viscosity and the load on a starter
Starter failures rising in winter is no coincidence. Cold hits the starter circuit from two directions at once: it reduces the current the battery can deliver, and it increases the torque needed to turn the engine over. The chemical reactions inside a battery slow down at low temperature, so a battery that delivers current comfortably on a mild day simply can't on a cold one. At the same time engine oil thickens, friction rises, and the resistance the starter has to overcome climbs with it. A system already running at its limit in summer gets stranded at the first real cold snap.
How easily engine oil flows in the cold is expressed by the number in front of the W in a multigrade oil; the lower that number, the more freely the oil flows when cold, and the less resistance the starter sees. Oil choice is still not a free decision on its own — the grade and specification the engine manufacturer approves is what governs it.
Discipline around cold-weather cranking matters just as much. Cranking bursts should be kept short, with a rest between attempts for the starter to cool and the battery to recover, using the duration the manufacturer specifies. Cranking continuously for a long stretch can finish off the brushes and commutator in a single attempt and burn the armature windings. If the engine doesn't catch within a few clean attempts, the problem is usually not the starter but the fuel side or the preheat system; forcing the starter further risks losing a sound part as well.
On the fleet side, cold-weather preparation cuts starter failures the most: load-testing batteries before winter, cleaning terminals, inspecting ground straps, and checking the preheat circuit. Vehicles parked for a long stretch should have their battery pack kept on charge; a flat battery is damaged by the cold in its own right.
Should a starter motor be rebuilt, or replaced?
A heavy-duty starter motor is designed to be rebuilt: brushes, solenoid, bendix drive assembly, return spring, lever and bushings are all available as service parts. That doesn't mean the decision defaults to rebuilding — the right call depends on which layer of the removed machine has actually reached the end of its life.
The general principle: rebuild when the wear parts are finished, replace when the carrier parts are finished. Brushes, solenoid, clutch and bushings are wear parts; the housing, armature and field assembly are carrier parts. Once the commutator is worn past its machinable limit, the winding is leaking current, magnets are cracked, or the housing itself is cracked, a rebuild no longer makes economic sense. On a starter flooded with water or oil, any repair done without first fixing the leak source is short-lived. On the fleet side, a third factor is downtime — a tractor unit sitting idle on the road usually costs well more than the price difference between parts.
Points to watch on removal and installation
Before removal, open the battery master switch and disconnect the negative terminal; the main positive cable is connected directly to the starter. Mark cable positions, because mixing up the light-gauge control lead with the main supply lead creates a fault that's hard to diagnose afterwards. Three points matter on installation: on some applications, a shim fitted between the housing and the block is easy to forget, and its absence throws off pinion clearance and produces a grinding noise; fasteners must be torqued to the value and sequence the manufacturer specifies; and cable lugs must be clean, insulating boots seated properly, with cables routed away from the exhaust on their original path.
Whichever is chosen, rebuild or replacement, the root cause of the failure has to be closed off before the starter goes back in. Leave a weak battery, an oxidised terminal, a tired ground strap or an inefficient charging circuit in place, and the new starter follows the exact same path; the most expensive repair in the field is replacing the same part twice.
Maintenance, lifespan and protecting the starter circuit
A starter motor has no periodic maintenance schedule of its own; maintaining the starter means maintaining the starter circuit. What determines its lifespan is the quality of the voltage reaching it and the way it's asked to work. The items below are the checks that reduce starter failures the most in fleet practice.
- Battery pack discipline: keep the pair matched and the same age; when one is replaced, evaluate the pair together and load-test it before winter.
- Terminal and ground inspection: clean battery terminals on a schedule, check ground straps for corrosion and looseness.
- Master switch check: test the battery master switch with a meter even when it looks fine from the outside; a switch burned internally is a quiet source of trouble.
- Charging circuit monitoring: check alternator output and belt tension regularly; weak charging forces the starter to work every morning and shortens brush life.
- Cranking discipline: instruct drivers on continuous cranking duration and the rest time between attempts; don't force the starter if the engine won't catch.
- Leak and noise tracking: close off any oil or water source dripping onto the starter housing, and investigate any new metallic noise during cranking without delay.
- Measurement records: log voltage drop readings in the vehicle file, and inspect a replaced starter to see what actually failed inside it.
The starter motor steps in at the most critical moment of a heavy commercial vehicle's day; it runs for only a few seconds, and those seconds decide whether the trip begins at all. A starter complaint should therefore always be worked in the same order: prove the supply and connections first, then confirm the control circuit, then evaluate the solenoid, and question the starter motor itself last. Following that order eliminates needless parts replacement and fixes the real fault without it coming back. For every measurement, torque and adjustment value, the current OE service documentation for the vehicle's engine and chassis code is the authority.
Shop this part: Electric System
Main guide: What Is a Crankshaft? Function, Failure Symptoms and Maintenance
Tags
Frequently Asked Questions
- What is a starter motor and what does it do?
- A starter motor is an electric motor that takes direct current from the battery pack and converts it, for a short burst, into high mechanical torque that turns the flywheel ring gear. Its job is not to start the engine but to create the condition under which the engine can start itself. Since a diesel has no spark, the compressed air needs to reach ignition temperature, which only happens if the crankshaft is turning fast enough. The moment the engine fires, the starter drops out of the circuit.
- What are the symptoms of a failing starter motor?
- The most common ones are a single click when the key is turned with no crank, fast repeated clicking, the engine turning heavily and slowly, no sound at all, the starter spinning without turning the engine, and a metallic grinding noise. The starter continuing to spin after the engine has started, a burning smell from the housing, and intermittent cranking also point to the starter side. Most of these symptoms are not exclusive to the starter — a weak battery, an oxidised terminal or a loose ground strap produce the same picture.
- I turn the key and get one click but the engine doesn't crank, what could it be?
- A single click means the solenoid pulled in, so the control circuit is working; the problem is that current isn't reaching the starter. The most common causes are a burned contact disc inside the solenoid, an internal fault in the starter itself, or high resistance in the main supply cable. Before deciding, check for supply at the solenoid's output terminal and measure the voltage drop while cranking.
- How do you tell whether it's the battery or the starter motor?
- The key indicator is how the headlights and instrument cluster behave during cranking. If they dim noticeably and fast clicking is heard, the fault is on the supply side. If the supply looks healthy but the engine still turns heavily, the starter's own internal resistance is the more likely cause. The decision has to be made from a measurement taken while the starter is actually cranking, under real load — battery voltage read with the key off is misleading.
- How is a voltage drop test done and why does it matter?
- Resistance only shows itself once current is flowing, so the test has to be done while the starter is cranking. One meter lead goes on the battery positive post, the other on the starter's main input terminal, and the reading while cranking is the voltage lost across that cable; the same test is repeated on the negative side between the battery negative post and the starter housing. The acceptable limit is given in the vehicle manufacturer's manual; as a general rule, a clean, sound connection keeps the drop very small.
- When do starter motor brushes need replacing?
- Brushes wear a little with every crank, and as they approach their limit the starter doesn't fail outright — it becomes unreliable first, cranking sometimes and not others, and slower when it does. The acceptable brush length is given in the OE service manual. Replacing the brushes alone isn't enough; the commutator surface, spring pressure, bushing play and the armature's winding insulation all need checking, or the repair only lasts a short time.
- The starter spins but the engine doesn't turn, what does that mean?
- The starter spinning freely at high speed while the flywheel stays still usually means the one-way clutch is slipping, or the pinion isn't engaging the ring gear. On a removed starter, the pinion should turn freely by hand in one direction and lock solid in the other; if it turns freely both ways, the clutch has failed, and if it locks in both directions it has seized, which will drag the starter along once the engine runs.
- Why do heavy-duty vehicles use a 24V starter system?
- Heavy commercial vehicles run on 24V, produced by two 12V batteries wired in series. Carrying the same power at a higher voltage means lower current, so there's less heating and fewer losses. The trade-off is that once one of the two batteries weakens, cranking quality drops even if the other one is perfectly healthy, which is why the pair has to be kept matched, same age and same capacity.
- Why does a starter struggle more in cold weather?
- Cold hits the starter circuit from two sides at once: it reduces the current the battery can deliver, and it increases the torque needed to turn the engine over. The chemical reactions inside the battery slow down, and at the same time the engine oil thickens and friction rises. A system that was already at its limit in summer gets stranded at the first real cold snap, which is why load-testing batteries and cleaning terminals before winter is the most effective prevention.
- Should a starter motor be rebuilt or replaced with a new one?
- The general rule is to rebuild when the wear parts are finished, and replace when the carrier parts are finished. Brushes, the solenoid, the clutch and the bushings are wear parts and can be renewed individually on heavy-duty starters. If the commutator is worn past its machinable limit, the armature winding is leaking current, or the housing itself is cracked, a rebuild no longer makes economic sense. Whichever is chosen, the root cause of the failure — a weak battery, an oxidised terminal, an inefficient charging circuit — has to be fixed first, or the new starter fails the same way.
Related Articles
What Is a Charging Alternator? Its Function and Alternator Failure Symptoms
What is an alternator and how does it work? Heavy-duty truck alternator failure symptoms, battery-vs-alternator diagnosis, voltage testing, and maintenance.


