What Is a Charging Alternator? Its Function and Alternator Failure Symptoms
What is an alternator and how does it work? Heavy-duty truck alternator failure symptoms, battery-vs-alternator diagnosis, voltage testing, and maintenance.
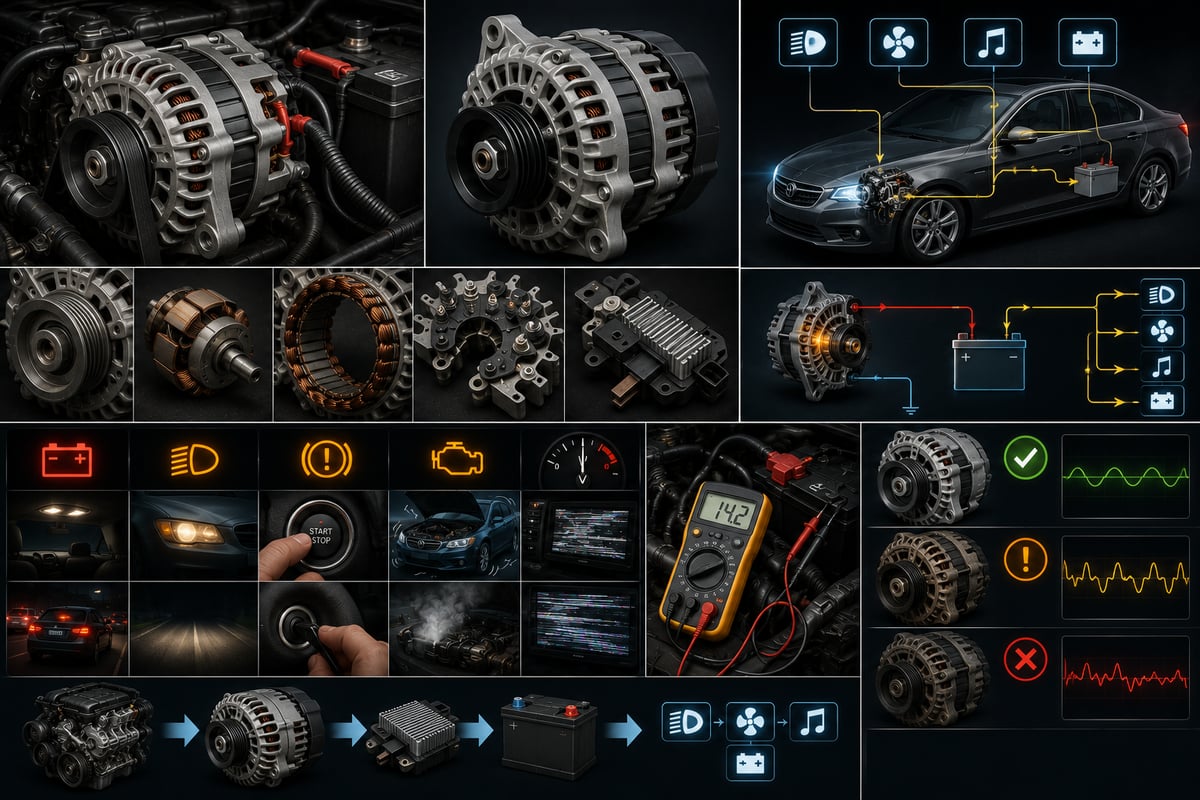
The first sign after a night run usually shows up not on the dash but in the headlights: they dim slightly at idle, then recover as soon as the driver revs the engine. Most drivers blame the battery, fit a new one, and two weeks later the same truck won't start at 5 a.m. The battery was never the culprit — it was only the side that ran dry. The charging system is a chain: belt to rotor, stator to diode bridge, from there to the cable, to chassis ground, and finally to the battery terminal. This guide treats the alternator not as a single part but as the generating link in that chain.
What Is an Alternator? Charging Alternator, Dynamo, and Generator Naming
An alternator is a generator that takes the engine's rotation off the drive belt and converts it into electrical energy, powering every electrical consumer while the vehicle runs and charging the battery at the same time. The name comes from the current it produces: the voltage induced in its windings is alternating current, and the diode bridge inside the housing converts that into the direct current the vehicle's electrical network actually uses.
On the shop floor the same part gets called a charging alternator, or loosely a dynamo or generator; catalogues and fault codes stick to "alternator." Technically the two older names describe a genuinely different machine. In a classic dynamo, the generating windings sit on the rotating part and the entire output current passes through a commutator and brushes. In an alternator the logic is reversed: the generating windings are fixed in the housing, the rotating part is nothing more than an electromagnet, and the current passing through the brushes isn't the output current at all — it's the much smaller field (excitation) current. That's why an alternator delivers more current for the same size, keeps charging even at idle, and wears its brushes far more slowly.
Division of Labour Between the Battery and the Alternator
The battery is a reservoir: it powers consumers while the engine is off and delivers a very short, very high current burst at cranking. The alternator is the source: as long as the engine runs, it covers ongoing consumption and refills what the battery spent on starting. That distinction is the foundation of diagnosis, because both types of failure arrive at the workshop with the same sentence: "the truck won't start." What separates them isn't guesswork but three measurements: resting voltage, charging voltage read with the engine running, and any parasitic current still flowing with the engine off.
Why Is a Heavy Commercial Vehicle's Charging System 24V and High-Amperage?
Trucks, tractor units, and buses typically run a 24V network built from two 12V batteries wired in series. Carrying the same power at double the voltage means half the current; halving the current lets cable cross-sections shrink, cuts resistive losses, and keeps voltage drop over long chassis runs within bounds. The consequence is that the two batteries become dependent on each other: if one weakens, it never fully charges while the healthy one is chronically overcharged. That's why the pair is always replaced together, matched in capacity and age.
Electrical load is also nothing like a passenger car's: window and mirror heaters, cab heating, the tachograph, telematics, refrigerated-body control, tail-lift operation, and driver-assistance systems can all be drawing current at once. Alternators on these networks are typically sized for a 24V output somewhere between 80 and 150 amps. The amperage on the label is a ceiling — the alternator only delivers it at sufficient speed and when cold. On a vehicle that idles for long stretches with consumers left on, the current balance can tip negative: the alternator is running, yet the battery is still slowly draining. A large share of trucks that won't crank in the morning despite testing "fault-free" fall into exactly this duty-cycle category.
How Does an Alternator Work? Rotor, Stator, Diode Bridge, and Regulator
Inside, four steps follow one another: a rotating magnetic field is created, that field induces an alternating voltage in fixed windings, the voltage is rectified, and it's held steady. Most failures can be isolated simply by working out which of these four steps has broken down.
The rotor sits on the shaft attached to the belt pulley and is, in effect, an electromagnet. A small direct current reaches its field winding through two slip rings and the spring-loaded brushes pressed against them; the claw poles on either side of the winding become north and south poles under that current. The stator is the fixed winding package surrounding the rotor, usually three-phase; the rotating field induces phase-shifted voltages in these windings. The induced voltage depends on rotor speed and on the strength of the field current — since speed follows the engine, field current is the only variable that can actually be controlled.
The diode bridge rectifies the three-phase AC into DC and acts as a one-way gate, stopping the battery from discharging back through the alternator once the engine stops. The regulator continuously samples output voltage and switches the field current on and off rapidly to hold the target voltage steady. It also compensates for temperature: the target voltage is nudged down when the battery is hot and raised when it's cold.
How Does an Alternator Self-Excite? The Hidden Job of the Charge Warning Light
A stationary rotor retains only a trace of residual magnetism, usually not enough on its own to kick off generation. When the ignition is switched on, battery positive feeds a small pre-excitation current through the dashboard charge warning light to the alternator's D+ terminal (L terminal in some layouts); the lamp here isn't just an indicator, it's a current-limiting element in the circuit. Once the alternator starts generating, D+ voltage climbs toward network voltage, the difference across the lamp's two ends collapses, and the lamp goes out. This is why a blown bulb or a loose socket on the charge lamp circuit can leave a perfectly healthy alternator producing nothing at all — an unsuitable LED replacement bulb can cause the same failure.
The reverse also holds: the lamp going out doesn't by itself mean charging is healthy. The lamp only confirms voltage is present at D+, not that the voltage is at the correct level. A small amount of ripple always rides on top of rectified DC; when a diode fails, that ripple grows noticeably and the battery never fully charges. Measuring charging voltage alone isn't enough for that reason — ripple has to be measured too.
What Do the Alternator's Components Do?
An alternator failure is usually not a failure of the complete unit but of a single component inside it. The table below matches each part's job to the first symptom typically seen in the field when it fails.
| Component | Function | Typical failure symptom |
|---|---|---|
| Pulley (often an overrunning alternator pulley) | Transfers drive to the rotor, damps speed irregularity | Belt vibration, squealing, dropping charge |
| Rotor (field winding and claw poles) | Produces the rotating magnetic field | No charge at all, overheated housing |
| Slip rings and brushes | Carry field current to the rotating rotor | Charge cutting out at idle, flickering lamp |
| Stator windings | Induce three-phase voltage in the rotating field | Smell of burnt varnish, voltage collapse under load |
| Diode bridge | Rectifies AC to DC, blocks reverse current flow | High ripple, radio interference, battery drain while parked |
| Regulator | Adjusts field current to hold voltage steady | Overcharging or no charge at all |
| Front and rear bearings | Support the rotor shaft | Whining, rumbling, play in the shaft |
| B+ terminal and cable | Carries generated current to the battery and network | Heating and voltage drop at a loose connection |
| D+/L terminal and ground connection | Receives pre-excitation, closes the circuit's return path | Lamp never goes out, unexplained low charge |
What Are the Symptoms of Alternator Failure?
The most deceptive part of a charging fault is how the battery acts as a buffer: when the alternator stops producing, the truck doesn't stop immediately — it keeps running until the battery is spent. Symptoms therefore don't look like a sudden failure but a slow fade, and they tend to surface at night and in cold weather.
The first warning is usually the battery or charge lamp. A lamp that stays lit means production has stopped; one that lights at idle and clears as revs rise means production is marginal, typically from belt slip or brush wear. Headlights dimming at idle at night is the visual version of the same thing. Some symptoms are mechanical: squealing on cold start-up points to the belt slipping on the pulley, a continuous whine points to the alternator bearing, and a burnt-varnish smell points to overheated windings or diodes.
The overcharging side is less well known but more expensive. When the regulator can't cap voltage, battery electrolyte drops, the battery heats up and swells, bulbs blow repeatedly, and control units get damaged. Because the complaint still comes in as "the battery keeps dying," it's frequently misdiagnosed — the battery isn't dying, it's boiling. On modern trucks the first sign is often on the data side: tachograph resets, low-voltage fault codes accumulating in the fault memory.
| Symptom | Likely mechanism | Confirmation / check |
|---|---|---|
| Battery lamp stays lit continuously | No output: belt broken, no field excitation, faulty regulator or diode | Measure battery terminal voltage with engine running |
| Lamp lit at idle, clears as revs rise | Belt slip, worn brushes, a resistive connection | Compare voltage at idle and at mid-range revs |
| Headlights dim at idle at night | Output current insufficient under load | Monitor voltage with consumers switched on |
| Battery keeps dying, a new one doesn't help either | Insufficient charge, or a parasitic draw with the engine off | Measure charging voltage and parasitic draw separately |
| Electrolyte drops, bulbs blow repeatedly | Overcharging: regulator can't cap the voltage | Measure charging voltage at mid-to-high revs |
| Squealing on cold start-up or under load | Belt loose or contaminated, pulley seized | Check the belt, tensioner, and pulley rotation |
| Whining or rumbling from the engine bay | Worn alternator bearing | Remove the belt and spin the rotor by hand |
| Static or interference on the radio | Faulty diode, high ripple | Measure ripple on the AC range |
| Tachograph resets, low-voltage codes pile up | Unstable charging, resistive cable or ground | Measure voltage drop across the B+ and ground paths |
Is It the Battery or the Alternator? How to Tell the Difference
The culprit is found by measuring, not by swapping parts. If a tank keeps emptying, either the source isn't filling it, the tank itself doesn't hold, or something is draining it unseen. Three measurements separate the three possibilities.
Resting voltage is read at the battery terminals with the ignition off, after the vehicle has sat for a few hours; on a 24V system a fully charged battery pair generally sits above the 25V mark. Charging voltage is taken with the engine running; it should climb noticeably above resting voltage and hold that level once consumers are switched on. If voltage never rises at all, there's no output, and the search moves to the alternator side: belt, field circuit, brushes, regulator, diode bridge, B+ cable, and ground. If it rises but collapses as soon as load is applied, the alternator is generating but can't deliver enough current — most often that points to a bad diode or a slipping belt.
Parasitic current is the third measurement. If charging is normal but the truck still goes flat overnight, something is drawing current with the engine off: a telematics unit, a reefer control board, an alarm, and aftermarket add-ons are the usual suspects. A shorted diode bridge produces the exact same result; in that case, disconnecting the alternator's B+ cable makes the parasitic draw disappear, and the culprit is confirmed.
Once the three measurements are in, the decision gets simple. If charging is normal and there's no parasitic draw, but the battery still sags when cranking, the fault sits in the battery's own capacity — confirmed with a load test. If charging is low or absent, replacing the battery is wasted time; two different batteries dying the same way back-to-back is proof the battery isn't the guilty party. On a heavy commercial vehicle there are two more variables: the series-connected batteries need to be measured individually and, if the gap is large, replaced as a pair; and a truck run on short trips with a lot of idling can tip the battery balance negative even with a perfectly healthy alternator.
How Do You Measure Charging Voltage, and What's the Expected Range?
The entire charging-system diagnosis can be done with a multimeter. The steps below move from a cold, safe state up to loaded running conditions.
- Park the vehicle on level ground, apply the parking brake, put it in neutral, and switch off the ignition.
- Inspect the battery terminals and the ground connection; a corroded or loose connection will throw off every measurement that follows.
- Set the multimeter to DC voltage, touch the probes to the battery terminals, and record the resting voltage.
- Start the engine and take a reading at idle; the value must climb above resting voltage.
- Hold engine speed roughly between 1,500 and 2,000 rpm and let voltage settle into its regulation band.
- Switch consumers on in stages: low beam, high beam, cab blower, rear-window heater. Watch whether the band holds as load increases.
- Switch the multimeter to the AC range and measure ripple; a noticeable AC component makes the diode bridge suspect.
- Measure voltage drop: under load, put one probe on the alternator's B+ terminal and the other on the battery's positive post; repeat the same measurement between the housing and the battery's negative post.
- Confirm the belt isn't slipping, and log the values against the vehicle record. Early diagnosis comes not from a single reading but from how a given vehicle's values move over time.
It's more useful to think in terms of a band than a single number. On 24V systems, regulated charging voltage generally sits between 27.5 and 28.5 volts; on 12V systems, between 13.8 and 14.4 volts. Because of temperature compensation, the upper side of the band is normal when cold and the lower side once the engine has warmed up. A voltage that settles noticeably below the band means the battery will never fully charge; one that settles noticeably above it means overcharging. These figures are general reference points — the target values in the current OE service manual for the vehicle's specific engine and chassis code are authoritative.
Further reading
For a plain-language technical overview of this subject, see the reference article on Wikipedia. Always confirm specific figures and procedures against the vehicle manufacturer service data.
How Do You Tell Apart Brush, Regulator, and Diode Bridge Failures?
These three failures arrive with similar complaints; what separates them isn't the symptom itself but how it behaves. Brush wear is gradual and intermittent, regulator failure is sudden and steady, and diode failure is a weakness that only shows up under load.
Brushes carry only the field current, so they last a long time — but not forever. As they wear, spring pressure drops, contact breaks under vibration, and charging cuts out intermittently; the classic complaint is the charge lamp flickering over speed bumps. If the slip-ring surface has grooved, a fresh set of brushes will reach the same state again quickly. Regulator failure shows up at one of two extremes: if it can't supply field current at all, the alternator never generates and the lamp stays lit continuously; if it can't cut field current off, voltage runs away and overcharging begins.
In the diode bridge, the type of fault determines the outcome. An open-circuit diode takes one phase out of service: output drops, voltage collapses under load, and ripple grows. A shorted diode opens up the reverse path instead — the battery discharges back through the alternator with the engine off, and the truck won't crank after sitting a few days.
| Faulty component | Typical symptom | Distinguishing sign |
|---|---|---|
| Brushes and slip rings | Charging cuts out intermittently | Worsens under vibration, then self-clears |
| Regulator (no output) | Lamp stays lit, voltage never rises | Belt and brushes are fine, no field current present |
| Regulator (overcharging) | Voltage climbs above the expected band | Electrolyte drops, battery heats up, bulbs blow |
| Diode bridge (open circuit) | Output low, voltage collapses under load | High ripple, radio interference present |
| Diode bridge (short circuit) | Battery drains while the truck is parked | Parasitic draw disappears when the B+ cable is disconnected |
| Stator winding | Low voltage, housing overheating | Smell of burnt varnish, discolouration on the winding |
| Rotor winding | No output whatsoever | Slip rings and brushes are fine, no field builds up |
| Bearings | Continuous whine or rumble | Noise and play persist with the belt removed |
| Overrunning alternator pulley | Belt vibration, squealing, dropping charge | Pulley locked in both directions, or spinning completely free |
How Do the Belt, Pulley, and Overrunning Alternator Pulley Affect the Alternator?
However sound the alternator itself is, if the drive reaching it is bad, output will be bad too. On heavy commercial vehicles the alternator, water pump, air-conditioning compressor, and fan are usually all turned by a single multi-rib belt, running over one tensioner and several idler pulleys. When belt tension drops, the alternator is the first unit to suffer, because it demands the most torque under load.
Slippage creeps in quietly: at first only a brief squeal on cold mornings, as the belt's working surface glazes over and loses grip. At this stage charging voltage sags at idle and recovers as revs rise, and drivers tend to blame the alternator itself. Oil, diesel, or coolant reaching the belt path speeds up the same outcome; replacing the belt without finding the source of the leak just puts a new one in the same position within weeks. For a detailed check sequence covering accessory-belt noise and tensioner-pulley failures, see our V-belt and tensioner pulley guide.
One mix-up worth clearing up: the accessory belt that drives the alternator and the timing belt that drives the engine's valve timing are not the same thing. When the accessory belt breaks, the truck stops charging and, on most vehicles, loses cooling and power steering assist too, but the engine itself isn't mechanically damaged — a failure on the timing side has far more severe consequences. The reasons behind that distinction are covered in the guide on when a timing belt should be replaced and what happens if it breaks.
What Does the Overrunning Alternator Pulley Do, and What Happens When It Fails?
Large-displacement diesel engines produce noticeable rotational irregularity at the crankshaft: every firing stroke accelerates the shaft, every compression stroke slows it down. The alternator's rotor, held back by its own inertia, resists following these rapid swings, and the mismatch shows up as constant tension-and-slack cycling on the belt. The overrunning alternator pulley separates the two worlds by transmitting drive in one direction while letting the rotor spin freely in the other; belt tension steadies, squealing drops, and bearing life extends.
Two failure patterns show up when the pulley itself fails. If the one-way mechanism seizes, the pulley behaves like a solid pulley: belt vibration and noise increase and the tensioner wears out fast. If it spins completely free instead, drive never reaches the rotor at all and the charge lamp lights up — the belt is intact and properly tensioned, yet the alternator simply doesn't turn. There's a quick field check for this: turning the pulley by hand should drag the rotor in one direction and spin freely with an audible ratchet in the other.
What to Watch for During Alternator Replacement and Overhaul
Replacing an alternator isn't mechanically difficult; most mistakes happen not during removal but during electrical prep and post-installation verification.
- Switch off the master (battery) switch and disconnect the battery from the system. On vehicles fitted with telematics, tachograph, or other control units, follow the OE procedure for cutting supply.
- Insulate the end of the B+ cable before removing it — this terminal is wired directly to the battery, and contact with the chassis will cause a fire.
- Note the belt's routing and the tensioner's position. Release the tensioner with the correct tool; forcing the belt off damages both the belt and the pulley.
- Assess the belt, tensioner pulley, and idler pulleys together; if any show cracking, glazing, or bearing noise, replace them in the same job.
- Clean corrosion and paint off the mounting surfaces, mounting ears, and the chassis ground point. If ground resistance is left unaddressed, the new unit will underperform too.
- Tighten fasteners to the OE-specified torque values and sequence. An over-tightened B+ nut lets the terminal spin and breaks the internal connection; a loose one causes contact resistance and heating.
- Check pulley alignment; a misaligned pulley eats the belt from one edge and loads the bearings sideways.
- Seat cable ends, terminals, and protective boots fully. Forgetting to connect the D+ terminal is one of the most common reasons a perfectly good alternator produces no charge at all.
- Reconnect the battery, switch on the ignition, and confirm the charge lamp lights up; it should go out once the engine starts, voltage should reach the expected band, and the band should hold with consumers switched on. Re-measure voltage drop and ripple, clear fault codes, and log the values.
Whether to overhaul or replace depends on the type of failure. Brushes, the regulator, bearings, and slip rings are wear items; on a unit with a sound housing, an overhaul can be economical. Stator or rotor winding burnout, a cracked housing, or discolouration from heat, on the other hand, mean an overhaul won't last. Duty cycle also plays into the decision: on a tractor unit where downtime is expensive, reliability outweighs workshop cost.
Charging System Technical Values and Reference Ranges
The table below lists the measurements most commonly used in the field, along with general reference ranges. These are workshop benchmarks for judging whether a reading looks healthy; the final target values are defined in the current OE service manual for the vehicle's engine and chassis code.
| Measurement | General reference | What a deviation indicates |
|---|---|---|
| System voltage | 24V (two 12V batteries in series) | Balance is upset if one battery is weak |
| Resting voltage (ignition off) | Above roughly 25V for a fully charged pair | Low means discharged or aged battery |
| Regulated charging voltage (mid revs) | Approx. 27.5-28.5V at 24V; 13.8-14.4V at 12V | Below is undercharging, above is overcharging |
| Ripple (AC component) | General workshop threshold around 0.5V AC | High readings make the diode bridge suspect |
| B+ line voltage drop | Generally under 0.5V under load | High readings mean a resistive cable or terminal |
| Ground line voltage drop | Generally under 0.2V under load | High readings mean a corroded or loose ground point |
| Typical output current | Commonly 80-150A on 24V applications | Varies by equipment fitted, drops at idle |
| Parasitic draw (ignition off) | Defined by the vehicle's equipment fit-out | High readings mean a shorted diode or an unsleeping module |
| Belt tension and fastener torques | OE-specified values are authoritative | Loose causes slip, over-tight damages terminals |
Maintenance, Lifespan, and Fleet Checklist
What determines an alternator's lifespan isn't mileage but operating hours combined with heat, vibration, and contamination load. The same unit can run trouble-free for years on long-haul work, while one running short city routes with constant idling wears out far sooner.
- Belt and tensioner check: Belt ribs, cracking, and glazing, along with tensioner and idler-pulley noise, should be assessed at every periodic service.
- Connection and ground discipline: Battery terminals, the B+ terminal, and ground points should be kept clean and tight; a warm connection is an early-warning sign of failure.
- Ventilation ducts: If dust, mud, and oil residue block the cooling ducts, diode and winding temperatures rise — a large share of heat-related failures start here.
- Washing precautions: Never point a high-pressure washer directly at the alternator; water entering through seals and vents degrades the slip-ring and brush surfaces.
- Leak tracking: Oil or coolant dripping onto the belt path both makes the belt slip and coats the housing in grime; replacing the belt without finding the source is not a lasting fix.
- Battery pair health: Batteries should be measured individually, the gap between them tracked, and they should always be renewed together.
- Voltage logging and idle discipline: Track charging voltage and the lowest voltage seen at cranking; not leaving consumers on unnecessarily during long stops extends both battery and alternator life.
Where Does the Alternator Sit in the Charging Chain?
The alternator can't be judged in isolation; it sits in the middle of a chain. The chain starts at the battery, runs through the master switch and cabling to the starter motor; once the engine is running, it shifts to the drive side: crank pulley, accessory belt, tensioner, and alternator pulley. The current produced is rectified at the diode bridge, carried to the battery and network by the B+ cable, and the circuit closes through chassis ground. When one link weakens, the symptom often shows up on a completely different link.
The most common mix-up happens on the starter side. A sluggish morning crank is usually blamed on the starter motor, when the actual cause is a battery that never fully recharged overnight — a shortfall on the charging side. The reverse also happens: a starter motor with high internal resistance draws more than expected on every start and keeps the battery permanently half-charged. For how the symptoms of the two systems are told apart, and how to read brush wear, the starter motor failure symptoms and brush replacement guide is the natural continuation of this section.
In summary, an alternator failure is almost never a failure of one part in isolation. Problems fall into three categories: slack or a failed pulley on the drive side, resistance at connections and ground, and worn brushes, regulator, or diode bridge inside the alternator itself. Telling these apart isn't a matter of swapping parts but of four measurements: resting voltage, charging voltage under load, ripple, and voltage drop. Whenever there's uncertainty, the current OE service documentation specific to the vehicle's engine and chassis code is authoritative.
At the other end of the same circuit sits the unit that turns the engine over on current drawn from the battery; how its symptoms are distinguished is covered in the starter motor guide.
Shop this part: Electric System
Main guide: What Is a Crankshaft? Function, Failure Symptoms and Maintenance
Tags
Frequently Asked Questions
- What is an alternator and what does it do?
- An alternator is the generator that takes the engine's rotation off the drive belt and converts it into electrical energy. While the vehicle is running, it powers every electrical consumer and charges the battery at the same time. The current it produces is alternating current; the diode bridge inside the housing converts that into the direct current the vehicle's network actually uses.
- Is a charging alternator the same thing as a dynamo?
- In everyday shop talk, yes — people still say 'dynamo' out of habit, while parts catalogues and fault codes use 'alternator.' Technically they're not the same machine. A classic dynamo generates DC and routes its entire output current through brushes. In an alternator the generating windings are fixed, the rotating part is just an electromagnet, and only a small field current passes through the brushes — which is why it delivers more current and lasts longer.
- What are the symptoms of alternator failure?
- The most common signs are the battery or charge warning light coming on, headlights dimming at idle at night, a battery that keeps going flat, and a slow crank in the morning. On the mechanical side, look for belt squeal, a whine or hum from the alternator, and a smell of burnt varnish. With overcharging, electrolyte drops, the battery runs hot, and bulbs blow more often than they should.
- How can you tell if the problem is the battery or the alternator?
- Three measurements separate them: resting voltage, charging voltage with the engine running, and any parasitic current still flowing with the engine off. If voltage with the engine running never climbs above resting voltage, there's no output and the alternator side is at fault. If charging voltage is normal but the truck still goes flat overnight, check battery capacity and parasitic draw instead.
- What should charging voltage be on a 24V truck?
- On 24V systems, regulated charging voltage generally sits between 27.5 and 28.5 volts; on 12V systems, that band is 13.8 to 14.4 volts. Because the regulator compensates for temperature, the upper end of the band is normal when cold and the lower end once the engine is warm. These are general reference figures — the current OE service manual for the vehicle's engine and chassis code sets the actual target values.
- What happens when the alternator brushes wear out?
- As the brushes wear, spring pressure drops and contact breaks under vibration, so charging cuts out intermittently rather than failing outright. The classic symptom is the charge lamp flickering over speed bumps or at idle. If the slip-ring surface has grooved or discoloured, fresh brushes will wear out just as fast, so the ring surface always needs checking too.
- What happens when the alternator's diode bridge fails?
- An open-circuit diode takes one phase out of service: output current drops, voltage collapses under load, ripple grows, and the battery never fully charges — you may also hear interference on the radio. A shorted diode opens the reverse path instead, so the battery discharges back through the alternator while the engine is off. In that case, disconnecting the B+ cable makes the parasitic draw disappear, confirming the diagnosis.
- Can you keep driving with a failed alternator?
- The vehicle will keep running for a while, until the battery is exhausted — and that window can be very short on a loaded truck running with headlights on at night. As voltage drops, the lights weaken, electronic control units start behaving erratically, and the engine eventually stalls. Once the charge lamp comes on, shut off unnecessary consumers and head to the nearest safe stop rather than continuing the trip.
- Does a loose alternator belt cause the charging voltage to drop?
- Yes. The alternator demands more torque under load than any other belt-driven accessory, so when belt tension drops, it's the first to slip on the pulley. Charging voltage sags at idle and recovers as revs climb, usually along with an audible squeal. Oil or coolant reaching the belt path speeds up the same failure — replacing the belt without finding the leak's source is never a lasting fix.
- Should a failed alternator be overhauled or replaced?
- Brushes, the regulator, bearings, and slip rings are wear items, so an overhaul can be economical on a unit with a sound housing. But if the stator or rotor winding has burned out, the housing is cracked, or the unit shows heat discolouration, an overhaul won't last long. Duty cycle matters too: on a tractor unit where downtime is expensive, reliability outweighs the workshop bill.
Related Articles
What Is a Starter Motor? Failure Symptoms and Brush Replacement
What a starter motor does, common failure symptoms, battery-vs-starter diagnosis, voltage drop testing and brush replacement for heavy-duty trucks.


