What Is an Oil Cooler? Failure Symptoms and Rupture
What is an oil cooler and how does it fail? Oil cooler symptoms, leak direction, milky coolant, and rupture causes in heavy-duty trucks.
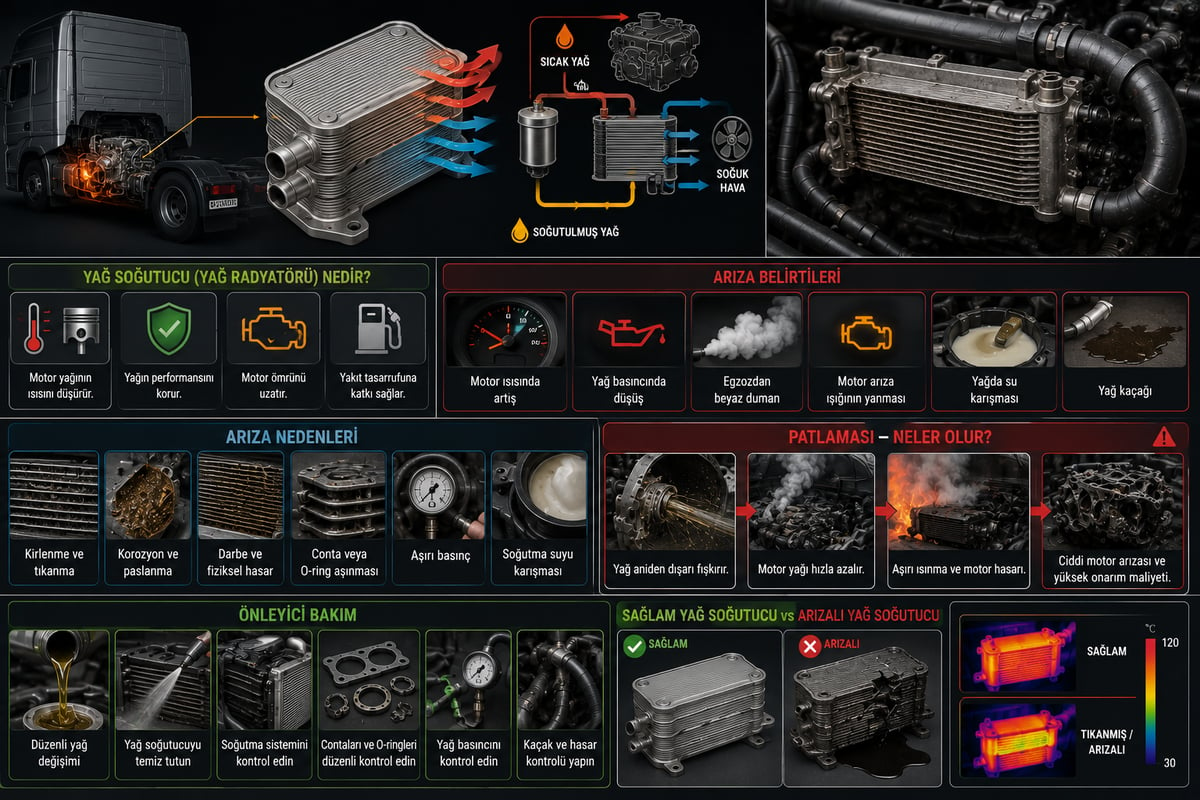
One morning the coolant in a fleet truck's expansion tank is no longer clear: a light brown, creamy foam sits on the surface. The engine runs at normal temperature, no white smoke comes from the exhaust, and the driver reports no noticeable loss of power. The diagnosis that comes to mind first in the workshop is ready-made — "the head gasket has gone" — and the engine gets opened up. Yet there is a second source that produces the exact same picture, and more often than not it is the one actually at fault: the oil cooler, which carries oil and coolant on either side of a thin metal wall. Once a single micron-scale path opens in that wall, two circuits that should never mix become one — and which way the leak flows determines how much time the engine has left.
Why Does Engine Oil Need Cooling? Its Role and Location
An oil cooler is a heat exchanger that keeps oil temperature within its working band by transferring the heat the engine oil carries to another fluid across a thin-walled metal surface. Cooling the oil here is not a comfort feature — it protects the oil's load-carrying capacity: as temperature rises, viscosity drops, the film separating bearing surfaces thins out, and past a certain point lubrication becomes physically impossible.
In heavy-duty engines, oil does not only reduce friction — it is also a cooling fluid. Piston-cooling jets spray oil onto the underside of the piston crown, friction heat in the main and connecting-rod bearings passes straight into the oil, and oil returning from the turbocharger bearing carries the heat of the exhaust side with it. All of this heat collects in the sump; a significant share of the heat the engine rejects leaves not through the water jacket but directly through the oil circuit.
That is why the oil cooler sits directly on the main artery of the oil circuit. The oil pump draws oil from the sump and pressurises it; the oil is usually routed through the cooler and the filter before it reaches the main gallery. On some engines the cooler is a single module combined with the filter housing; on others it is a tube bundle set inside the water jacket in the block; on still others it is a separate-bodied exchanger bolted to the side of the block.
Are Oil Cooler, Oil Radiator, and Heat Exchanger the Same Thing?
In the field all three names are used for the same part, but there is a meaningful distinction between them. Heat exchanger is the general term, covering any assembly that transfers heat between two fluids. Oil cooler, in heavy-duty vehicles, usually refers to the water-oil exchanger that works between coolant and oil. Oil radiator, meanwhile, describes the finned type that cools oil directly with airflow. The distinction matters: an internal leak in a water-oil exchanger mixes the two circuits together, while a leak in an air-cooled radiator simply drains outward.
Why Is an Oil Cooler Mandatory on Heavy-Duty Vehicles?
On a passenger-car diesel, an oil cooler is optional in most applications; on a heavy-duty vehicle it is a mandatory component. The reason is not engine displacement but duty cycle. A loaded tractor unit runs for hours in the high-torque range, at steady revs and close to full load; the idling and stationary periods that let a city vehicle cool down are almost absent on a long haul.
The second factor that raises the heat load is the type of work. A vehicle climbing a grade in a low gear has falling airflow while engine load is at its ceiling; a tipper working on a construction or mining site combines idling, low speed, and high load at the same time. A tractor unit driving a hydraulic pump through a power take-off loads the engine even while stationary. In stop-and-go traffic in summer heat, airflow ahead of the radiator weakens, and once a front surface clogged with dust and insect debris is added on top, the entire cooling chain is put under strain.
The third factor is the design itself. As emissions regulations have tightened, exhaust gas recirculation, high injection pressures, and high specific power output have become the norm; extracting more power from the same displacement means pulling more heat out of the same volume of oil.
When these factors combine, a second function of the oil cooler emerges: warming the oil during cold starts. In winter, coolant warms up faster than oil, and in the first few minutes the water-oil exchanger carries heat in the reverse direction, from coolant to oil. Seen this way, the oil cooler is less a cooler than a balancer that limits oil temperature from both directions.
Oil Temperature, Viscosity, and Oil Film Thickness
Understanding why the oil cooler exists takes just one chain of cause and effect: temperature rises, viscosity drops, the oil film thins, and once the film reaches a load it can no longer carry, metal-to-metal contact begins. Oil's job is to form a hydrodynamic film that keeps the bearing surface and the shaft surface apart; this film is only microns thick and depends directly on viscosity.
The second chain is chemical. Oil's oxidation rate rises sharply with temperature; a rule of thumb widely accepted in lubrication engineering is that above a certain band, every ten-degree rise roughly doubles the oxidation rate. Oxidised oil darkens, turns acidic, and sticks to surfaces first as varnish and then as sludge. This is why oil cooler performance determines not only bearing safety but also whether the oil change interval can actually be met.
| Temperature band | Oil's behaviour | Effect seen on the engine |
|---|---|---|
| Below operating temperature (cold engine) | Viscosity high, flow resistance high | Oil pressure high, bypass open, wear risk until warm-up |
| Normal operating band | Viscosity within target range, film stable | Bearing safety and fuel consumption balanced |
| Upper edge of the band, heavy load and gradients | Viscosity reduced, film thinned | Tendency for oil pressure to drop, marginal lubrication |
| Sustained overtemperature | Oxidation accelerates, additive package depletes | Varnish and sludge formation, shortened oil life, coking in the turbo bearing |
The bands in the table are behavioural thresholds, not numeric ones; the oil temperature range each engine actually tolerates can only be read from the OE documentation for that specific engine code. What works in the field is not an absolute figure but a trend: if the same vehicle on the same route shows a noticeably higher oil temperature than it did in previous months, something in the cooling chain has changed.
How Does an Oil Cooler Work? The Three Variables of Heat Transfer
The heat transferred in a heat exchanger depends on three things: the temperature difference between the two fluids, the surface area the heat passes through, and the fluids' flow rate. Hot oil enters on one side, relatively cool coolant on the other; the thin metal wall between them conducts heat but not the fluids themselves. In most designs the two flows run in opposite directions; this arrangement keeps the temperature difference more even along the channel and lets more heat be transferred across the same surface.
The practical advantage of a water-oil exchanger is that the temperature on the cooling side stays stable. Engine coolant is held within a narrow band by the thermostat, so the cold side of the oil cooler remains relatively independent of ambient temperature, road speed, and a clogged front grille. In an air-cooled oil radiator, on the other hand, the cold side is outside air, and its capacity drops noticeably at low speed under heavy load.
The system often also includes a thermostatic valve or a bypass channel. Routing cold oil through the cooler is both unnecessary and a source of pressure loss; the valve routes the oil around the cooler in this case and opens once the oil has warmed up. A safety bypass is another application of the same logic: once the pressure difference between inlet and outlet exceeds a limit, oil skips the cooler and goes straight to the main gallery. The engine does not run out of oil, but the oil is no longer being cooled — which is why a clogged oil cooler usually shows up not as a low oil pressure fault but as unexplained high oil temperature.
Oil Cooler Types and Their Locations
Four designs operate side by side across the heavy-duty fleet, and the difference is not just in appearance; failure mode, diagnostic method, and removal difficulty all vary by type.
In a plate exchanger, thin stamped plates are stacked and brazed together; oil and coolant pass through alternating channels. It is common on modern engines because it delivers very high surface area in a small volume. In a tube-bundle type, one fluid passes through a bundle set inside a housing while the other passes around it; on heavy-duty vehicles this bundle is often seated in the water jacket on the block. In integrated modules, the cooler, the filter housing, the thermostatic valve, and the bypass are all in a single body. In an air-cooled oil radiator, oil is routed through a finned core and cooled directly by airflow.
| Type | Cooling medium | Typical location | Strengths and weaknesses |
|---|---|---|---|
| Plate exchanger | Coolant | Beside the block or on the filter module | High capacity in a small volume; an internal leak mixes the two circuits and cannot be repaired |
| Tube bundle (shell-and-tube) | Coolant | Set inside the water jacket in the block | Durable and serviceable; removal takes longer, with gaskets at multiple points |
| Module integrated with the filter housing | Coolant | Single body with the oil filter housing | Valve and bypass combined; a failure widens the scope of parts to replace |
| Air-cooled oil radiator | Outside air | In front of or beside the coolant radiator | Does not mix the circuits; capacity depends on road speed and front-surface cleanliness |
| Transmission and retarder oil cooler | Coolant or air | On the driveline unit or in the radiator pack | Independent of the engine circuit; a leak contaminates it with transmission oil |
Knowing the type is the first step of diagnosis. On a vehicle where oil shows up in the expansion tank, the transmission or retarder cooler sharing the same radiator pack is just as much a suspect as the engine oil cooler; the smell, colour, and consistency of the mixed oil usually gives away which circuit it came from.
Neighbours in the System: Oil Pump, Filter Housing, Thermostatic Valve, and Bypass
The oil cooler sits in the middle of the oil circuit — a link that bears the consequences of the oil's pressure and cleanliness without being responsible for either. Two components in the chain directly shape its behaviour. The first is the oil filter: when the filter is neglected or the wrong grade of element is fitted, the filter bypass opens, unfiltered oil enters the circuit, and soot, wear particles, and oxidation products start to collect at the narrowest cross-section — the cooler's channels. Filter discipline therefore also determines the cooler's service life; this is covered in detail in the Engine Oil Filter: Faults, Diagnosis, Replacement Guide guide. The second is the thermostatic valve and bypass assembly: if the valve sticks open, the oil is never cooled; if it sticks closed, cold oil is forced through and the resulting pressure difference fatigues the body.
The neighbours on the coolant side are just as decisive. If the thermostat, water pump, radiator, fan clutch, or expansion tank cap is not in good condition, the cold side never gets cool enough, and oil temperature rises even though the cooler itself is flawless. A common mistake in the field is for a team seeing high oil temperature to replace the cooler straight away; the circulation and temperature of the coolant circuit should be proven first.
The Two Directions of an Internal Leak: Does Oil Enter the Coolant, or Coolant Enter the Oil?
The characteristic failure of a water-oil exchanger is a breach in the wall that separates the two fluids. The breach itself is a single event, but it produces two different failure pictures, and which one appears at any given moment depends on which side has the higher pressure.
While the engine is running, oil circuit pressure sits well above coolant circuit pressure; the oil side operates in the range of a few bar, while the coolant circuit is limited by cap pressure to a much lower level. This is why, on a running engine, the leak almost always flows from oil into coolant: oil crosses into the coolant and appears in the expansion tank as brown foam. Once the engine is shut down, oil pressure drops to zero while the pressure the coolant circuit built up from heat is retained for a while longer; at this stage the flow reverses and a coolant-to-oil transfer begins. When the vehicle is started the next morning, the water that has collected in the sump emulsifies with the oil and produces a milky-coffee appearance.
Both directions occur in sequence on the same engine, and that is what makes diagnosis difficult. A team that only checks the expansion tank spots the leak early; a team that only checks the dipstick may see nothing at all unless the vehicle has been parked for a long stretch. The right approach is to check both sides at the same service visit.
| Direction of the leak | When it dominates | Symptom | How it is detected | Effect on the engine |
|---|---|---|---|---|
| Oil enters coolant | While the engine runs, when oil pressure is high | Brown, creamy foam in the expansion tank; oily film on the radiator's top surface | Visual check of the tank surface and underside of the cap; a coolant sample is taken | Water pump seal and hoses deteriorate, cooling efficiency drops |
| Coolant enters oil | While the engine is off and cooling, while the coolant circuit is pressurised | Milky-coffee-coloured emulsion on the dipstick, rising oil level | A bottom sample is taken from the sump; oil level and consistency are monitored | The oil film loses load-carrying capacity, causing rapid bearing wear and corrosion |
| Both directions alternating | Over the daily run-stop cycle | Foam in the tank and cloudiness on the dipstick together | Both circuits' levels are logged together over several days | The failure progresses quickly; delay turns it into a major repair |
| External leak (body or gasket) | On a hot engine, under pressure | Oil or coolant trace around the body, a dried crust once it evaporates | Surface is cleaned, engine warmed up, and the leak point is searched for again | Level loss continues; no mixing occurs, but the risk of running dry appears |
Further reading
For a plain-language technical overview of this subject, see the reference article on Wikipedia. Always confirm specific figures and procedures against the vehicle manufacturer service data.
What Do Brown Foam and a Milky Appearance Actually Mean?
An emulsion is the dispersion of two immiscible liquids into one another under mechanical agitation. Oil and water normally separate; but the mixing action created by the crankshaft, the pump impeller, and flow turbulence produces micron-scale droplets and turns the mixture stable. Its colour and consistency reveal which liquid is dispersed in which.
If light brown, creamy foam is seen in the expansion tank, oil is dispersed in the coolant; this pattern is the classic sign of an oil-to-coolant leak and comes together with an oily film clinging to the tank wall, the underside of the cap, and the radiator's top chamber. If there is a milky-coffee-coloured, dark, sticky layer on the dipstick or under the filler cap, water is dispersed in the oil. The critical distinction is this: a creamy layer under the cap is not proof on its own. On vehicles that run short distances and never reach normal oil temperature, condensation collects on the cool cap surface and produces the same appearance; this kind of condensation does not settle to the bottom of the sump.
Sampling is the method that settles the distinction for certain. After the engine has been off for a while, the sump drain plug is loosened carefully and the first fluid to come out — the bottom sample — is collected. Water is heavier than oil and settles at the bottom; if that first portion contains clear water or a dark emulsion, it is a genuine water ingress. Oil analysis is used to confirm the mixing for certain; finding glycol traces in the result is the strongest proof of coolant ingress.
Head Gasket or Oil Cooler? How to Tell the Difference
Oil and coolant mixing is a shared symptom of two different failures, and there is a large gap between their repair costs. A head gasket failure requires opening up the top of the engine, measuring the head surface, and often machining it flat; an oil cooler failure, by contrast, is usually resolved with a single module and a gasket set.
The core idea behind the distinction is this: a head gasket leak usually brings the combustion chamber into the circuit, while an oil cooler leak does not. When combustion gas enters the coolant, circuit pressure rises, bubbles appear, and a test for combustion byproducts in the coolant comes back positive. When coolant enters the combustion chamber, sweet-smelling white smoke comes from the exhaust. None of this appears with an oil cooler leak; only the two fluids mix, while compression and combustion stay normal.
| Finding | Head gasket | Oil cooler |
|---|---|---|
| Combustion gas test in coolant | Usually positive, test fluid changes colour | Negative, no combustion byproducts found |
| Continuous bubbling and pressure rise in the expansion tank | Continues even at idle | Not seen, pressure stays normal |
| White, sweet-smelling smoke from the exhaust | Commonly seen | Not seen |
| Compression or cylinder leakage test | Marked deviation on one or two cylinders | All cylinders normal |
| Timing of the mixing | Progresses continuously while the engine runs | Increases noticeably during shutdown and cooling |
| Fluid loss under a coolant circuit pressure test | Escapes into the cylinder, level drops, no trace visible outside | Escapes into the oil circuit, sump level rises |
When reading this table, no single finding should be relied on alone; if an engine has been run for a long time with a failed oil cooler, overheating can appear too, because cooling efficiency has dropped. The call should only be made once at least two independent findings point the same way.
The Logic of Pressure Testing: How Is a Leak Proven?
The purpose of a pressure test is not to see the failure but to prove, by isolating it, which circuit is leaking into which. The logic is simple: controlled pressure is applied to one of the two circuits and the other is observed; if the pressurised circuit loses fluid while the opposite circuit gains it, a path has opened between them. The sequence below is not a step-by-step procedure but the order in which the diagnostic logic operates; the pressure values and adapter types to use vary by engine and are taken from the OE documentation.
- First rule out visible leaks: clean around the body, the gasket faces, the hose clamps, and the fittings, warm the engine up, and determine whether any trace of leakage is external or internal.
- Record the level of both circuits. If a rise in oil level and a drop in coolant level are seen at the same time, the direction is most likely coolant into oil.
- Apply controlled pressure to the coolant circuit, staying below cap pressure, and watch whether the pressure drops over time. If pressure drops with no trace outside, the fluid is going somewhere.
- While under pressure, watch the dipstick and the sump; a rising level or clear water coming from the drain plug is direct proof that coolant is entering the oil circuit.
- Rule out the combustion chamber circuit: run a combustion gas test on the coolant and verify the engine's compression or cylinder-leakage behaviour. If the test is positive, suspicion shifts to the head gasket.
- If possible, isolate the oil cooler from the circuit and test it on its own; on removable types, both ports are capped, the unit is air-tested at the specified low pressure, and it is checked for bubbles in a water bath. On non-removable types, the inlet and outlet are temporarily bridged and it is checked whether the symptom disappears.
- Back up the finding with laboratory analysis: glycol and water traces in oil analysis, and oil content in coolant analysis, put a number on the decision and prevent unnecessary teardown.
- Repeat the same test after the repair; retesting serves as both confirmation and a check on how clean the circuits are.
The method has a limit: a very small internal leak can close up on a cold engine at low pressure, giving no finding during the test and reopening once the vehicle is back on the road. For this reason, tests should be run at operating temperature, and level tracking should be continued for several days on vehicles that come back negative.
Clogging and Oil Pressure: What Happens When the Bypass Kicks In?
The second major failure mode of an oil cooler is not a leak but clogging. The channel cross-sections are narrow and can be restricted from either side: on the oil side, oxidation products, soot, sludge, and wear particles build up; on the coolant side, scale, sediment, and the gel-like deposit left by degraded antifreeze do the same job. On the air-cooled type there is a third route: the fins of the core getting coated from outside with dust, oil, and insect debris.
Clogging first widens the pressure difference. As the gap between the cooler's inlet and outlet grows, the oil loses more pressure to push the same flow through. If a safety bypass is fitted, it opens once the difference exceeds a certain point and the oil skips the cooler; the engine does not run out of oil, but the oil is no longer cooled. This is why the first indicator of a clogged cooler is usually not low oil pressure but unexplained high oil temperature and premature darkening of the oil. On a setup with no bypass, or where the bypass itself is clogged, the result is a direct pressure loss instead.
The two failures are often confused with each other here. On a vehicle showing a low oil pressure warning, the first suspects are usually the oil pump or bearing clearances; yet excessive pressure loss across the cooler can produce the exact same warning. All the possible sources of low oil pressure, the measurement method, and the pump-side causes are covered in the Low Engine Oil Pressure: Symptoms, Causes, and the Role of the Oil Pump guide; suspicion of the cooler should be weighed as one link in that same chain.
The most expensive consequence of clogging is indirect: uncooled oil oxidises quickly, oxidised oil produces more deposit, and the deposit clogs the channels further still. The chain feeds itself, which is why high oil temperature should be read as an early warning of the failure, not the failure itself.
Gasket, O-Ring, and Body Ageing: Why Does an Oil Cooler Rupture?
The phrase "the oil cooler ruptured" describes two different events in the field: an internal leak from a breach in the wall, and a sudden external leak from the body or gasket opening up. Several mechanisms sit behind each one, and almost all of them develop over time.
The most common mechanism is corrosion. Antifreeze does not only prevent freezing; the inhibitor package it contains protects aluminium, copper, and solder surfaces. Once the additive package is depleted, or once fluids of different specifications are mixed, that protection disappears; electrochemical attack begins in an exchanger body where different metals sit together, the wall thins from the inside, and eventually a pinhole opens. In circuits topped up with tap water, scale and chloride noticeably accelerate this process.
The second mechanism is thermal fatigue. The exchanger heats up and cools down with every start-stop cycle; stress builds up at the joints between materials with different expansion coefficients, especially at brazed plate edges, and a micro-crack forms after a large number of cycles. Thermal shock events — such as adding cold water to an overheated engine — can open the same kind of crack in a single instance.
The third is pressure spikes: oil thickened by very cold weather is forced through the cooler's channels, and the body is exposed to high pressure until the bypass opens; on a clogged cooler, a permanently high pressure difference keeps stressing the body continuously. The fourth is gasket and O-ring ageing: elastomers harden and take a permanent set under thermal cycling; an aged O-ring does not seal the same way once it has been removed and refitted, which is why renewing it at every disassembly is treated as a rule. The fifth is freeze damage: in a circuit that goes into winter with an inadequate antifreeze ratio, freezing water expands in volume and tears the thin-walled channels from the inside.
What all these mechanisms have in common is that none of them is sudden. The cooler "ruptures" on a single day, but the failure spends months getting ready for it. Removal order, cleaning the mating surfaces, gasket selection, and torque discipline are a separate subject; for the step-by-step replacement procedure and the checks to make after reassembly, see the Oil Cooler: Failure Symptoms, Replacement & Maintenance Guide guide.
Failure Symptoms, Maintenance, and Service Life
There is no fixed replacement interval for an oil cooler; its service life is determined not by mileage but by the condition of the two fluids passing through it. One of two vehicles with the same engine may cover a high mileage without issue while the other, whose antifreeze was not renewed on time, can develop a leak much earlier.
| Symptom | Likely mechanism | Initial verification |
|---|---|---|
| Brown, creamy foam in the expansion tank | Internal leak, oil into coolant | Tank and cap surface are inspected, a coolant sample is taken |
| Milky-coffee-coloured emulsion on the dipstick | Coolant-to-oil transfer, during shutdown | A bottom sample is taken from the sump; oil analysis checks for glycol |
| Unexplained rise in oil level | Coolant collecting in the sump | Both circuits' levels are recorded together over several days |
| High oil temperature, normal coolant temperature | Cooler clogged or bypass stuck open | Oil and coolant temperature are monitored together under load |
| Oil pressure that drops once warm | Excessive pressure loss in the cooler, or oil has thinned | Cold and hot pressure are compared with a gauge |
| Premature darkening of the oil, shortened oil life | Oxidation under sustained high temperature | Oxidation and viscosity trend are tracked with oil analysis |
| Persistent drop in coolant level | Internal leak or a body/gasket leak | Controlled pressure is applied to the circuit and loss is monitored |
| Oil or antifreeze crust around the body | Gasket and O-ring ageing | Surface is cleaned, engine warmed, and the leak searched for again |
| Premature deterioration of the water pump and hoses | Oil that has entered the coolant circuit is swelling the rubber | The inner hose surface and the seal area are inspected |
On the maintenance side, the tasks are few and cost far less than the failure itself. The items below can be added directly to a fleet's checklist.
- Antifreeze discipline: Renew the coolant based on whichever comes first, the manufacturer's specified time or mileage; do not mix fluids of different specifications, and never top up with tap water.
- Oil change interval: Shorten the interval for heavy-duty profiles, dusty sites, and stop-heavy work; renew the oil filter at every oil change.
- Reading both levels together: The daily check should cover the expansion tank as well as the dipstick, not just the dipstick alone; both levels moving together is an early warning.
- Tracking the temperature trend: Compare oil and coolant temperature on the same route using telematics or dashboard data; a deviation in the trend shows up before the part actually fails.
- Front-surface cleaning: Clean the front face of the air-cooled oil radiator and the radiator pack regularly, without crushing the fins.
- Post-repair flushing: Once an internal leak has been repaired, flush both circuits with the proper procedure; leftover contamination affects the new part in short order.
- Periodic oil analysis and record-keeping: Analysis catches glycol and water traces before any visible symptom appears; log the replaced cooler, gasket set, and antifreeze type in the vehicle file.
The oil cooler is the silent link in the engine lubrication chain: it gives no sign of itself while working, and when it fails, it puts the health of two separate systems at risk at once. That is why a vehicle coming into the workshop with an "oil is mixing" complaint marks the start of the diagnosis, not the end of it. The correct sequence is clear: first establish the direction of the mixing, then rule out the combustion chamber circuit, then prove the source with an isolated pressure test, and only then replace the part and flush the circuits. At every stage, the current OE service documentation for the vehicle's specific engine and chassis code is authoritative.
Shop this part: Engine Oil Cooler
In-depth technical guide: For fault diagnosis, step-by-step replacement and service intervals: Oil Cooler: Failure Symptoms, Replacement & Maintenance Guide
Main guide: Water Pump: Faults, Replacement & Maintenance Guide
Tags
Frequently Asked Questions
- What is an oil cooler and what does it do?
- An oil cooler is a heat exchanger that transfers the heat carried by engine oil to another fluid across a thin-walled metal surface. Its purpose is to keep oil temperature within its working band; when temperature rises, viscosity drops and the oil film separating bearing surfaces thins out. In heavy-duty vehicles, oil is also a cooling fluid that carries heat away from the pistons, bearings, and turbo bearing area.
- What is the difference between an oil cooler and an oil radiator?
- In heavy-duty vehicles, oil cooler usually refers to the water-oil exchanger that works between coolant and oil. Oil radiator describes the finned type that cools oil directly with airflow. The distinction matters: an internal leak in a water-oil exchanger mixes the two circuits together, while a leak in an air-cooled radiator simply drains outward.
- What are the symptoms of a failed oil cooler?
- The most typical symptoms are brown, creamy foam in the expansion tank, a milky-coffee-coloured emulsion on the dipstick, and an unexplained rise in oil level. When clogging is the issue, oil temperature rises while coolant temperature stays normal, the oil darkens prematurely, and oil pressure can drop below expected once the engine is warm. An oil or antifreeze crust around the body points to an external leak.
- What happens when an oil cooler ruptures?
- A breach in the wall lets oil and coolant mix with each other. Because oil pressure is higher while the engine runs, the leak usually flows from oil into coolant; once the engine has stopped and cooled, coolant flows into the oil instead. Mixed oil loses its film strength, and mixed coolant degrades hoses and the water pump seal, which is why the vehicle should not continue on the road.
- What does brown foam in the expansion tank mean?
- It means oil is dispersed in the coolant — an internal leak flowing from oil into coolant. It usually appears together with an oily film clinging to the tank wall, the cap surface, and the radiator's top chamber. Cloudiness can start appearing on the oil side of the same engine not long afterward.
- Does a milky dipstick always mean an oil cooler failure?
- No. On vehicles that run short distances and never reach normal oil temperature, condensation collects on the cool cap surface and produces a similar creamy layer, but this condensation never settles to the bottom of the sump. To confirm for certain, a bottom sample is taken from the sump drain plug after the engine has been off for a while, and oil analysis is used to check for glycol traces if needed.
- How do you tell an oil cooler failure apart from a head gasket failure?
- A head gasket leak usually brings the combustion chamber into the circuit: a combustion gas test on the coolant comes back positive, bubbling and pressure rise appear in the tank, and sweet-smelling white smoke can come from the exhaust. None of this appears with an oil cooler leak — only the two fluids mix, while compression and combustion stay normal. The call should be based on at least two independent findings pointing the same way.
- How is an oil cooler leak proven with a pressure test?
- The purpose of the test is to isolate which circuit is leaking into which. Controlled pressure, staying below cap pressure, is applied to the coolant circuit while the oil side is observed; a rising sump level or clear water coming from the drain plug is direct proof. The pressure values and adapter types to use vary by engine and are taken from the OE documentation.
- How does a clogged oil cooler affect oil pressure?
- Clogging first widens the pressure difference between the cooler's inlet and outlet. If a safety bypass is fitted, it opens past a certain difference and the oil skips the cooler; the engine does not run out of oil, but the oil is no longer cooled, so the first indicator is usually high oil temperature rather than low pressure. On a setup with no bypass, or where the bypass itself is clogged, the result is a direct pressure loss instead.
- How long does an oil cooler last, and how can its life be extended?
- There is no fixed replacement interval; its service life tracks the condition of the two fluids passing through it rather than mileage. Renewing coolant before it expires, using the correct antifreeze specification, never topping up with tap water, and keeping to the oil filter discipline all delay corrosion and clogging. Checking the expansion tank in the daily inspection as carefully as the dipstick catches the failure at its cheapest stage.
Related Articles

Engine Overheating in Heavy-Duty Trucks: Causes & Fixes
Learn why heavy-duty truck engines overheat, how to read the gauge, step-by-step diagnosis, and how coolant, water pump, thermostat, and fan clutch fail.
Fan Belt Tensioner: Failure, Replacement & Maintenance
What a truck fan belt tensioner does, why it squeals or vibrates, how to measure belt tension and how to replace a worn tensioner pulley bearing.
Water Pump: Faults, Replacement & Maintenance Guide
How the heavy-duty water pump keeps engine temperature in check, what fluid colour at the weep hole reveals about a failing seal, and safe replacement.


