Engine Coolant Thermostat: Faults, Replacement & Care
Heavy truck engine coolant thermostat guide: stuck-open vs stuck-closed faults, diagnosis, correct replacement, torque values and maintenance tips.
In a heavy commercial vehicle, engine efficiency, emissions and service life depend directly on operating temperature; one of the smallest yet most critical parts governing that temperature is the engine cooling thermostat. When a thermostat fails to do its job in a tractor unit or a bus, the problem is not just a "wandering gauge needle": a slow-warming engine, rising fuel consumption, a cabin that never heats up, disrupted DPF regeneration, or the opposite extreme — sudden overheating and cylinder-head risk — all appear as a chain of related failures. This guide brings together the working logic of the thermostat, fault diagnosis, correct replacement practice and safe technical values for heavy diesel vehicles, all in the language of the field.
What Is an Engine Cooling Thermostat? Its Purpose and Working Principle
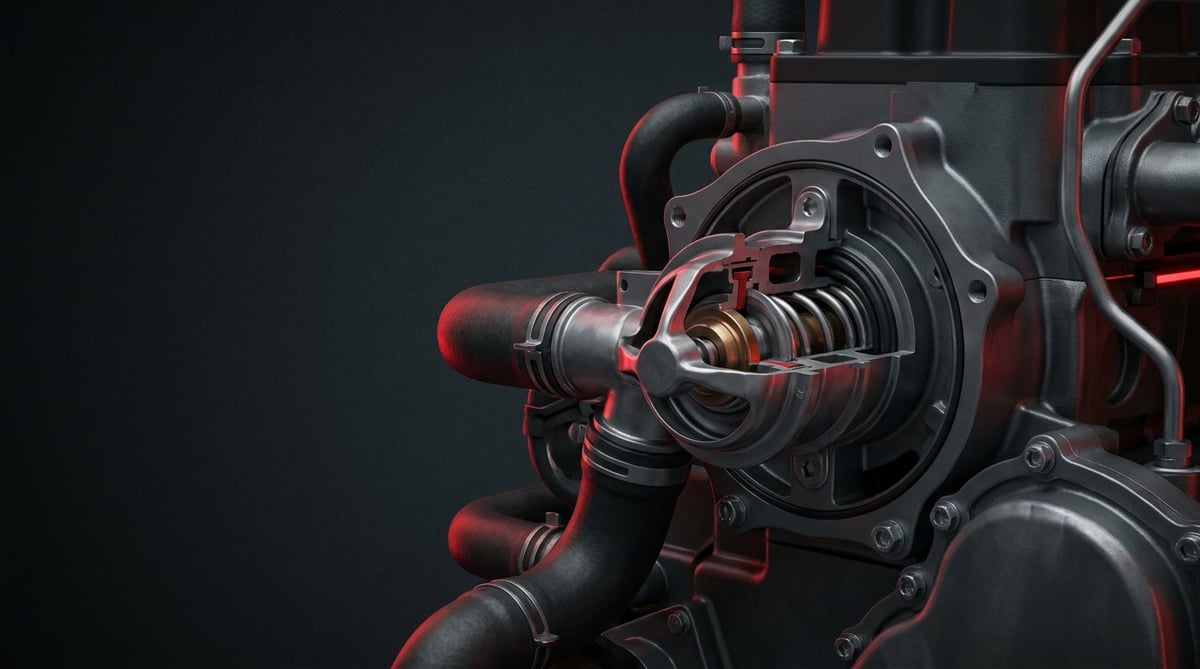
The engine cooling thermostat is a heat-sensitive valve, driven by a wax element, that automatically opens and closes to route coolant to the radiator based on temperature within the diesel engine's cooling circuit. While the engine is cold it stays closed, circulating the coolant through the bypass circuit without sending it to the radiator, so the engine reaches ideal operating temperature as quickly as possible. Once the coolant reaches the opening temperature, the wax element expands, pushing the valve to open the radiator circuit and holding the temperature stable within a narrow band. In heavy diesel applications this unit works on the same logic as the equivalents of Behr/Mahle and Wahler-type thermostats; the VADEN product family is likewise manufactured as a direct replacement for these OE-type designs.
Although the thermostat looks simple, it contains several components that work together:
- Wax element: A special wax compound that expands at a specific temperature; it is the "brain" that converts thermal energy into mechanical motion.
- Main valve and spring: The wax element pushes the main valve open; when the temperature drops, the spring closes the valve again. The spring is always positioned facing the engine (hot) side.
- Bypass valve: Allows coolant to circulate within the engine (short circuit) while the thermostat is closed; restricts the bypass when it opens.
- Air-bleed pin (jiggle pin): A small moving pin that lets trapped air escape during filling; it must sit in the 12 o'clock position during installation.
- Housing/cover and gasket/O-ring: The seat that connects the thermostat to the engine and the sealing element that ensures leak tightness.
How does the wax element work?
The special wax inside the element increases its volume as it goes from solid to liquid when it reaches its designed temperature. This expansion pushes the piston at the center of the element, opening the valve. When the temperature drops, the wax solidifies again, its volume shrinks, and the spring closes the valve. This is an entirely mechanical, non-electrical system; its reliability is high, but the wax can fatigue over time, and coolant seeping into the element can turn it into a thermostat that stays "stuck open" or opens late.
Bypass and main circuit: what happens in a cold engine?
On a cold start the thermostat is closed; the coolant circulates through the bypass circuit inside the engine block and head without going to the radiator. This "short circuit" reduces the cooling mass of the engine, enabling fast and balanced warm-up. As the engine approaches ideal temperature, the thermostat opens gradually, routing hot coolant to the radiator and drawing cooled coolant back into the engine. Full opening is typically completed 10–15°C above the opening temperature.
The component that keeps that bypass circulation going is the water pump; its duties, failure symptoms and maintenance approach are covered separately in the water pump in commercial vehicles guide.
What does the opening temperature mean? (79 / 83 / 87°C)
The value stamped on the thermostat (e.g. 79, 83, 87°C) is the temperature at which the valve begins to open; full opening is 10–15°C above that. This value is set by the manufacturer according to the engine family and emission strategy; fitting a randomly "cooler" or "hotter" thermostat disrupts fuel consumption, emissions and DPF behavior. The table below summarizes common opening-temperature classes and their typical usage tendency.
| Opening temperature (stamp) | Typical full opening | General usage tendency |
|---|---|---|
| ~71–75°C | ~85–90°C | Some older/heavy-load, cooling-oriented applications |
| ~79°C | ~90–94°C | Hot climates or high thermal-load tendency |
| ~83°C | ~95–98°C | Common heavy commercial diesel reference |
| ~87–90°C | ~100–105°C | Modern engines focused on low emissions/efficiency |
Fault Symptoms and Diagnosis
Thermostat failures fall broadly into two opposite poles: a stuck-open and a stuck-closed thermostat; to these you can add housing/gasket leakage and corrosion. The key point is this: the same symptom (for example, the gauge temperature staying low) can be caused both by a stuck-open thermostat and by a faulty temperature sensor. That is why diagnosis should be done by observing the system before removing the thermostat.
| Symptom | Possible Cause | Check / Verification |
|---|---|---|
| Engine warms up slowly or never reaches operating temperature; gauge stays low | Stuck-open thermostat, incorrect low-rating thermostat | Observe the warm-up time; if the lower radiator hose heats up early, before the engine has warmed, the thermostat may be stuck open |
| Cabin/heater does not warm up enough | Low engine temperature due to a stuck-open thermostat | Verify engine temperature with sensor data; if the thermostat is stuck open, the heater will also warm poorly |
| Increased fuel consumption, rough idle, a "cold-running" feel | Low operating temperature (stuck-open thermostat) | Read the actual coolant temperature with a diagnostic tool; if it is persistently below the target band, the thermostat is suspect |
| Engine overheats rapidly, gauge climbs into the red | Stuck-closed thermostat, no path opened to the radiator | If the upper radiator hose heats up while the lower hose stays cold, the thermostat is not opening; stop immediately |
| Disrupted DPF regeneration, emission/fault lamp, EGT deviations | Chronic low engine temperature (stuck-open thermostat) | Review the engine temperature history and DTC records; low temperature prevents regeneration |
| Coolant leak around the thermostat housing/cover | Worn gasket/O-ring, cracked housing/cover, corrosion | Dry the area around the housing when cold and look for a leak trail under pressure; check for crusted corrosion |
| Temperature gauge continuously rising and falling (fluctuation) | Fatigued wax element opening late/erratically, air lock | Observe whether air remains in the system and whether the thermostat opens gradually |
Identifying a stuck-open thermostat
The stuck-open thermostat is the most insidious fault because the vehicle does not stop — it simply runs "inefficiently." The tell-tale trio is typical: the engine never quite reaches operating temperature, the heater blows cold, and fuel consumption rises. On a modern vehicle, low engine temperature also prevents DPF regeneration, and the emission fault lamp may light up. A simple field tip: if the lower radiator hose heats up early, before the engine has warmed, on a cold start, it means the thermostat is releasing coolant to the radiator too soon.
Identifying a stuck-closed thermostat
A stuck-closed thermostat is an emergency fault: the engine overheats rapidly within a few minutes because hot coolant can never reach the radiator. The most practical way to identify it is to (carefully) observe the upper and lower radiator hoses as the engine warms up — if the upper hose heats up and pressurizes while the lower hose stays cold, the thermostat is not opening. In this case, do not push the engine; overheating can cause damage to the cylinder head and gasket.
Identifying housing/gasket leakage and corrosion
The thermostat housing and cover operate under the pressure and thermal cycling of the coolant; the gasket/O-ring hardens over time, and corrosion and porosity can form on the aluminum housing. If, after drying the surface when cold and heating the system, you see dampness, crusted green/white corrosion trails or dripping around the housing, the sealing element and, if necessary, the housing should be renewed.
Further reading
For a plain-language technical overview of this subject, see the reference article on Wikipedia. Always confirm specific figures and procedures against the vehicle manufacturer service data.
Replacement / Installation Steps
The steps below are a general sequence for heavy diesel (truck/tractor/bus); always rely on the torque, opening temperature and procedure values in the vehicle's and engine's service manual.
- Cool the engine and make the system safe: Park the vehicle on level ground, chock it, stop the engine and wait for it to cool completely. Do not open any cap until the pressure has dropped.
- Drain the coolant: Open the radiator lower drain plug (or the lower hose) and drain the coolant into a clean container. Keep it clean if it will be reused; otherwise dispose of it properly. Lowering the level below the thermostat housing may be sufficient.
- Access the thermostat housing: It is usually the housing at the engine inlet (lower-hose side) or outlet. Photograph and label the hose, sensor and cable connections on it.
- Remove the housing cover: Loosen the cover bolts gradually. The bolts may be corroded; work without forcing them, using a rust penetrant if necessary (a broken bolt creates a big job).
- Remove the old thermostat and gasket: Take out the thermostat and the old gasket/O-ring. Note the orientation and position (especially the jiggle-pin location) before removal.
- Clean the seat and surfaces: Clean off the old gasket residue and corrosion on the sealing surface without scratching it. Remove any crusted corrosion in the seat; if it is heavily damaged, replace the housing.
- Fit the new thermostat in the CORRECT ORIENTATION: Position it so that the wax element and spring face the engine (hot) side. The wrong orientation causes the thermostat not to work at all.
- Bring the air-bleed pin (jiggle pin) to the 12 o'clock position: The air-bleed hole/pin must be at the top (in the 12 o'clock direction) so that air can escape here during filling. If the manual specifies a different position, follow it.
- Fit the cover with a new gasket/O-ring: Always use a new gasket/O-ring. Seat the cover and tighten the bolts to the manufacturer's torque, gradually and in a crosswise sequence (see the "Technical Values" section for typical ranges).
- Fill and bleed the system: Fill with coolant of the type and mixture specified by the manufacturer. Carry out the bleeding procedure; the jiggle pin helps the air escape. Check the expansion tank level.
- First start and opening confirmation: Start the engine and bring it to operating temperature. Confirm that the thermostat opens by the warming of the upper radiator hose, verify that the gauge temperature settles in the target band and that there is no leak around the housing. Recheck the coolant level after it has cooled.
Points to Watch (Common Mistakes)
- The "if the problem is low temperature, let me remove the thermostat entirely" fallacy: Running without a thermostat never lets the engine warm up; efficiency, fuel, emissions and DPF behavior all deteriorate, and on some engines the coolant flow becomes unbalanced, even causing localized overheating. The thermostat is not removed — it is replaced with the correct rating.
- Choosing the wrong opening temperature: Fitting a "cooler" thermostat outside the engine's design value disrupts fuel and emissions; verify the exact value with the engine code.
- Skipping bleeding: Air lock remaining in the system causes incorrect temperature readings around the thermostat and a fluctuating gauge. Carry out the bleeding procedure in full.
- Not cleaning the old gasket surface properly: Remaining gasket residue and corrosion lead to leakage and having to disassemble again.
- Confusing the sensor with the thermostat: A low temperature reading is sometimes caused by a faulty temperature sensor. Verify the actual coolant temperature with a diagnostic tool before blaming the thermostat.
- Wrong coolant/mixture: An unsuitable antifreeze type leads to corrosion, foaming and a shortened wax-element life; use the type and ratio specified by the manufacturer.
Technical Values and Checkpoints
The values below are general/safe references for common heavy commercial vehicle cooling systems. Critical values such as opening temperature, torque and system pressure vary by vehicle and engine model; for exact figures, always rely on the relevant service manual.
| Parameter | Typical / Safe Reference | Note |
|---|---|---|
| Thermostat begins to open (stamp) | ~79 / 83 / 87°C | Set precisely by engine family |
| Full opening temperature | ~10–15°C above the opening value | Opens gradually, not suddenly |
| Normal operating temperature band | ~85–95°C (typical) | Varies by engine and load |
| Cooling system pressure (cap) | ~0.9–1.4 bar (13–20 psi) | Pressure raises the boiling point; the cap value is model-specific |
| Antifreeze mixture ratio | ~50% antifreeze / 50% water (general) | Per climate and manufacturer requirement; balance of protection and boiling/freezing |
| Air-bleed pin (jiggle pin) position | 12 o'clock (topmost) | Unless the manual states otherwise |
The opening temperatures above (79/83/87°C) and the full-opening range (~10–15°C above opening) are consistent with the common values given in the service bulletins of OE-type manufacturers such as Behr/Mahle and Wahler for heavy commercial diesel engines. The cooling system pressure and the antifreeze mixture, on the other hand, are set according to the vehicle manufacturer's requirement. Regional regulations and the vehicle manufacturer's values always take priority.
Typical installation torque and tightening sequence
The torque of the thermostat housing/cover bolts varies according to the bolt size, its grade (8.8/10.9) and the housing material (mostly aluminum). Over-tightening on an aluminum housing leads to stripped threads and cracks. The values below are a general reference only; for exact torque and tightening sequence, always use the vehicle/engine manual.
| Bolt (size / grade) | Typical dry torque range | Note |
|---|---|---|
| M6 / 8.8 | ~9–11 Nm | Tighten carefully on an aluminum housing |
| M8 / 8.8 | ~22–25 Nm | General reference |
| M10 / 8.8 | ~43–48 Nm | General reference |
| M10 / 10.9 | ~60–65 Nm | High-strength bolt |
Quick field checkpoints
- On a cold start, observe whether the engine reaches operating temperature within a reasonable time; if it never does, the thermostat may be stuck open.
- As the engine warms up, confirm that the thermostat has opened by the distinct warming of the upper radiator hose; if the lower hose stays cold continuously, it is not opening.
- Check that the coolant temperature read from the gauge/diagnostic tool stays stable in the target band and does not continuously rise and fall.
- Dry the area around the thermostat housing when cold and, after heating, visually check for leaks, dampness and corrosion trails.
Maintenance and Service Life
Thermostat life depends largely on two things: the quality of the coolant and the cleanliness of the system. Degraded, low-concentration or wrong-type antifreeze creates corrosion, deposits and foaming, which both fatigues the wax element and erodes the housing. A routine that keeps preventive maintenance simple extends the life of the thermostat as well as the radiator, water pump and hoses.
- Daily / pre-trip: Observe the coolant level (when cold) and the gauge temperature; note any change in warm-up behavior.
- At periodic service: Check the color, concentration and pH/protection status of the coolant; scan the hoses, clamps and thermostat housing for leaks and corrosion.
- Coolant change: Renew the antifreeze within the manufacturer's interval and in the correct type/ratio. Old, protection-depleted coolant significantly shortens the life of the thermostat and water pump.
- Thermostat replacement: The thermostat is usually replaced when it fails; however, during a major cooling-system service (water pump, radiator, belt work), renewing the aged thermostat as well prevents having to come back for repeat work shortly after.
- Gasket and housing: Use a new gasket/O-ring at every disassembly; replace a corroded aluminum housing in good time.
If a slow-warming engine, a fluctuating temperature gauge, weak cabin heating and increased fuel consumption are seen together, it means it is time to replace the thermostat. The thermostat is a cheap part, but when it fails to do its job, the cost is paid in engine efficiency, emissions and, in the worst case, cylinder-head damage. When renewing the thermostat, evaluating the gasket/O-ring, the housing/cover if necessary, and the aged coolant together is the most reliable way to prevent a recurrence of the fault.
International Equivalents / Equivalent Terms
When searching for heavy commercial vehicle cooling parts in international catalogs, imported OE lists or overseas supplier correspondence, knowing the equivalents of the engine cooling thermostat in different languages speeds up finding the right part. The Turkish term termostat appears in technical documents under the following equivalent names:
| Language | Term / Equivalent naming | Note |
|---|---|---|
| Turkish (TR) | Termostat, Motor soğutma termostatı, Soğutma suyu termostatı | The main term used in this guide |
| German (DE) | Thermostat, Kühlmittelthermostat, Kühlwasserthermostat | The OE catalog language of Behr/Mahle and Wahler |
| English (EN) | Thermostat, Engine (coolant) thermostat, Coolant thermostat | The language of international trade and OE cross-reference |
The Kühlmittelthermostat (coolant thermostat) frequently seen in German catalogs and the English engine coolant thermostat both describe the same functional part as the engine cooling thermostat that is the subject of this guide. Even when searching with equivalent terms, what determines the final selection is the vehicle's engine code, the OE number of the removed original part and the opening-temperature stamp on the thermostat; the naming language may change, but the correct part is verified by these three data points.
After correct diagnosis and a clean installation, what proves decisive is that the thermostat you fit meets the opening temperature, gradual-opening character and durability of the OE-type design. The VADEN Engine Cooling Thermostat family is developed to meet the safe technical values and field expectations in this guide, as an equivalent of Behr/Mahle and Wahler-type units in heavy diesel trucks, tractor units and buses; you simply need to select the model suited to your needs together with the vehicle and engine match, evaluating it as a whole with cooling-system product groups such as the VADEN thermostat housing/cover, pipes and gasket/O-ring.
Shop this part: Thermostat
Related categories: Thermostat · Housing · Cover · Pipe · Thermostat
Related technical guides: Truck Radiator & Expansion Tank: Faults, Replacement & Care · Viscous Fan Clutch: Fault, Replacement & Maintenance Guide · Belt Tensioner: Failure, Replacement & Maintenance Guide
Application and compatibility: Vehicle compatibility catalogue · Engine compatibility catalogue
Main guide: Water Pump: Faults, Replacement & Maintenance Guide
Tags
Frequently Asked Questions
- Is the thermostat stuck open or stuck closed? How can I tell?
- The most practical method is to observe the radiator hoses. As the engine warms up, if the upper hose heats up while the lower hose stays cold for a while, and then the lower hose also heats up once the thermostat opens, the system is normal. If the lower hose heats up early from cold start onward, the thermostat is stuck open; if the engine overheats rapidly and the lower hose never heats up, the thermostat may be stuck closed.
- Can't I just remove the thermostat and run without it?
- No. Without a thermostat, the engine can never reach operating temperature; fuel consumption rises, emissions and DPF regeneration are disrupted, and engine life is shortened. On some engines, the absence of the thermostat unbalances the coolant flow and even causes localized overheating. The correct solution is not to remove the thermostat, but to replace it with a new one of the correct opening rating.
- The engine warms up slowly and fuel consumption has increased — is the thermostat the cause?
- Very likely. The trio of an engine that warms up slowly or never, a heater that blows cold and increased fuel consumption is the classic "stuck-open thermostat" picture. Still, to be certain, read the actual coolant temperature with a diagnostic tool; if it is persistently below the target band, the thermostat is a strong suspect. Rarely, a faulty temperature sensor can give similar symptoms.
- What is the harm in fitting a thermostat with the wrong opening temperature?
- A thermostat outside the engine's design value disrupts the temperature balance. A lower-rated thermostat keeps the engine cooler than necessary, worsening fuel and emissions and disrupting DPF behavior; a higher-rated one brings it closer to overheating. Always use a thermostat that matches the engine code and has the same stamp temperature as the original.
- I fitted a new thermostat but the engine still overheats — why?
- First, confirm that the thermostat is fitted in the correct orientation (with the spring/wax element facing the engine); a reversed installation prevents opening. Then make sure no air lock remains in the system and repeat the bleeding procedure. If the problem persists, the fault may be beyond the thermostat: check the water pump, radiator blockage, fan/viscous coupling, or a low coolant level.
- Should I also change the coolant when replacing the thermostat?
- Since you have already drained the system, this is a good opportunity. If the coolant is old, discolored or its protection is depleted, replace it with a new one (of the correct type and ratio). If the coolant is still in good condition, you can collect it cleanly and reuse it; in any case, top up the level and bleed the system thoroughly.
- Water is leaking from the thermostat housing — is only the gasket replaced?
- Most of the time, yes; the source of the leak is a worn gasket/O-ring and is resolved by replacing it. However, if the aluminum housing/cover is cracked, corroded or the sealing surface is damaged, the gasket alone is not enough; the housing/cover must also be replaced. Inspect the surface carefully during removal.
- How often should the thermostat be replaced?
- The thermostat has no fixed replacement interval; it is usually replaced when it shows a fault symptom. Still, on high-mileage heavy commercial vehicles, renewing the aged thermostat and gasket/O-ring together during a major cooling-system service (water pump, radiator, belt) prevents a repeat fault and lost labor shortly after.
- What is the jiggle pin and why must it sit at the 12 o'clock position?
- The jiggle pin is the small moving air-bleed pin on the thermostat; it lets air trapped in the housing escape while the system is being filled. That is why the bleed hole must sit at the very top, in the 12 o'clock direction: air collects at the highest point and can only leave from there. In the wrong position an air lock stays in the system, the gauge fluctuates and the temperature read around the thermostat is wrong. If the manual specifies a different position, follow it.
- How tight and in what order should the thermostat cover bolts be tightened?
- Take the exact torque from the vehicle and engine service manual. The bolt-grade table in this guide is a general steel-to-steel dry-joint chart and is not specific to a thermostat housing; because the housing is usually aluminium and the seal is made by the gasket/O-ring, the real figure is normally below those values. Tighten gradually (about 50%, then 100%) in a crosswise sequence with a torque wrench; over-tightening by feel strips the threads.
Related Articles

Engine Overheating in Heavy-Duty Trucks: Causes & Fixes
Learn why heavy-duty truck engines overheat, how to read the gauge, step-by-step diagnosis, and how coolant, water pump, thermostat, and fan clutch fail.
Truck Radiator & Expansion Tank: Faults, Replacement & Care
Diagnose radiator and expansion tank faults on heavy trucks: overheating, coolant loss, pressure caps, correct replacement steps and safe technical values.
Viscous Fan Clutch: Fault, Replacement & Maintenance Guide
Heavy-duty viscous fan clutch guide: how it works, fault symptoms, diagnosis, correct replacement steps and safe technical values for trucks and buses.


