Exhaust Flex Pipe: Faults, Replacement and Maintenance Guide
On a truck a collapsed exhaust flex pipe strains the whole line from turbo to DPF: how the bellows absorbs engine movement, fault signs and replacement.
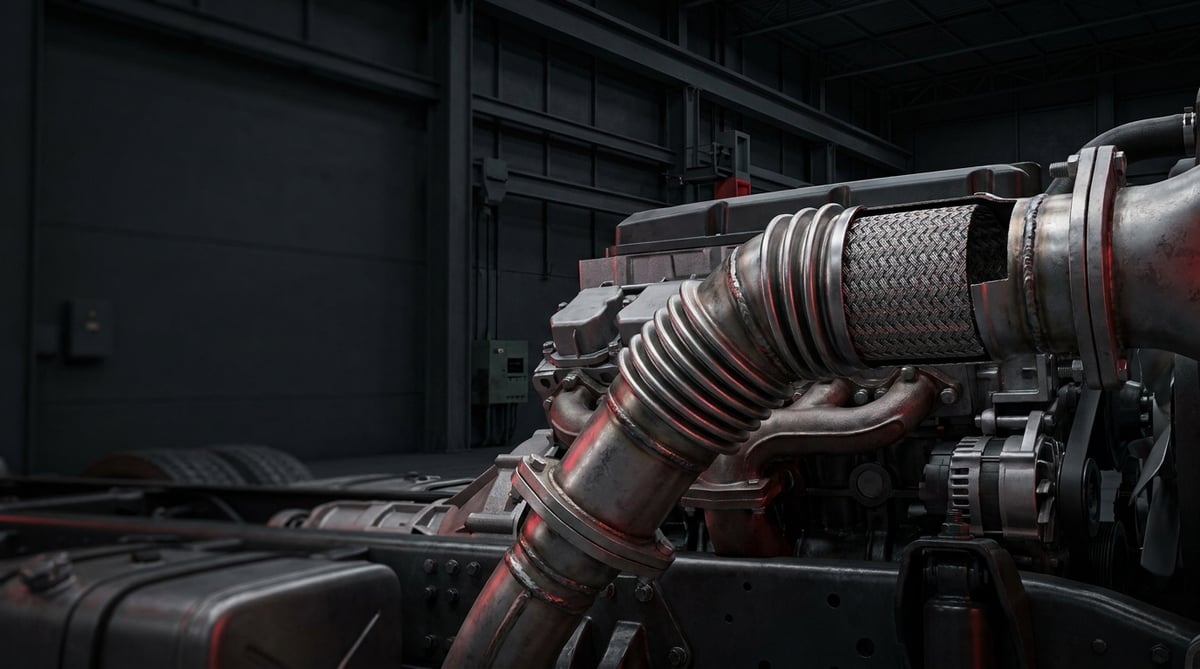
On a heavy commercial vehicle, the exhaust line shifts by millimetres with every engine revolution; that constant movement between the chassis and the engine has to be absorbed somewhere. This is exactly the job the exhaust flex pipe (flexible bellows) takes on. When a driver in the field says "the flex has collapsed", "it's hissing after the manifold" or "there's a burnt smell coming into the cab", this flexible connection is one of the first parts to check. It may look like a small component, but a cracked flex pipe gradually strains the entire exhaust system from the turbo outlet all the way to the DPF/SCR line, fatigues the welds and triggers one failure after another.
This guide was prepared by the VADEN technical team, drawing on field experience and OE manufacturer data. The values given here are typical reference ranges; they vary by engine, body and equipment. For exact torque, dimensions and procedure, always refer to the vehicle's current OE service manual. Last updated: September 2026.
The integrity of the exhaust line directly affects compliance with ECE R51, which governs vehicle sound levels, and with UNECE R49, which governs engine emission type approval.What Is an Exhaust Flex Pipe (Flexible Bellows)? Function and Working Principle
The exhaust flex pipe (flexible bellows) is a flexible connecting element made of braided steel, fitted between the exhaust line and the engine/manifold; it dampens engine vibration and the thermal expansion of the exhaust, preventing the line from being strained and cracking. In German it is called Flexrohr or Abgas-Flexrohr; in everyday usage it is also known as a flex pipe, flexible pipe, bellows or, colloquially, an "accordion".
The working principle is mechanical. The engine block sits on flexible mounts and vibrates constantly while running, rotating slightly under torque reaction when you press the accelerator. The exhaust line, on the other hand, is largely suspended from the chassis by hangers. If there were a rigid (single-piece stiff) pipe between these two points, every vibration and every heat-up/cool-down cycle would fatigue the metal and quickly form a crack. The flex pipe absorbs this fatigue by taking up axial (back-and-forth), angular (bending) and some radial movement. At the same time, it allows the line to lengthen (thermal expansion) when the engine is started cold and the exhaust heats up to 500-600 °C.
- Inner bellows (inner corrugation / bellows): Usually a thin corrugated bellows of stainless steel (AISI 304/321 type); it provides sealing and flexibility.
- Outer braid (braid / sleeve): A braided stainless wire sleeve; it protects the bellows from over-extension and external impact and carries the internal pressure.
- Inner guide tube (interlock / liner): An inner liner that smooths the exhaust flow and protects the bellows from hot-gas erosion.
- End connections: Welded pipe ends or a bolted flange; the assembly is mounted to the line via these ends.
Where Is It Located?
The flex pipe is mostly located just after the turbo/exhaust manifold outlet, between the first exhaust pipe and the engine side. On some heavy commercial bodies a second flex may also be found ahead of the DPF/SCR (particulate filter / AdBlue) module or in the middle section of long lines. Its position is closest to the area where the engine moves, because that is where the movement to be dampened actually occurs.
Difference Between a Rigid Line and a Line With Flex
A line without a flex looks cheap but transmits vibration directly to the welds and flanges. The result: pipes that crack early, loosening flanges, broken hanger lugs. A flex pipe of the correct length and correct type significantly extends the life of the whole line.
The working principle, clogging symptoms and cleaning options of the emission unit serving this part of the line are explained in our diesel particulate filter (DPF) guide.
Type Comparison
| Feature | Weld-End Flex | Bolted-Flange Flex |
|---|---|---|
| Assembly | Welded to pipe ends | Flange + bolt/nut |
| Replacement time | Longer (welder required) | Shorter (with hand tools) |
| Leak risk | Depends on weld quality | Depends on gasket and torque |
| Roadside repair | Difficult | Easy |
| Typical use | OE fabricated lines | Service/renewal, modular lines |
Part number verification: A flex pipe is body-specific in terms of diameter, length, braid type and end connection (weld/flange, flange hole pattern). The wrong length or wrong diameter will either strain the line or leave it slack and cause early failure. Before ordering, always confirm the OE part number and the VADEN equivalent reference using the vehicle's chassis/engine number.
Failure Symptoms and Diagnosis
A flex pipe failure is most often an "audible" one. Noise and smell come before a visible crack. The table below is a guide for field diagnosis.
| Symptom | Possible Cause | Check / Verification |
|---|---|---|
| Hissing / blowing noise from the engine (especially under acceleration) | Crack in the braid, tear in the bellows, exhaust leak | Search for a leak around the flex at idle with your hand (carefully) or a piece of paper; visual inspection when cold |
| Metallic rattle / chattering | Broken outer braid wire, inner liner detachment, loose flange | Lift the vehicle and shake the flex by hand; check hangers and flange bolts |
| Burnt / exhaust smell entering the cab | Leaking exhaust gas reaching the cab air intake | Locate the leak point from soot/carbon traces; look for staining along the line |
| Visible crack, tear, black soot mark | Fatigue crack, over-extension, corrosion | Visual inspection of the flex body and ends, soot accumulation |
| Power loss / drop in turbo response | Large leak upstream of the manifold, loss of back pressure | Assess leak size; read DPF/EGR-related fault codes |
| Flex appears crushed, collapsed or over-stretched | Wrong-length installation, broken line hanger, misalignment | Check the line hangers and flex alignment; verify length/diameter |
| Vibration transmitted to the cab/steering | Flex has lost its damping (stiffened/clogged) | Observe vibration at idle and low rpm; distinguish from engine mounts |
Audible Diagnosis
On a cold engine the sound of a flex leak is usually clearer, because the metal has not yet expanded to partially close the leak. If you hear the sound increasing with engine speed while running, the leak is most likely on the pressurised exhaust side. To narrow down the source of the sound — since the engine is hot and dangerous — it is safer to avoid direct contact and use a long-handled wooden rod or a mechanic's stethoscope.
Visual Diagnosis
Lift the vehicle and, after the line has cooled, inspect around the flex with a good flashlight. At the leak point you will see a dark soot/carbon ring, scorched paint or bright break marks on the braid wire. Wires on the outer braid that look frayed or brushed out are a warning sign of damage in the inner bellows.
Confusion With Other Failures
Manifold gasket, turbo outlet gasket, DPF flange and clamp leaks produce a similar sound. In vibration complaints, engine mounts and driveshaft imbalance can also be confused with the flex. Replacing the flex without confirming the diagnosis can leave the real leak hidden; physically verify the leak point.
If the noise turns out to come from the joints rather than the flex, the clamp and connecting pipe side has its own checklist, set out in the exhaust clamp and connecting pipe guide.
Further reading
For a plain-language technical overview of this subject, see the reference article on Wikipedia. Always confirm specific figures and procedures against the vehicle manufacturer service data.
Replacement / Installation Steps
PPE and safety: The exhaust line reaches very high temperatures. Let the engine cool completely before starting work. Use heat-resistant gloves, safety goggles, a dust mask (soot/rusty parts) and safety shoes. Secure the vehicle on level ground and support it with jack stands; do not rely on the jack alone. If welding is required, keep a fire extinguisher on hand and protect the fuel/AdBlue lines and cables from heat.
- Preparation and diagnosis confirmation: Confirm the leak/damage point, verify the correct part number (diameter, length, end type) and the VADEN equivalent. Have the new flex, gasket and required bolts/nuts ready.
- Securing the vehicle: Apply the parking brake, chock the wheels, lift the vehicle and set it on stands. Make sure the engine has cooled.
- Heat and surrounding protection: If necessary, remove or protect the nearby wiring harness, air bellows and ABS/AdBlue lines with a heat blanket.
- Loosening the connections: On the flanged type, apply penetrating/rust remover and loosen the bolts/nuts gradually; on the welded type, mark the cut line. Do not force seized bolts; heat them if necessary.
- Removing the old flex: Release the hangers and take the flex off the line. If it is welded, cut it at the marked point with a suitable cutting tool; protect the surroundings against sparks.
- Surface and flange cleaning: Clean the flange surfaces of old gasket residue, soot and rust with a wire brush. Make sure the surface is flat and free of burrs.
- Dry fit / alignment: Fit the new flex first without tightening the bolts. Check that the line is neither strained nor slack, and that the flex sits on axis at its own natural length. The wrong length is the most common installation mistake.
- Gasket and connection: On the flanged type, join with a new gasket. On the welded type, tack it in place, verify the alignment, then complete the full weld (suitable electrode/gas, correct method for stainless steel).
- Torquing: Tighten the bolts/nuts to the OE value and in a cross (staged) sequence. Do not apply full torque in one go; build it up over 2-3 passes. Refer to the service manual for the value.
- Hanger and clearance check: Fit the exhaust hangers and verify that the line does not touch the chassis and body and that there is sufficient clearance. Make sure the flex does not rub against anything while running.
- Start-up and leak test: Start the engine and check the flex and flanges for leaks (noise, soot) at idle and under light throttle. After a short test drive, re-confirm torque and sealing.
Points to Watch (Common Mistakes)
The three most common mistakes: (1) Fitting a wrong-length/diameter flex and straining the line — this cuts the flex life down to weeks. (2) Installing the flex over-bent or twisted — the bellows fatigues at a single point. (3) Replacing the flex without fully confirming the leak and missing the real source (manifold gasket, clamp).
Welding warning: A faulty weld that exposes the stainless bellows directly to excessive heat deforms the inner liner and cracks it early. Make the weld away from the bellows body, on the end pipes, and control the heat input.
- Tighten the bolts gradually and crosswise, not in one go; otherwise the flange warps and the gasket is crushed unevenly.
- Do not reuse old, crushed or rusty bolts and nuts; they break under heat.
- Do not sharply bend the flex during handling/installation; if the bellows is damaged, sealing is compromised from the start.
- Do not leave out any line hangers; an unsupported line loads all its weight onto the flex.
- Always perform a cold-hot leak check after installation; a connection may loosen on the first heat-up.
Technical Values and Check Points
The values below are of a typical/general reference nature for heavy commercial vehicle exhaust systems. They vary by body, engine and manufacturer; for the exact value, the OE service manual is decisive.
| Parameter | Typical Reference Range | Note |
|---|---|---|
| Exhaust gas temperature (flex area) | ~400-650 °C (higher instantaneous peaks under load) | Rises the closer it is to the turbo outlet |
| Material continuous operating temperature | ~600-800 °C resistance for the stainless bellows | AISI 304/321 type material |
| Exhaust back pressure (system) | ~0.1-0.5 bar (≈1.5-7 psi) typical | Varies with DPF loading; a high value indicates clogging |
| Flex axial movement tolerance | On the order of a few mm (typical) | Movement it is expected to absorb without strain |
| Angular flexibility | A few degrees (depending on type/length) | Excessive angle fatigues the bellows |
| Expected service life | Typically aligned with the main exhaust overhaul | Depends on usage, road and vibration conditions |
The flange connection torque varies with the part diameter and the bolt class. The values below are for general reference only; for exact torque, the OE manual is decisive.
| Bolt / Nut (type) | Typical Torque Reference | Note |
|---|---|---|
| M8 exhaust flange nut | ~20-30 Nm | Staged, cross tightening |
| M10 exhaust flange nut | ~35-50 Nm | Re-check after heat |
| M12 flange / clamp | ~55-75 Nm | Take care with spring-washer connections |
| V-band clamp (if present) | ~10-20 Nm | Follow the manufacturer's value exactly |
Because exhaust bolts work under high heat and vibration, using heat-resistant anti-seize compound and, where possible, new fasteners at assembly makes removal easier at the next service. Always apply torque on a cold engine.
Field checklist:
- Is there any crack, tear, crushing or soot ring on the flex body?
- Is the outer braid wire intact, or are there frayed/broken wires?
- Are the flange surfaces flat and clean, and is the gasket crushed evenly?
- Are the bolts/nuts complete and at the correct torque?
- Are the line hangers intact, and is the flex slack or strained?
- Is the flex rubbing against the chassis/body or hoses?
Maintenance and Service Life
The flex pipe is not a "fit and forget" part; it should be checked visually and by ear at scheduled maintenance. A small leak caught early can be fixed before it fatigues the whole line and neighbouring parts (DPF, SCR, manifold).
- Inspect the flex visually at every major service: look for cracks, soot and braid damage.
- Never postpone an exhaust leak noise or a smell entering the cab; a small leak grows quickly.
- When fitting a new flex, also check the line hangers and engine mounts; if the vibration source persists, the new flex will also fail early.
- Rough terrain, constant full load and stop-start traffic shorten flex life; increase the inspection frequency on vehicles in these conditions.
- A corrosive environment (salt, mud) wears down the outer braid; inspect the line after undercarriage washing.
A flex pipe of the correct length and quality material, when properly installed and with its hangers kept secure, generally runs trouble-free until the main overhaul period of the exhaust line. The main factor that shortens its life is not the material but, most often, incorrect installation and an unresolved vibration source.
When correct diagnosis, the right length and installation to the rules come together, the exhaust flex pipe runs long and trouble-free. The VADEN ORIGINAL Exhaust Flex Pipe (Flexible Bellows) product family is designed for heavy commercial vehicle bodies with suitable diameter, length and end-connection options, a stainless braid structure and OE-equivalent dimensions. To select the right reference for your vehicle and get technical support, you can contact VADEN's authorised channels.
Shop this part: Flexible Pipe
Related categories: Flexible Pipe · Flexible Pipe
Related technical guides: Turbo Intake & Exhaust Inlet Pipe: Faults and Replacement
Application and compatibility: Vehicle compatibility catalogue · Engine compatibility catalogue
Main guide: What Is an EGR Valve? Failure Symptoms and Cleaning (Heavy Commercial Vehicles)
Tags
Frequently Asked Questions
- If the exhaust flex pipe (flexible bellows) cracks, can I keep driving the vehicle?
- Although it may run for a short time, it is not recommended. The leaking hot exhaust gas can burn surrounding cables and hoses, harmful gas can seep into the cab, and the loss of back pressure can disrupt engine/DPF management. It should be replaced as soon as possible.
- Is the flex pipe replaced by welding or by bolting?
- Either works. OE lines usually have welded ends; in service/renewal, the bolted flange type makes installation easier. Which type is suitable depends on the structure of the existing line and the part number.
- How do I tell an exhaust leak noise from a manifold gasket noise?
- A manifold gasket leak usually produces a "tick-tick"-like sound closer to the engine that becomes more pronounced when cold; a flex leak is a bit further down and takes the form of a blowing/hissing that increases with engine speed. For a definite distinction, you need to physically verify the leak point from the soot trace.
- What happens if I fit the wrong-length flex?
- A short flex strains the line, the bellows stays under constant tension and cracks early; a long flex is left slack, bends and suffers rubbing/fatigue. Both cases significantly shorten the life. The length and diameter must be exactly correct.
- How long does a flex pipe last?
- There is no fixed mileage. Operating conditions, the road, the state of the vibration source and installation quality are the determining factors. A quality, well-installed flex typically lasts until the main overhaul period of the exhaust line.
- Can I repair the flex pipe by patching (welding) it?
- It can be a temporary roadside fix but is not permanent. A flex whose bellows structure is compromised cannot be made sound by welding; moreover, a faulty weld deforms the inner liner. The correct solution is to renew the part.
- Should I also replace the gasket when replacing the flex?
- Yes. On flanged connections the old gasket has already been crushed once and will not provide a full seal again. Using a new gasket at every flex replacement is standard practice.
- Does an exhaust flex pipe failure trigger the engine warning light?
- There may be no dedicated code for the flex itself, but the back pressure and gas flow disrupted by a large leak can produce indirect fault codes related to the EGR, DPF or lambda/NOx. If there is an exhaust leak noise together with these codes, the flex should also be checked.
- Where exactly is the flex pipe located on the vehicle, and can there be more than one?
- The first flex sits just after the turbo or exhaust manifold outlet, between the first exhaust pipe and the engine side, because that is where the movement to be damped originates. On some heavy commercial bodies a second flex is fitted ahead of the DPF/SCR module or, on long lines, in the middle section. When hunting a leak, check the whole line rather than one point.
- In what sequence should the flange bolts be tightened?
- Crosswise and in stages: build up to the full torque over two or three passes instead of one go, and take the value from the vehicle service manual. Always apply torque on a cold engine. Tightening in a single pass warps the flange and crushes the gasket unevenly. Do not reuse old, crushed or rusty fasteners, and heat-resistant anti-seize makes the next removal easier.
Related Articles

DPF (Diesel Particulate Filter) Guide: Symptoms & Cleaning
Learn what a DPF is, how passive and active regeneration work, warning signs of clogging, and safe cleaning methods for heavy commercial diesel trucks.
Turbo Intake & Exhaust Inlet Pipe: Faults and Replacement
Turbo intake and exhaust inlet pipe faults on trucks: leak symptoms, diagnosis, step-by-step replacement, torque values and maintenance tips from VADEN.
Exhaust Clamp & Connecting Pipe: Faults, Replacement, Care
Diagnose exhaust leaks, replace clamps and flex pipes in the correct order, apply the right torque bands and extend service life on heavy trucks.


