What Is a Truck Axle? Axle Types and Wheel Hub Bearing Failure
What is a truck axle? A guide to heavy-vehicle axle types, 4x2-8x4 drive configurations, and wheel hub bearing failure, diagnosis and replacement.
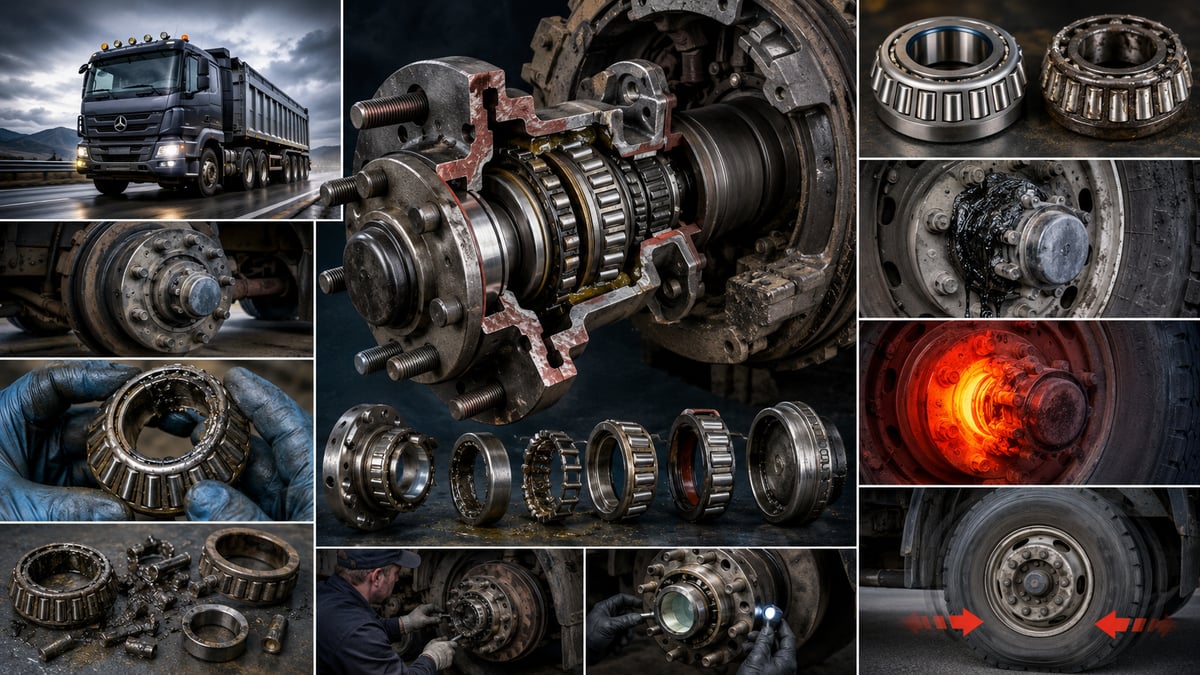
On a loaded tractor unit cruising down the highway, a faint drone creeps into the cab — one that builds quickly with road speed, fades in a right-hand bend and sharpens in a left-hand one. The driver's first instinct is the tyres; a shop checks toe and wheel balance, but the noise won't go away. Only once the vehicle is jacked up and the wheel is gripped top and bottom and rocked does the picture become clear: there is a small amount of play, felt right at the fingertips. The fault isn't in the tyre — it's in the hub the wheel spins on, the wheel hub. And that hub sits on the end of the axle. The two parts can't really be discussed separately: the axle is the structural member that carries the weight of the vehicle and its load and, where fitted, delivers rotational torque to the wheels; the wheel hub is the bearing assembly at the end of that structure that lets the wheel rotate with as little friction as possible.
What Is an Axle? Definition, Function and Basic Structure in a Heavy Vehicle
An axle is the load-bearing structure that connects a pair of opposing wheels to one another and, through the suspension, to the chassis — carrying the vehicle's own weight and its payload down to the road, and, where required, delivering rotational torque from the engine to the wheels. In a heavy commercial vehicle this assembly defines much of the vehicle's character: how many tonnes a truck can carry, what surfaces it can generate traction on, and how tightly it can turn in a confined space all depend heavily on axle configuration.
An axle's job breaks down into three headings. The first is load-carrying: the vertical load from the body structure passes through the suspension into the axle housing and from there, via the hub, to the wheels. The second is traction: on drive axles, a differential splits the torque coming from the engine between the two wheels. The third is steering: the front axle carries the steering angle, while every axle has to maintain the geometry that keeps the vehicle tracking straight. A given axle can take on just one of these three roles, two of them, or all three at once — and that is exactly where the different axle types come from.
Structurally, a heavy-vehicle axle consists of a housing — either a hollow beam or a housing built around a differential — with a load-bearing section at each end. On non-driven axles that end section is a fixed spindle, onto which the bearings seat directly; on drive axles, an axle shaft runs inside the housing out to the wheel, and the hub is instead mounted on the bearing journal outside that shaft. Either way, it is never the axle shaft itself that carries the load — it is the bearing surface the hub sits on.
Axle, axle beam and axle shaft — is it all the same thing?
In everyday shop talk the terms get used almost interchangeably, and that overlap makes diagnostic conversations harder than they need to be. In regulatory and load-rating language, an axle (or axle position) refers to a location along the chassis. On the shop floor, "axle" is used loosely for both that position and the whole mechanical assembly at it. The axle shaft — or half-shaft — is something else again: it exists only on drive axles, and it is the rotating component that carries torque from the differential out to the wheel hub. A dead trailer axle has no axle shaft at all; what is there is a fixed spindle with a hub spinning on it.
How Does an Axle Work? Separating the Load Path from the Torque Path
Two separate paths run through the vehicle. One runs bottom-up — the load path: force from the road surface passes into the tyre, through the rim and wheel studs, into the hub body, through the bearings inside the hub, into the spindle and the axle housing, then out through the leaf springs or air bellows to the chassis. The other runs top-down — the torque path: engine, gearbox, propeller shaft, differential, axle shafts and finally the hub deliver rotational drive to the wheel.
These two paths cross at exactly one point: the wheel hub. It has to carry the vehicle's weight and let the wheel spin freely at the same time; on drive axles, torque transfer is added on top of that. Asking one component to do three jobs at once is exactly why the hub is the single most failure-prone part of the axle group. Its bearings absorb not just vertical load but the lateral force generated in a corner, the fore-aft force from braking, and the peak loads coming up through road shock.
On a drive axle, the differential does two jobs at once: its crown-and-pinion gear set turns the axis of rotation through ninety degrees and multiplies torque, while its planetary gear set lets the outer wheel in a turn spin faster than the inner one. Because the torque involved is so large, reduction is often carried out in two stages — a main reduction at the centre of the housing, topped up by a planetary reduction built into the wheel end. On dead axles the housing is simply a hollow beam with a fixed spindle at each end, and it deflects measurably under load; seeing the wheels on an unladen trailer tuck in very slightly at the top is a function of design, not a fault.
Axle Types: Drive, Dead, Steer and Lift Axles
Axles built for different jobs sit side by side on the same vehicle. On a three-axle tractor unit, the front axle steers and carries load, one of the rear axles drives, and the other only carries load. Maintenance needs, failure patterns and even the spare-parts structure differ completely between these three axles.
| Axle type | Where it is fitted | Role and defining feature |
|---|---|---|
| Steer axle (front axle) | Front of trucks, tractor units and buses | Carries load and generates the steering angle; tie rods, ball joints and kingpins belong to this axle |
| Drive axle (differential axle) | Rear axle group of tractor units and trucks | Splits torque between the two wheels; contains a differential, axle shafts and often a wheel-end reduction |
| Dead (carrier) axle | Second rear axle on tractor units, trailers and semi-trailers | Carries load only, no drive; the hub rotates on a fixed spindle |
| Lift axle | Carrier axle on trucks and tractor units, some trailers | Raised off the road when empty or lightly loaded; reduces tyre wear and rolling resistance |
| Self-steering axle | Long trailers and multi-axle vehicles | Steers itself under cornering force, reducing tyre scrub |
Drive Configurations: What Do 4x2, 6x2, 6x4 and 8x4 Mean?
The 4x2 or 6x4 notation used in heavy-vehicle spec sheets is simple to read once you know the rule: the first number is the vehicle's total number of wheel positions, and the second is how many of those are driven. A dual-tyred end still counts as a single position. On that basis, 4x2 describes a two-axle vehicle with one driven axle, and 6x4 a three-axle vehicle with two driven axles. In notations like 6x2/4, the number after the slash gives the number of steered positions.
| Configuration | What it means | Typical use and character |
|---|---|---|
| 4x2 | Two axles, one drive axle | Line-haul tractor and distribution truck; light, low driveline losses, limited traction |
| 6x2 | Three axles, one drive axle, one carrier axle | High-tonnage road haulage; the carrier axle is often a lift axle |
| 6x2/4 | Three axles, one drive axle, one steerable extra axle | Urban work and tight turns; less tyre scrub and a smaller turning circle |
| 6x4 | Three axles, two drive axles (tandem drive) | Construction, mining, heavy towing; strong traction, more weight and driveline loss |
| 8x4 | Four axles, two drive axles | Concrete mixers, tippers, cranes; the front group often carries two steer axles |
The configuration chosen feeds straight into operating cost. More drive axles mean better traction and hill-climbing ability, but also more rotating mass, more driveline loss and higher fuel burn when running empty. That is exactly why 6x2 has become so common in road-haulage fleets: drive stays on a single axle, while the second axle only carries load. On construction sites, by contrast, continuous traction is the priority.
Load Sharing on Tractor and Trailer Axles: Tandems and Lift Axles
Two axle groups sharing the same road have very different design goals. A tractor drive axle carries load, transmits torque and takes most of the braking effort all at once; its housing is built around a differential cavity, holds gear oil, and containment of that oil depends entirely on the hub seal. A trailer (dead) axle is, in effect, a load-bearing beam — it holds no oil, and its only moving parts are the hub assemblies at each end plus the brake mechanism. That difference shows up directly in the fault pattern: on a drive axle, a leak is usually differential oil finding its way past the seal onto the brake lining; on a trailer axle, it is hub grease escaping.
On a semi-trailer, a significant share of the load at the front of the trailer passes through the kingpin onto the fifth wheel and from there into the tractor's rear axle group. Wear or play in that connection is more than a comfort issue — it changes the nature of the load reaching the axle group. For wear limits, inspection method and lubrication discipline, see the Fifth Wheel & King Pin: Faults, Replacement & Maintenance Guide.
Where two or three axles are grouped close together, the group is called a tandem; the purpose is to spread total weight across the road rather than concentrating it on a single axle. Because the stress an axle places on the road structure tracks the load carried per axle, regulations set limits on both gross weight and load per axle — the exact figures depend on the applicable road transport regulations and the vehicle's registration documents. A tandem only works properly when load is shared evenly between its axles; once that balance is lost, one axle carries more than its share, and the result is accelerated tyre wear, an overheating hub and premature bearing failure.
The brackets that tie the axle group to the chassis are the quiet keepers of that balance. An oval-worn bracket hole, a loose bushing or a cracked weld lets the axle shift position under the chassis by a few millimetres, and the first sign is usually a recurring tyre wear pattern or a slight drift felt while driving straight. These mounting points are covered in the Chassis Mounting Bracket: Failure, Replacement & Care Guide.
A lift axle is a carrier axle that is raised off the road when the vehicle is empty or lightly loaded, breaking tyre contact with the ground. Rolling resistance drops and the tyre stops wearing; the trade-off is that the remaining axle now carries more load, which is why the axle must be lowered again once the vehicle is loaded, or once doing so would otherwise exceed the regulatory limit.
From Axle Housing to Wheel: Spindle, Hub, Brake and Wheel-End Connection
The end section of the axle group is a small number of parts that depend on one another to work, and a fault in one shows up as a symptom in its neighbour. The chain runs in this order: axle housing, the spindle the bearings seat on, inner and outer bearing set, hub body, seal, adjusting nut and retention hardware, hub cap, brake component, wheel studs and rim.
| Component | Function | Field symptom of a fault |
|---|---|---|
| Axle housing and spindle | Carries load, provides the seating surface for the bearings | A crack or bend shows up as recurring tyre wear and geometry that will not correct |
| Inner and outer taper roller bearing set | Absorbs vertical, lateral and fore-aft loads | Drone, play, overheating, metal-flecked grease |
| Wheel hub body | Carries the bearings and the rim, transmits torque | Elongated stud holes, cracking, wheel wobble |
| Hub seal | Keeps grease or oil in, dirt and water out | Leak, contaminated brake lining, a bearing running dry |
| Adjusting nut and locking hardware | Sets bearing preload or end-play | A loose assembly gives play, over-tightening gives heat and early failure |
| Brake disc or drum, ABS tone ring | Transfers brake force to the hub, lets wheel speed be read | Run-out, judder, heat cracking, a false ABS signal |
| Wheel studs, nuts and rim | Locks the wheel to the hub | Loose nuts give vibration, oval holes, risk of wheel loss |
| Axle shaft and flange (on drive axles) | Carries torque from the differential to the hub | Twisting, gear tooth stripping, loss of drive on breakage |
What Is a Wheel Hub and How Does It Relate to the Axle?
The wheel hub is the rotating body that seats, via bearings, on the fixed spindle or bearing journal at the end of the axle, and that carries the rim and brake component. In the trade it is also called the hub assembly, wheel end or, in some markets, simply the "hub bearing". Its job can be summed up in a single sentence: carry the vehicle's weight while letting the wheel spin with as little friction as possible. If the axle is the skeleton that carries the load, the hub is the joint at the end of that skeleton.
Internally, most applications use two tapered roller bearings mounted facing each other. Tapered geometry is chosen because that bearing type can carry vertical load and cornering side load at the same time. With two bearings set opposite one another, the hub is supported in both directions; the further apart they sit, the more resistant the assembly is to bending moment. Grease or oil sits between them, a seal keeps it in, and a hub cap closes off the cavity.
Two design approaches are in use. An adjustable (conventional) hub is the traditional layout, where the bearings are fitted separately and preload or end-play is set with an adjusting nut; the bearings can be serviced individually. A pre-set, sealed hub unit is a factory-matched assembly of bearing, seal and grease with its internal clearance fixed at manufacture; there is no field adjustment, the whole unit is replaced as one, and "tightening it up a bit" at the locknut disturbs the internal geometry.
On a drive axle, the hub takes on one more job: it hands torque coming from the axle shaft over to the rim, and where the wheel end includes a reduction stage, it houses the planetary gear set. In these designs the hub cavity may hold oil instead of grease, complete with its own level and drain plugs. For teardown sequence, measurement points and assembly discipline, the Truck Wheel Hub: Faults, Replacement and Maintenance Guide is a useful companion reference.
Further reading
For a plain-language technical overview of this subject, see the reference article on Wikipedia. Always confirm specific figures and procedures against the vehicle manufacturer service data.
Wheel Hub Bearing Failure Symptoms
A wheel hub bearing does not fail out of nowhere — it gives warning first. The symptoms generally arrive in a set order: first a drone that builds with speed, then a sound that changes character in corners, then play you can feel by hand, and finally overheating and a grease leak. Knowing that order is what lets a crew catch the fault before it strands the vehicle on the road.
| Symptom | Likely mechanism | First check |
|---|---|---|
| Continuous drone that builds with speed | Fatigue or roughening on the bearing raceway | Listen at different speeds; jack the vehicle and spin the wheel by hand |
| Noise that grows or fades in a corner | A change in lateral load loads or unloads the damaged bearing | Note whether the sound changes on left versus right turns |
| Play in the wheel, roughness felt turning it by hand | Worn bearing, loose adjusting nut, or a pitted raceway | Lift the wheel, rock it at 12/6 and 3/9 o'clock, then rotate it slowly |
| Hub running noticeably hotter than the others | Excess preload, insufficient grease, or a dragging brake | Compare hub temperatures after a stop |
| Leak around the hub, lubricant on the brake lining | Seal has failed; escaped grease or oil has reached the friction surface | Clean the surface, drive a short distance, check again for a leak, inspect the lining |
| ABS warning light, steering wheel vibration | Growing play is disturbing wheel alignment and sensor gap | Read the fault code, check sensor gap and tone-ring cleanliness |
| Metallic sheen, darkening or a burnt smell in the grease | Rolling elements or a race have started to spall | Open the cap and inspect a grease sample between the fingers |
No single symptom is conclusive on its own. A drone can come from a worn tyre just as easily as from a hub, and a feeling of play can originate at the tie-rod end; what sets a hub fault apart is how the symptom tracks with speed and cornering direction.
Wheel Hub Diagnosis: Jacking, Play Check and Rotation Test
Checking a hub does not call for special equipment — it calls for the right order and a safe jacking setup. The goal is to separate two questions: is there play in the bearing itself, and is the raceway surface damaged?
- Park the vehicle on level, solid ground, apply the parking brake, chock the wheels that will not be checked, and follow the manufacturer's safety procedure on vehicles with air suspension.
- Raise the vehicle from an approved lifting point and always support it on axle stands; play checks should never be carried out with the vehicle resting on a jack alone.
- Check wheel-stud torque and rim seating first; a loose stud produces a movement that looks very much like bearing play and will throw off the reading.
- Grip the wheel at the 12 and 6 o'clock positions and rock it in and out; the movement felt is the combined axial and radial play in the bearing set.
- Repeat the same check at the 3 and 9 o'clock positions. On a steer axle, play in this direction usually belongs to the tie-rod end or kingpin rather than the hub; have a helper hold those parts by hand while checking to see where the movement actually comes from.
- Where possible, confirm the source with a dial indicator: set the tip square against the hub's face, then push and pull the wheel along the axle centreline to read the axial play directly.
- Release the wheel and turn it slowly by hand. A sound bearing turns smoothly with steady resistance; catching, crunching or a feel that repeats once per revolution points to a damaged raceway. Turn the wheel forward and back and watch the brake component visually to rule out drag from the brake itself.
- Open the hub cap and inspect the grease: darkening, a colour change from water contamination, a metallic sheen or a burnt smell all call for bearing renewal. In oil-filled hubs, a milky consistency points to water ingress, while a dark, metallic appearance points to bearing damage.
- Compare findings against the opposite wheel on the same axle, refit the cap, retorque the wheel studs to the OE value and sequence, and confirm the fix with a short test drive.
Acceptable play varies with axle type and hub design: a very small amount of axial play is considered normal on an adjustable tapered-bearing hub, while any perceptible play at all is treated as a fault on a pre-set sealed unit. The exact limit is always set by the OE service manual.
Bearing Preload and Grease: The Two Things That Determine Hub Life
A large share of hub failures trace back not to part quality but to two basics being applied wrong: preload and lubrication. Tapered bearings can be set up to run with a small amount of play or with a light preload. In a play-set arrangement, the hub is free to move a very small distance; in a preloaded arrangement, the bearings are pressed lightly against one another. Which approach applies is fixed by the design, and the two are not interchangeable. Too much play throws load onto only a few rollers and produces impact loading and accelerated wear; too much preload produces continuous friction, heat and early fatigue. Either extreme ends the same way.
The setting procedure also follows the design. In the common method, the nut is torqued to a set value while the hub is rotated so the bearings seat properly, then backed off by a specified amount before being brought to its final setting and locked. Some designs have no field adjustment at all — clearance is fixed at manufacture by a spacer. Tightening the nut without knowing the correct procedure will wear out a perfectly good bearing in short order.
Three rules govern lubrication. The right product: use a grease of the correct consistency rating specified for wheel bearings; mixing different grease types can break down the thickener structure. The right quantity: filling the cavity completely causes overheating, so it is filled only partially, with the bearings themselves packed by hand. Cleanliness: a single dirty rag or an uncovered tub used for greasing is enough to carry abrasive grit into the bearing.
Wheel Hub and Bearing Replacement: Removal, Installation and Sealing
Most mistakes here do not come from a bad part — they come from a dirty mounting surface, a reused seal, or the wrong tightening sequence. The sequence below is a general framework; torque values, adjustment steps and any special tools are always taken from the OE manual for the specific vehicle and axle type.
- Secure the vehicle, chock it, release air-suspension pressure the way the manufacturer specifies, and set it on axle stands.
- Remove the wheel. A heavy-vehicle wheel and tyre assembly is too heavy for one person to carry — use a proper wheel dolly or lifting equipment.
- Disconnect the brake component in the manufacturer's sequence, remove the ABS sensor and its cable without damaging them, and relieve any tension on the caliper connections.
- Remove the hub cap. On a drive axle, remove the axle shaft and any wheel-end reduction gear set in the manufacturer's sequence, catching any oil that drains in a controlled way.
- Remove the retaining hardware and the adjusting nut. Marking the old nut position gives no useful reference — the setting is always redone from scratch using the manual's procedure.
- Pull the hub off the spindle. If it is seized, use a proper puller; levering it off or striking it leaves a permanent mark on the spindle's seating surface.
- Clean the spindle surface, the bearing bores in the hub and the seal seat of corrosion, scale and any old gasket material; a damaged or burred spindle will wear out a new bearing in short order.
- Press the outer races in with a suitable driver set, square to the bore and fully seated. Forcing a race in through the rollers marks the raceway surface.
- Pack the bearings by hand with the correct grease, fill the cavity to the specified amount, fit the inner bearing and press in a new seal, square and undamaged, in the correct orientation.
- Fit the hub onto the spindle, install the outer bearing and the adjusting nut, set preload or end-play using the manual's tighten-and-back-off procedure, and fit new locking hardware.
- Refit the hub cap with a new gasket, topping up the oil level on oil-filled designs. Reconnect the brake component, ABS sensor and cable clips, and set the sensor gap.
- Refit the wheel, run the nuts up hand-tight, then torque them in a cross pattern to the OE value with a torque wrench. After a short test drive, recheck hub temperature and stud torque — retorquing after the first load is where most loosening gets caught.
Axle Breakage and Torsional Failure: Causes, Symptoms and Prevention
The most serious axle-related failures are a cracked housing, a twisted-off axle shaft and a bent spindle; they are rare, but the consequences are severe, and almost none of them arrive without warning. Axle shaft breakage is usually the result of either a single large torque spike or long-term fatigue. Typical causes include a wheel spinning free in mud and suddenly gripping, an aggressive launch, forcing a climb under excessive load, and sustained operation under continuously high torque. Before it lets go, there is often a warning — a clunk on pull-away or a brief moment of play felt in the drive.
Housing cracking and bending results from impact and overload. The symptom is indirect: tyre wear that keeps recurring even after correction, the vehicle pulling to one side when driven straight, and a measured axle-to-axle distance that differs from one side to the other. Chasing this with wheel balancing or a toe adjustment wastes time — the measurement needs to be taken against the axle housing and the chassis geometry.
A bent spindle is more insidious. A hub cannot run true on a bent spindle; the bearing is loaded differently on every revolution, grease collects on one side, and the seal starts leaking because it is no longer running concentric. This is the most common reason a freshly replaced bearing fails again quickly — the second time a bearing fails on the same wheel, the question is no longer the bearing itself, it is the surface it is seated on. Prevention comes down to operating discipline: distributing load evenly, staying within axle load limits, and periodic inspection of suspension mounts.
Technical Values, Inspection Criteria and General Reference Ranges
The table below gathers the figures most often needed, at an order-of-magnitude level. They are not meant to be used to make a pass/fail call on their own, but to judge whether a measured result is in the right ballpark — the exact figure always belongs to the vehicle's specific axle type and OE documentation.
| Value or check | General reference criterion | Interpretation |
|---|---|---|
| Hub axial play | A very small amount on an adjustable design; treated as zero on a sealed unit | Any perceptible play on either design warrants inspection |
| Bearing preload | Set with play or with light preload, depending on design | Choosing the wrong approach wears the bearing out quickly |
| Adjusting nut tightening procedure | Seating torque, specified back-off, then final setting | Skipping the procedure leaves bearings improperly seated and play develops quickly |
| Wheel stud torque and sequence | OE value, cross pattern, retorque after first load | A loose stud produces a feeling of play and elongates the stud holes |
| Hub temperature | Judged by the difference between axles, not an absolute figure | A hub noticeably hotter than the rest is suspect |
| Grease type and quantity | Grease specified for wheel bearings, cavity partially filled | Overfilling causes overheating; mixing grease types breaks down the thickener |
| Seal and locking hardware | Renewed at every teardown | Reuse results in a leak |
| Axle load limit and axle geometry | Set by regulation and registration data; compare side-to-side distance | The first place to check for recurring tyre wear |
Maintenance, Service Life and the Axle Group's Place in the Vehicle
Neither the hub nor the axle has a fixed replacement interval — service life is set far more by operating conditions than by mileage. Two examples of the same model can run completely different lifetimes: one covers a very high mileage without a single bearing change, while the other, running shorter routes under heavy load on rough ground, needs a hub rebuilt much sooner. Axle maintenance is therefore built on observation rather than a calendar.
- Temperature scan: On longer stops, compare hub temperatures across axles and between sides; a noticeable difference is what starts an investigation.
- Leak check: Regularly inspect the hub cap, seal area and around the brake component for signs of grease or oil.
- Play check: During scheduled maintenance, lift the wheels and run the rock-and-rotation check, logging the result against the vehicle.
- Stud retorque: Retorque wheel nuts after every wheel-off job and after the first load.
- Reading tyre wear: A wear pattern is the cheapest diagnostic tool there is for axle geometry and bearing condition.
- Wash discipline: Keep high-pressure water off the seal and hub cap area directly; water ingress breaks down the grease structure.
- Suspension and records: Inspect air bellows, leaf springs, torque rods, bushings and chassis brackets, and log every bearing, seal and hub replaced against mileage in the vehicle file.
The axle group is the least talked-about, hardest-working part of the vehicle. An engine fault stops the vehicle; an axle fault threatens control of it. And within that group, the wheel hub is the part that gives the earliest warning — and the one whose warning gets ignored most often. The order that works in the field is this: first separate whether the noise tracks with speed or with the brake, then confirm stud torque and rim seating, then measure play, and only then inspect the grease and the raceway surface. For every figure quoted here, the vehicle's specific axle type and its current OE service documentation always take precedence.
Shop this part: Wheel Hub
In-depth technical guide: For fault diagnosis, step-by-step replacement and service intervals: Truck Wheel Hub: Faults, Replacement and Maintenance Guide
All our technical guides on this topic
- Truck Wheel Hub: Faults, Replacement and Maintenance Guide
- Chassis Mounting Bracket: Failure, Replacement & Care Guide
- Chassis Mounting Bracket: Crack, Loosening and Replacement Guide
- Fifth Wheel & King Pin: Faults, Replacement & Maintenance Guide
VADEN ORIGINAL products
- Fifth Wheel — 58 products
- Chassis — 17 products
- Wheel Hub — 10 products
- Axle Lift Valves — 14 products
Tags
Frequently Asked Questions
- What is a truck axle and what does it do?
- An axle is the load-bearing structure that connects a pair of opposing wheels to one another and, through the suspension, to the chassis. It carries the weight of the vehicle and its payload down to the road, transmits torque from the engine to the wheels on drive axles, and carries the steering angle on the front axle. How many tonnes a heavy vehicle can carry and what surfaces it can generate traction on depend heavily on axle configuration.
- What is a wheel hub?
- The wheel hub is the rotating body that seats, via bearings, on the fixed spindle or bearing journal at the end of the axle, and that carries the rim and brake component. It is also called the hub assembly, wheel end or hub bearing. Its job is to carry the vehicle's weight while letting the wheel spin with as little friction as possible.
- What do 6x2 and 6x4 mean on a truck?
- In this notation, the first number is the vehicle's total number of wheel positions and the second is how many of those are driven; a dual-tyred end still counts as a single position. 6x2 describes a three-axle vehicle with one drive axle, while 6x4 describes a three-axle vehicle with two drive axles. 6x2 gives road-haulage fleets a fuel advantage, while 6x4 is preferred on construction and off-road work that needs continuous traction.
- What happens when a wheel hub bearing fails?
- The symptoms generally arrive in a set order: first a drone that builds with speed, then a sound that changes character in corners, then play you can feel by hand in the wheel, and finally overheating and a grease leak. As it progresses, the bearing is left running dry, the hub overheats severely, and the risk grows into serious damage that can go as far as losing the wheel. That's why a rising drone or overheating should never be driven through.
- How do you tell if a wheel hub bearing is making noise?
- A hub-related noise changes in proportion to speed, and its character shifts noticeably with lateral load — it may fade in a right turn and grow in a left turn. Since the same drone can also come from a tyre with an uneven wear pattern, it should be confirmed by lifting the vehicle and spinning the wheel by hand. Catching, crunching, or a feel that repeats once per revolution points to a damaged raceway.
- How do you check a wheel hub for play?
- With the vehicle supported on axle stands, grip the wheel at the 12/6 and 3/9 o'clock positions and rock it; wheel-stud torque should be confirmed first, since a loose stud produces a movement that looks very much like bearing play. For a precise reading, a dial indicator is used: the tip is set square against the hub's face and the wheel is pushed and pulled along the axle centreline to read the axial play directly. The acceptable limit varies by axle type and is set by the OE service manual.
- Does the seal need to be replaced when the wheel hub is replaced?
- Yes. The seal is renewed at every teardown; the mark its lip has worn into the old surface will not seal the same way against a new surface. The inner bearing, outer bearing, seal and locking hardware should always be renewed together as a set, because escaped grease or differential oil reaching the brake lining is a direct threat to braking performance.
- What is a lift axle for?
- A lift axle is a carrier axle that is raised off the road when the vehicle is empty or lightly loaded, breaking tyre contact with the ground. This reduces rolling resistance and tyre wear, which is one reason 6x2 configurations are popular in road-haulage fleets. The trade-off is that lifting the axle increases the load on the remaining axle, so it must be lowered again once the vehicle is loaded or once the regulatory limit would otherwise be exceeded.
- Why do axle shafts break?
- Axle shaft breakage is usually the result of a single large torque spike or long-term fatigue. Typical causes include a wheel spinning free in mud and suddenly gripping, an aggressive launch, forcing a climb under excessive load, and sustained operation under continuously high torque. Before it lets go, there is often a warning — a clunk on pull-away or a brief moment of play felt in the drive.
- How often should wheel hub grease be changed, and what type should be used?
- There is no fixed interval; service life depends far more on operating conditions than on mileage, which is why grease condition is checked at scheduled maintenance by opening the hub cap. Darkening, a colour change from water contamination, a metallic sheen or a burnt smell all call for renewal. A grease of the correct consistency rating specified for wheel bearings should be used, and the cavity should be only partially filled — the exact product and quantity are set by the OE service manual.
Related Articles
Truck Wheel Hub: Faults, Replacement and Maintenance Guide
How to spot truck wheel hub bearing noise, heat and seal leaks, set bearing endplay correctly, replace the hub step by step and extend its service life.


