What Is a Clutch? How It Works, Failure Symptoms and Disc Life
How a heavy-duty clutch works, why it slips or drags, and what really determines clutch disc life — a technician's field guide.
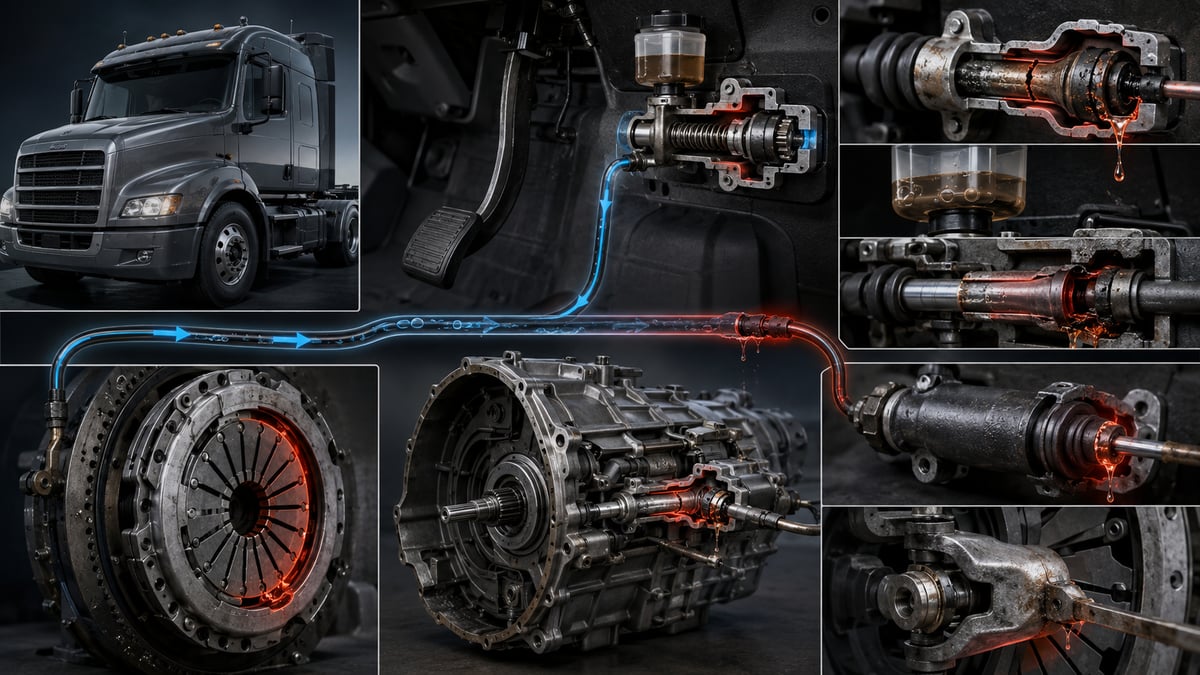
A loaded tractor unit pulling away on a ramp is the moment a heavy commercial vehicle's clutch works hardest. The driver applies throttle, eases off the pedal, and the truck creeps forward — but engine speed does not drop the way it should; a few seconds later a faint smell of burning drifts into the cab. Weeks later, the same truck is on flat road, in a high gear and fully loaded, and when the driver presses the accelerator the revs climb but the road speed does not follow. These are two points on the same story: the friction surface can no longer carry the torque being asked of it. This guide treats the clutch not as a single spare part but as a complete engagement system running from the flywheel to the pedal unit — what it does, how it works, which mechanism produces which fault, and what actually decides how long the friction lining lasts, seen through the eyes of a heavy-duty technician.
What Does a Clutch Do? The Engagement Link Between Engine and Transmission
A clutch is a friction coupling that transfers the engine's rotating torque to the transmission input shaft in a controlled way, and that can break this connection completely when needed. Its job is not simply to connect and disconnect; it manages the connecting process itself. A diesel engine cannot run smoothly below a certain idle speed, yet the vehicle has to pull away from a complete stop. The clutch is the only component that resolves this contradiction: on pull-away, the engine holds its own speed while the transmission input shaft starts from zero, and the speed difference between the two closes through a few seconds of controlled slip.
Alongside engagement, the clutch performs three further functions. First, it makes gear changes possible: in a synchromesh transmission, the gears can only mesh once torque at the input shaft has been interrupted. Second, it filters torsional vibration: every firing pulse from a diesel engine sends a shock through the driveline, and the springs in the disc hub cushion that shock. Third, it protects against overload: under a sudden torque spike, the clutch slips briefly and protects the transmission gears and shaft.
How Does a Clutch Work? Engaged, Slipping and Released
How the clutch works comes down to a simple balance of forces. The disc is clamped between the engine's flywheel and the pressure plate of the clutch cover assembly; this clamping load is produced by a diaphragm spring inside the cover, or in some heavy-duty applications by a set of coil springs. When the pedal is untouched, the spring presses the disc against the flywheel and torque is transmitted — in other words, the clutch's natural, at-rest state is engaged. When the pedal is pressed, the system overcomes this spring load and opens the connection.
Pedal movement is carried through a hydraulic or mechanical linkage to the release fork, and from there to the release bearing. The bearing applies axial force to the rotating diaphragm-spring fingers; the fingers act as levers, pulling the pressure plate away from the disc and breaking the torque path. The torque a clutch can carry is the product of four quantities: the coefficient of friction, the spring clamping force, the effective radius of the friction surface, and the number of friction surfaces. The moment this product falls below the engine's peak torque, the clutch begins to slip.
There are two clamping-load architectures, depending on the direction the linkage pulls. In a push-type design, the release bearing pushes against the diaphragm-spring fingers; in a pull-type design, it pulls the fingers toward itself. Because a pull-type cover delivers higher clamping force at the same diameter, it is common on heavy tractor units — but its removal procedure and bearing attachment differ, and fitting the wrong tool type is a mistake that goes unnoticed at installation and turns into a failure the first time the vehicle is driven.
What Parts Make Up a Clutch System?
In the field, "the clutch was replaced" usually means the three-piece kit of cover, disc and release bearing. Yet the root cause of a failure is often outside that trio; a worn-out pedal unit or a cracked flywheel can use up a perfectly good kit within a short time.
| Component | Function | Symptom of a fault in the field |
|---|---|---|
| Flywheel (friction surface) | Provides the main friction surface the disc clamps against, plus the inertia mass | Heat cracking, warping, vibration, premature lining wear |
| Cover assembly (pressure plate and diaphragm spring) | Clamps the disc to the flywheel, releases it on pedal command | Slipping, heavy pedal, failure to disengage, judder on pull-away |
| Clutch disc and friction lining | Transfers torque by friction, filters torsional shock | Slipping, burning smell, shudder, metallic screech |
| Release bearing (throw-out bearing) | Transmits axial force to the rotating diaphragm-spring fingers | Growing whine when the pedal is pressed, whistling, sticking |
| Pilot bearing or bushing | Centres the tip of the transmission input shaft | Failure to disengage, hard gear engagement, noise |
| Master cylinder and pedal unit | Converts pedal force into hydraulic pressure | Pedal sinking to the floor, sponginess, progressive catch point |
| Slave cylinder or air-assisted servo | Converts pressure into mechanical movement at the fork, boosts force | Failure to disengage, fluid leakage, heavier pedal |
How the table is read matters. A single symptom the driver describes usually matches more than one row: a complaint of "the clutch won't disengage" can equally point to air in the hydraulic line, a worn-out master or slave cylinder, a fork that has developed play, a worn pilot bushing, or a warped disc. For that reason diagnosis works by verifying the linkage step by step, not by swapping a part and hoping.
What Is a Clutch Facing? Construction, Material and How It Wears
The clutch facing (friction lining) is the friction material riveted or bonded to both sides of the disc; it is the surface that actually carries the torque. Its job is inherently contradictory: it must have a high enough coefficient of friction to carry the torque, yet be tough enough to tolerate the slip and heat generated on every pull-away.
Modern heavy-duty facings are composite materials — glass, steel and ceramic fibres bound in an organic resin matrix; in heavier applications, segmented ceramic-metallic facings are used instead. A segmented facing tolerates heat better, but engages more sharply and, if abused, sends a harder shock through the driveline. Two elements hidden beneath the lining are just as decisive: the cushioned marcel plate lets engagement happen over a short, progressive ramp, while the torsion springs in the hub filter firing pulses; a disc with weakened springs gives itself away through a rattle from the transmission at idle.
Facing wear progresses through two mechanisms. Normal wear is the steady toll taken by the controlled slip of everyday pull-aways. Abnormal wear comes from overheating: once surface temperature exceeds the material's tolerance, the resin binder breaks down, the surface glazes over, and the coefficient of friction drops. A glazed facing can look thick enough and still fail to carry torque — this is the mechanism behind the complaint "there was plenty of lining left, but it kept slipping."
Single-Disc vs Dual-Disc Dry Clutch: What's the Difference?
Two basic designs run side by side in the heavy commercial vehicle fleet. A single-disc dry clutch works with one disc and two friction surfaces; it is simple, light and easy to service. A dual-disc (twin-plate) dry clutch adds an intermediate plate between two discs, giving four friction surfaces. Because the number of surfaces doubles, the torque that can be carried at the same clamping force and the same diameter increases significantly.
| Criterion | Single-disc dry clutch | Dual-disc dry clutch |
|---|---|---|
| Number of friction surfaces | Two surfaces | Four surfaces |
| Torque capacity | Lower at the same diameter | Significantly higher at the same diameter |
| Typical use | Medium-tonnage trucks, urban distribution, part of the bus range | Heavy tractor units, high-torque engines, heavy off-road and construction duty |
| Engagement feel | Softer, more forgiving on pull-away | Sharper, release timing is critical |
| Heat capacity | Limited, heats up quickly under prolonged slip | Heat spread across more surfaces, still slip-sensitive |
| Service approach | Disc orientation and centring are enough | Disc sequence, intermediate-plate guides and orientation must also be verified |
The most common assembly mistake on dual-disc systems is the intermediate plate's guide pins not releasing freely. If the guide pins stick, the intermediate plate cannot retract when the pedal is pressed, and the clutch keeps partially engaging; this is the reason behind a large share of vehicles that come back complaining "gears are hard to select" right after a new kit has been fitted.
Clutch Actuation: Hydraulic, Mechanical and Air-Assisted Systems
How pedal force reaches the release fork depends on the vehicle's class and manufacturer — and so does the diagnostic approach.
Hydraulic actuation is the most common. The master cylinder attached to the pedal pressurises fluid, the pressure is carried through pipe and hose to the slave cylinder, and the slave cylinder pushes the fork. On heavy commercial vehicles, an air-powered booster is usually added into this chain so the driver's pedal effort stays at a manageable level. Failure symptoms, sealing behaviour and replacement of the master and slave cylinder are covered in detail in the Clutch Central Unit (Lower/Upper Servo): Faults & Replacement guide; rather than repeating that material, this guide places it within the system as a whole.
Mechanical actuation uses a linkage chain of a telescopic shaft, rods and joints between the pedal and the fork; part of the chain is telescopic because the cab can tilt. Its advantage is that it does not depend on fluid; its disadvantage is that joint wear builds up play over time, which is why checking pedal free play is part of routine maintenance.
The pedal unit is an overlooked link that fails often. The pedal arm, its bushings, the return spring and the master-cylinder linkage all come together here; play in the bushing or the connecting pin absorbs part of the pedal travel even on an otherwise sound hydraulic system. Typical faults and replacement discipline for this unit are covered in the Hydraulic Clutch Pedal Unit: Fault Diagnosis, Replacement, Maintenance guide; part of every "we replaced the master cylinder but the pedal is still off" case traces back here.
| Actuation type | How force is transmitted | Weak point | First diagnostic step |
|---|---|---|---|
| Fully hydraulic | Master cylinder, pipe and hose, slave cylinder | Air ingress, internal leakage, moisture in the fluid | Fluid level, wetness along the lines and bellows, pedal feel |
| Hydraulic with air-assisted booster | Hydraulic signal, boosted by compressed air | Servo internal seal, air supply pressure | System air pressure, leak noise from the servo |
| Mechanical telescopic linkage | Rod, joint and telescopic shaft | Joint wear, growing play, lack of lubrication | Measuring pedal free play, checking the joints |
| Concentric release cylinder | A cylinder around the input shaft pushes the bearing directly | Leakage inside the bell housing, poor access | Fluid trace under the bell housing, change in pedal travel |
Clutch Slip and Clutch Drag: The Two Core Fault Families
Nearly every clutch fault falls under one of two headings, and the two are opposites of each other. Slip is the clutch failing to engage when it should. Drag (failure to disengage) is the clutch failing to break the connection when it should. Drivers often mix the two up in their description; the first job of diagnosis is to establish which family the fault belongs to.
What Is Clutch Slip, and What Causes It?
Slip is engine speed rising without a matching rise in road speed. It shows up most clearly under sudden throttle in a high gear at full load: revs climb, speed does not follow. A burning smell confirms it, because the slipping surface is generating heat.
The causes form a chain. The most common is a worn or glazed facing. Second is a fatigued diaphragm spring: once clamping force drops, torque cannot be carried even with a sound facing. Third is oil contamination on the friction surface; oil leaking from the rear crankshaft seal or the input-shaft seal lowers the coefficient of friction. Fourth is the linkage not fully releasing the disc: a slave cylinder that does not return, or a badly adjusted linkage, produces continuous partial slip even with the pedal fully released. Fifth is driving behaviour: resting a foot on the pedal, riding the clutch too long on pull-away, or holding the vehicle on a grade with the clutch instead of the brake.
What Is Clutch Drag, and What Causes It?
Drag is the connection between engine and transmission failing to break fully even with the pedal pressed to the floor. It shows up as difficulty shifting, gear grinding, and a crunching noise when engaging first or reverse from a standstill. The leading causes are air or an internal leak in the hydraulic chain and excess play in the mechanical linkage; both absorb part of the pedal travel. Third is wear in the pilot bushing or the input-shaft splines: if the disc hub cannot slide freely on the shaft, the disc does not lift off the surface even once the plate retracts. Fourth is heat distortion of the disc; on dual-disc systems, a sticking intermediate plate joins this list too.
Further reading
For a plain-language technical overview of this subject, see the reference article on Wikipedia. Always confirm specific figures and procedures against the vehicle manufacturer service data.
Clutch Failure Symptoms and First Checks
What the driver describes and what the workshop finds often do not line up. The table below starts from the symptom the driver reports and matches it to the likely mechanism and the fastest way to confirm it.
| Symptom | Likely mechanism | First check |
|---|---|---|
| Revs climb in a high gear, no matching speed | Glazed or worn facing, fatigued pressure spring | Controlled slip test with the parking brake set |
| Burning smell on pull-away under load | Excess slip, surface temperature over the limit | Question the duty cycle, check bell housing temperature |
| Gears hard to select, grinding noise | Incomplete disengagement: air, play, sticking hub | Measure pedal travel and slave-cylinder piston movement |
| Pedal sinks to the floor, does not return | Internal hydraulic leak, return spring, pedal bushing | Check fluid level and master-cylinder bellows |
| Pedal feels spongy, catches progressively | Air in the line, moisture in the fluid, swollen hose | Compare pedal feel before and after bleeding |
| Whine or whistle when the pedal is pressed | Release bearing worn or dry of grease | Compare the sound with the pedal pressed and released |
| Judder on pull-away, vehicle hops forward | Oil on the friction surface, warped disc, loose mounting | Check under the bell housing for oil and inspect engine mounts |
| Vehicle creeps forward in gear with the pedal down | Drag, disc not lifting off the surface | Engine at idle, pedal held down, observe behaviour in first gear |
| Metallic screech, a scraping sound on engagement | Facing rivets touching the surface, lining worn through | Slip test and a look through the inspection hole |
Two traps apply when reading symptoms. First, release-bearing noise and input-shaft bearing noise are easily confused; note whether the sound is more pronounced with the pedal pressed or released. Bearing noise and what determines release-bearing life are covered in detail in the Clutch Release Bearing: Fault, Replacement and Care Guide. Second, a slipping symptom does not always come from the clutch: a tired engine or another loss elsewhere in the driveline can produce a similar "power isn't getting through" complaint.
Diagnosing a Clutch: Step by Step, on the Road and in the Workshop
The golden rule of clutch diagnosis is proving the actuation chain is sound before the bell housing is ever opened. Dropping a transmission is expensive, and a large share of "clutch faults" turn out to be air in the hydraulic line or a badly adjusted linkage. The sequence below runs from cheapest to most expensive.
- Pin down the complaint: ask the driver separately which gear, which load and which grade the symptom is tied to, and use that description to classify it as slip or drag.
- Check the hydraulic fluid level and colour; if the level has dropped, inspect the master-cylinder bellows, the lines, the hoses and the slave cylinder one by one for wetness.
- Measure pedal free play and total travel against the manufacturer's method; on a mechanical linkage, check the joints for play by hand.
- On air-assisted systems, confirm that system air pressure is within the normal range; low pressure leaves disengagement incomplete even with a sound servo.
- With the engine running, press the pedal fully and observe how far the slave cylinder or fork actually moves; if movement is shorter than expected, the fault is in the actuation, not the bell housing.
- Test disengagement in practice: with the engine at idle and the pedal held down, select first gear and note any grinding and whether the vehicle tends to creep forward.
- Test for slip in a controlled way: with the vehicle secured and the parking brake applied, engage the clutch slowly in a high gear. If engine speed rises without stalling, the clutch is slipping.
- Where possible, read disc thickness and the wear indicator on the pressure plate through the inspection hole and log the findings in the vehicle file. Only open the bell housing once the rest of the chain has been cleared.
When Does a Clutch Need Replacing, and What Should Be Replaced Alongside It?
A clutch has no fixed replacement interval; what determines its life is not the distance covered but how those miles were driven. The replacement decision is therefore made on three criteria rather than a calendar: confirmed slip, facing thickness or the wear indicator reaching its limit, and the nature of any damage found once the bell housing is open. Once the bell housing has been opened, replacing a single part and closing it back up is false economy: the overwhelming share of the labour goes into removal and refitting, and leaving one tired part inside means repeating that same labour within a few months.
| Part | Approach | Reason |
|---|---|---|
| Clutch disc | Always renewed | This is the main wear surface |
| Cover assembly (pressure plate) | Renewed together with the disc | Spring force has fatigued and needs to be matched to the new disc |
| Release bearing | Always renewed | Its life runs out on the same schedule as the kit; replacing it later means the same labour again |
| Pilot bearing or bushing | Inspected, renewed if in doubt | Its wear directly causes drag |
| Flywheel surface | Measured; machined or renewed if cracked, showing blue heat marks, or warped | A damaged surface eats through a new facing quickly |
| Rear crankshaft seal and input-shaft seal | Renewed if there is any sign of leakage | Oil contamination will make a new kit slip within a short time |
Two points decide the installation. The first is disc orientation: if the raised side of the hub faces the wrong way, the disc will not seat correctly against the flywheel; most discs carry a marking to show which way round they go. The second is centring: unless the disc is held on the input-shaft axis with a proper alignment tool while the cover is tightened, the transmission will not seat, and forcing the shaft home damages both the hub and the pilot bushing. Cover bolts are torqued in stages, in a crossing pattern, to the OE figure.
Driving Habits and Pull-Away Technique That Decide Facing Life
Two identical tractor units running the same route with the same load can see clutch life differ by a factor of two. The one variable making that difference is how the driver uses the pedal. The energy the facing burns through is the product of slip time and the torque being transmitted — in other words, every long, dragged-out slip takes a direct bite out of service life.
The correct pull-away technique on a heavy commercial vehicle is the opposite of a car driver's habit. Applying more throttle to get a loaded truck moving only stretches out the slip; the right method is to start in a lower gear, hold the engine in its peak-torque band, and release the pedal steadily. In a multi-speed transmission, an unladen pull-away can start in a taller gear, while a loaded one calls for the shortest gear available to shorten slip time. In every case, the goal is to complete engagement as quickly as possible.
A hill start is where facing life is used up fastest. Holding the vehicle on a grade with the clutch alone, to stop it rolling back, creates continuous slip and can overheat the facing within minutes. The correct method is to hold the vehicle with the parking brake or a hill-start aid and release the brake only once the engagement point is reached. What drivers call "burning the clutch" is exactly this: temperature exceeding the material's tolerance, the resin breaking down, and the surface glazing over. The burning smell is the last stage of that process — by the time it is noticed, the damage has already started. Running the vehicle constantly in too high a gear at too low a speed has a similar effect; the short bursts of slip needed to make up torque add up over time and wear the facing out.
How Does the Clutch Behave in an AMT (Automated Manual Transmission)?
Most of today's heavy commercial vehicle fleet now runs an automated manual transmission (AMT). A common misconception is that a truck with automated shifting has no clutch at all. An AMT still uses a dry clutch, and mechanically it is identical to a manual system; the only thing that changes is that an actuator takes the place of the pedal. Actuation is handled by an electric or air-powered actuator under the control of the transmission control unit.
This has two practical consequences. First, engagement quality now depends on the system's calibration rather than the driver's foot. The control unit continuously learns the engagement point and the actuator's travel; as the facing wears, the engagement point shifts, and the system compensates through its adaptation values. Once those values are used up, the vehicle raises a fault code — so the first symptom is often electronic rather than mechanical.
The second consequence is that a learning cycle after clutch replacement is mandatory. Fitting a new kit changes the engagement point; unless the adaptation is reset and relearned, the vehicle pulls away harshly, judders, or does not move at all. A good share of "we fitted a new clutch and now the truck shudders" complaints trace back not to a faulty part but to a skipped adaptation. The system is programmed to limit prolonged slip, but forcing extended creep in manoeuvring mode produces the same overheating, and a clutch overheating warning appears on the dash; when it does, the correct response is to stop in a safe place and let the system cool down.
Technical Values and General Reference Ranges
The table below gathers the figures most often needed in the field, given as an order of magnitude; they are not meant for making a decision, only for judging whether a measured result looks reasonable.
| Value | General reference figure | Interpretation |
|---|---|---|
| Disc diameter | Generally above 300 millimetres in heavy commercial vehicle classes | Diameter grows with the torque carried; check the engine code when selecting a kit |
| Facing thickness limit | The minimum thickness in the OE manual, or the wear indicator on the cover | Adequate thickness does not guarantee torque capacity if the surface is glazed |
| Pedal free play | A narrow range set by the manufacturer, adjusted on mechanical systems | Too much play causes drag; none at all causes constant partial slip |
| Release travel | The OE figure for how far the bearing must move | Insufficient travel leaves disengagement incomplete; excess travel overloads the diaphragm |
| Cover bolt torque | OE value, applied in stages and in a crossing pattern | Uneven tightening distorts the cover body |
| AMT engagement-point adaptation | Performed at every kit and actuator replacement | Skipping it causes harsh pull-away and judder |
| Kit service life | Determined by the duty cycle, not the distance covered | Urban and site work is far shorter than long-haul running for the same mileage |
The real rule behind the table is this: no numerical value for a clutch can be used independently of the engine, transmission and chassis code. The same engine from the same manufacturer can call for very different figures depending on the transmission or the actuation architecture fitted.
Maintenance, Life Tracking and a Fleet Checklist
A clutch has no periodic maintenance in the classic sense; the kit is renewed as a whole once the wear material is used up. What it does have is a monitoring discipline that extends life and catches a developing fault early.
- Hydraulic fluid level and condition: Check the level periodically; renew fluid that has darkened or absorbed moisture per the OE interval; a persistent drop in level starts the search for a leak.
- Leak inspection: Check the master-cylinder bellows, the lines, the hoses, the slave cylinder and underneath the bell housing for wetness at every service.
- Pedal-feel log: Record driver reports of the pedal going harder, softer, or the engagement point shifting; an engagement point moving upward is the earliest sign of wear.
- Noise tracking: A growing whine when the pedal is pressed points to the release bearing; a rattle that disappears in gear points to the disc springs.
- Driver feedback: Log any report of a burning smell; even a single occurrence takes a permanent bite out of the kit's remaining life.
- AMT adaptation values: On automated-transmission vehicles, read the clutch adaptation values periodically; a value approaching its limit buys time to plan a replacement.
- Service record: Log the replaced kit's part number, mileage, any flywheel work, and the adaptation performed; comparing life across a fleet is only possible with this record in place.
The clutch is the link in the driveline closest to the engine, and the one most sensitive to how it is used; how long it lasts is decided less by the factory that built it than by the driver at the wheel and the workshop that maintains it. A vehicle arriving at the workshop with a diagnosis of "clutch fault" is often the start of the real diagnosis, not the end of it. The correct order is fixed: first prove the actuation delivers full travel, then that no oil has reached the friction surface, then that the flywheel and hub side are sound; the facing is blamed last. At replacement, the kit is treated as a whole, seals and the pilot bushing are not skipped, and the post-installation adaptation is never left out. In every case, the vehicle's current OE service documentation for its engine and chassis code is authoritative.
Clutch Master and Slave Cylinder Fault Symptoms
In a hydraulically actuated clutch, two cylinders form the link between the pedal and the release fork: the master cylinder under the pedal generates pressure, and the slave cylinder on the transmission side converts that pressure into motion. Since both rely on sealing elements to work, their faults look very similar to each other; telling them apart is the first step toward avoiding an unnecessary parts replacement.
The most recognizable sign of a cylinder fault is a change in pedal behavior. The pedal turns unusually light, gives a spongy feel midway through its travel, or sinks to the floor and returns slowly. Gear changes become difficult, with the strain most noticeable shifting into first or reverse from a stop. In some vehicles the symptom temporarily clears after pumping the pedal a few times — a strong indication of air or an internal leak in the system.
| Observation | More likely points to | How to verify |
|---|---|---|
| Pedal sinks to the floor, returns slowly | Master cylinder internal leak | Check for leak traces under the pedal and at the firewall passthrough |
| Wetness or dripping around the bellhousing | Slave cylinder external leak | Lift the boot and inspect the cylinder end and pushrod |
| Hydraulic fluid level drops with no visible trace outside | Master cylinder internal leak (fluid bypassing back to the reservoir) | Monitor fluid level and run a pedal-hold test |
| Symptom clears after pumping the pedal | Air or an internal leak in the system | If the symptom persists after bleeding, suspect a cylinder |
| Clutch disengages but the pedal has gone stiff | Not the cylinder; check the fork, release bearing, or the control line | Inspect the line and mechanical linkage |
Ignoring a cylinder fault is not just a comfort issue: a clutch that fails to disengage fully strains the gear teeth and synchronizers, and needlessly burns the friction disc during heavy-load pull-away. Once the symptom appears, the hydraulic side of the system should be assessed as a whole, including fluid quality and moisture content.
The removal of these two cylinders, the bleeding sequence, and the post-installation checks are covered step by step in the Clutch Central Unit (Lower/Upper Servo): Faults & Replacement guide.
Shop this part: Clutch
In-depth technical guide: For fault diagnosis, step-by-step replacement and service intervals: Clutch Central Unit (Lower/Upper Servo): Faults & Replacement
All our technical guides on this topic
- Clutch Release Bearing: Fault, Replacement and Care Guide
- Clutch Hose Failure, Replacement and Maintenance Guide | VADEN
- Clutch Central Unit (Lower/Upper Servo): Faults & Replacement
- Clutch Fork: Fault, Replacement and Maintenance Guide
- Hydraulic Clutch Pedal Unit: Fault Diagnosis, Replacement, Maintenance
VADEN ORIGINAL products
- Clutch — 431 products
- Clutch Servo (Clutch) — 218 products
- Clutch Servo — 91 products
- Release Forks — 31 products
Tags
Frequently Asked Questions
- What is a clutch and what does it do?
- A clutch is a friction coupling that transfers the engine's rotating torque to the transmission input shaft in a controlled way, and that can break this connection completely when needed. Because a diesel engine cannot idle smoothly below a certain speed while the vehicle must still pull away from zero, the clutch closes that speed gap through a few seconds of controlled slip. It also interrupts torque so gears can be changed, filters firing-pulse vibration, and slips briefly under a sudden load spike to protect the driveline.
- What is a clutch facing (disc lining), and when does it need replacing?
- The clutch facing is the friction material riveted or bonded to both sides of the disc; it is the surface that actually carries the torque. The replacement decision is made on three criteria rather than a calendar: confirmed slip, facing thickness or the wear indicator reaching its limit, and the nature of any damage found once the bell housing is open. For the exact thickness limit, the current OE service manual for the vehicle's engine and chassis code is authoritative.
- How can you tell if a clutch is slipping?
- Slip is engine speed rising without a matching rise in road speed; it shows up most clearly under sudden throttle in a high gear at full load, and the slipping surface generating heat often adds a burning smell. To confirm it, secure the vehicle, apply the parking brake, and engage the clutch slowly in a high gear — if engine speed climbs without the engine stalling, the clutch is slipping.
- Clutch won't disengage and gears are hard to shift — what causes it?
- Drag is the connection between engine and transmission failing to break fully even with the pedal pressed to the floor. The most common causes are air or an internal leak in the hydraulic chain, excess play in a mechanical linkage, a worn pilot bushing or worn input-shaft splines, and a disc warped by heat. On dual-disc systems, an intermediate plate that sticks on its guide pins produces the same result.
- Why does a clutch smell burnt?
- The smell comes from the friction surface slipping for longer than it can tolerate and overheating. Once surface temperature exceeds the material's limit, the resin binder breaks down, the surface glazes over, and the coefficient of friction drops — what drivers call burning the clutch. By the time the smell is noticed, the damage has already started, because a glazed facing can look thick enough and still fail to carry torque.
- What parts should be replaced along with the clutch?
- As a rule, the disc, the cover assembly (pressure plate) and the release bearing are renewed together as a kit. The pilot bearing or bushing, the flywheel surface, and the rear crankshaft and input-shaft seals are inspected and addressed in the same job if there is leakage, cracking, blue heat marks or warping. Since most of the labour goes into removing and refitting the transmission, leaving one tired part inside is false economy.
- How long does a heavy-duty clutch last?
- A clutch has no fixed replacement interval; its life is decided not by distance covered but by how those miles were driven. A tractor unit running long-haul with the same load can get twice the clutch life of an identical vehicle working urban distribution or a job site. The number of pull-aways, load, gradient and how the driver uses the pedal are the deciding factors.
- Why does the clutch pedal feel hard or sink to the floor?
- A pedal that sinks to the floor and does not return usually points to an internal hydraulic leak, a weak return spring, or wear in the pedal bushing; a spongy, progressively catching pedal points to air in the line. A pedal that has gone unusually heavy often points to a weakening air-assisted booster or a sticking mechanical linkage. The first checks are fluid level, the master-cylinder bellows, the lines and the slave cylinder for wetness.
- Does an automated manual transmission (AMT) truck have a clutch?
- Yes. An AMT still uses a dry clutch that is mechanically identical to a manual system; the only change is that an electric or air-powered actuator takes the place of the pedal, under the control of the transmission control unit. Because of this, a learning cycle to reset the engagement-point adaptation is mandatory after every clutch replacement — skipping it causes harsh pull-away, judder, or a vehicle that will not move at all.
- What is the difference between a single-disc and dual-disc clutch?
- A single-disc dry clutch works with one disc and two friction surfaces; a dual-disc design adds an intermediate plate between two discs for four friction surfaces. Because the surface count doubles, the torque that can be carried at the same diameter and clamping force rises significantly, which is why dual-disc clutches are common on heavy tractor units and high-torque engines. In return, the intermediate plate's guide pins must release freely, since sticking there directly causes drag.
- What are the symptoms of a faulty clutch slave cylinder?
- With a faulty slave cylinder, the pedal turns soft, gear changes become difficult, and hydraulic leak traces are often visible around the bellhousing. If the boot is lifted and the pushrod area is wet, the fault is most likely there. If the symptom temporarily clears after pumping the pedal a few times, there is air or an internal leak in the system.
- How can you tell whether the clutch master cylinder or the slave cylinder is faulty?
- A dropping hydraulic fluid level with no visible leak outside, combined with a pedal that sinks to the floor and returns slowly, points to a master cylinder internal leak; visible wetness and dripping on the transmission side points to the slave cylinder. Before deciding, the hydraulic hose must always be checked: a swollen hose behaves exactly like a cylinder fault and leads to a perfectly good cylinder being replaced needlessly.
Related Articles
Clutch Release Bearing: Fault, Replacement and Care Guide
How a truck clutch release bearing works, how to spot noise and pedal symptoms, measure release travel, replace it correctly and extend its life.

Hydraulic Clutch Pedal Unit: Fault Diagnosis, Replacement, Maintenance
How to diagnose a faulty hydraulic clutch pedal unit on trucks, replace and properly bleed it, and maintain it to prevent a spongy clutch pedal.
Clutch Hose Failure, Replacement and Maintenance Guide | VADEN
Clutch hose symptoms, swelling test, step-by-step replacement, torque values and maintenance tips for heavy commercial vehicles — VADEN technical guide.


