Fleet Brake Maintenance Schedule and Recordkeeping
A layered brake maintenance schedule for heavy commercial vehicle fleets, from daily pre-trip checks to monthly measurements and clear stop-or-go thresholds.
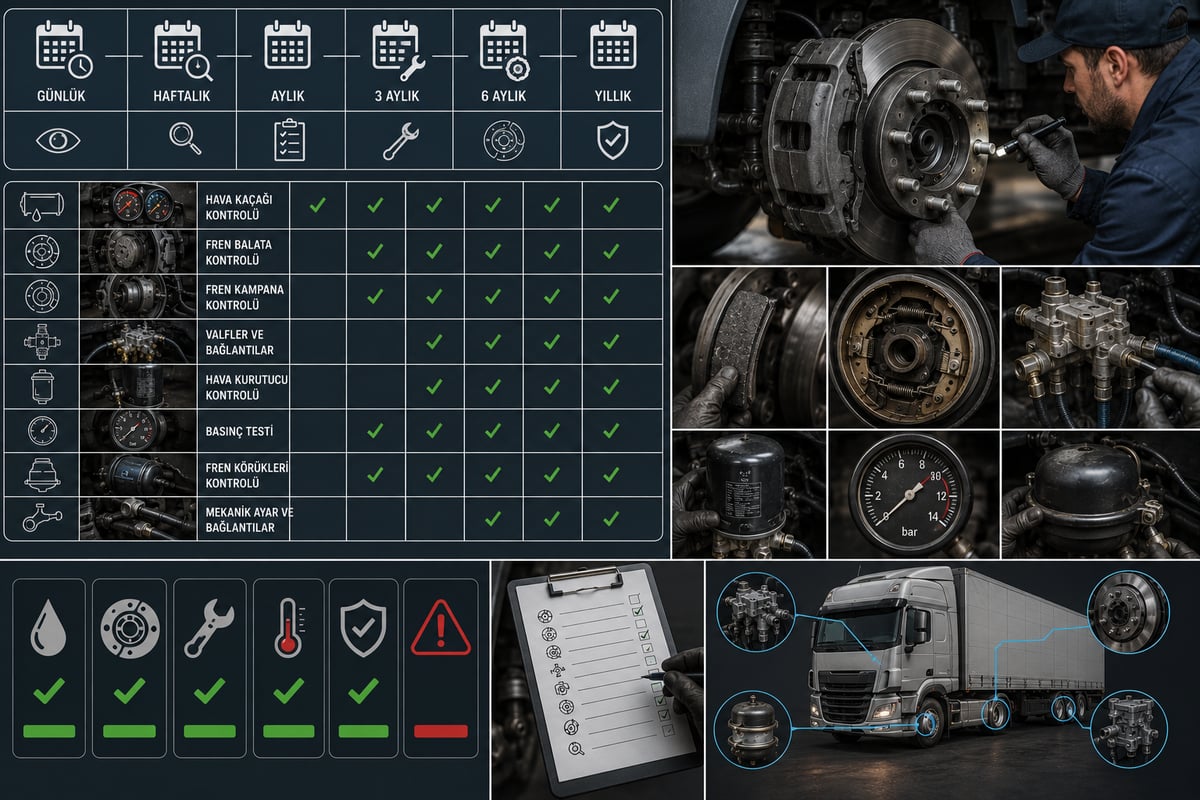
The report that lands on a fleet manager's desk usually says one thing: "the truck broke down on the road with a brake fault." But line up that same truck's last three pre-trip inspection forms and the pattern was already there — the slack on a rear-axle brake chamber crept out a little further on every measurement, the compressor's tank fill time climbed noticeably over the month, and pad thickness dropped twice as fast between two readings as it should have. The data existed. Nobody ever put the two records side by side. That's exactly what preventive maintenance is about: not what to do once a fault shows up, but which measurement gets taken, when, by whom, and where it gets written down before one ever does.
This guide treats scheduled brake maintenance on heavy commercial vehicle fleets as a calendar-and-recordkeeping system. Reading symptoms, interpreting fault codes and running a diagnostic workflow is a separate subject, covered in the Air Brake Fault Diagnosis guide. What's covered here is the work done before any fault exists at all: setting the interval, layering the inspection checklists, tracking measurements as trends, and turning an inspection result into a maintenance decision.
Why Is Unplanned Downtime So Expensive? The Economics of Preventive Maintenance
The difference between planned and unplanned maintenance isn't the part that goes on the truck. A brake pad set changed on the roadside and one changed in the shop are the same part, and the labor time is usually close too. The real difference is entirely in timing, and in everything that piles up around bad timing. On a planned job the truck is already in the shop, the part is on the shelf, and a technician has been scheduled for it; on an unplanned job none of that is ready, and each missing piece produces its own delay.
The line items that come with a roadside breakdown look small on their own, but together they easily dwarf the repair itself: the tow bill, the driver's paid hours sitting on the shoulder, contractual penalties for a late load, the second truck dispatched to cover the gap, a trailer sitting idle, the after-hours callout premium, and the hardest one to put a figure on — customer trust. Doing the exact same job on a planned basis erases almost every one of those costs.
On brakes there's also a safety side to the math. An alternator failure leaves a truck stranded; a brake failure extends stopping distance, throws off the balance between axles, and sets the stage for something far more serious. Roadside inspections and periodic roadworthiness tests treat brake-related findings as serious enough to pull a vehicle from service on the spot. That is why brake maintenance is never the item that waits until "everything else is done."
What Sets the Maintenance Interval: Mileage, Time and Duty Severity
The most common mistake in fleets is pinning the maintenance interval to a single number. Mileage alone isn't enough, a fixed calendar alone isn't enough, and duty severity is often left out of the equation entirely. The right approach uses all three together and treats whichever one arrives first as the trigger.
Mileage is the most direct measure for wear-driven items — pads, discs, drums and slack adjuster movement all age with distance. But mileage alone says nothing about how that distance was covered: a hundred kilometers of steady highway cruising and a hundred kilometers of constant stop-and-go city driving are not the same thing for a brake system.
Time catches deterioration that runs independently of mileage. Rubber brake chambers, air hoses, valve seals and the moisture-absorbing material inside the air dryer cartridge all age even when the truck barely moves. A spare tractor that sits idle most of the time is still on the full calendar interval for time-based items, and a parked vehicle actually carries a higher risk of corrosion and sticking.
Duty severity is the multiplier on top of the interval. Running consistently at maximum load, hilly routes, dusty or salted environments, heavy braking over short distances, and city delivery work with dozens of stops per hour all shorten it.
| Duty profile | Dominant effect on the brake system | Leading criterion | Interval approach |
|---|---|---|---|
| Long-haul, steady-load highway | Few brake applications but each one high-energy | Mileage | Base the interval on the OE schedule |
| Urban delivery, heavy stop-and-go | Frequent low-energy braking, constant heat buildup | Mileage and operating hours together | Shorten the interval significantly |
| Hilly and mountain routes | Sustained heat load, disc and drum fatigue | Mileage plus heat-related findings | Increase the frequency of wear measurements |
| Construction site, mining, quarry | Dust, mud, impact, constant maximum load | Operating hours and duty severity | Never rely on mileage alone |
| Urban passenger transport | Very high stop-based brake application count | Operating hours and number of stops | Reinforce the daily check layer |
| Rarely used spare vehicle | Aging, sticking, rubber hardening | Time | Base the interval on the calendar |
| Trailer and semi-trailer fleet | Long standing time, changing tractor pairings | Time and number of couplings | Track on its own independent schedule |
The most critical row in the table is the last one, and it is the one most fleets overlook. Trailers don't carry their own odometer, so their maintenance ends up riding on whichever tractor's schedule they happen to be attached to — and a trailer that rotates through different tractors never sits cleanly on any single calendar. A trailer fleet needs its own date-based schedule, tracked independently.
How to Build a Brake Maintenance Schedule: A Layered Planning Approach
A working brake maintenance schedule is not a single long checklist. It is a set of layers stacked on top of each other, and each layer has its own duration, its own owner and its own depth. The goal is not to have everyone run every check — it is to hand the right check to the right person at the right frequency.
The layers get deeper as you move up. At the bottom sits the daily pre-trip check: quick, no disassembly, run by the driver, and its only purpose is deciding whether the truck can leave today. Above it sits the weekly check, which looks for visible wear and leak marks. Above that, the monthly check is where measurement starts — nothing is just "looked at" anymore, it is measured and the value is written down. At the top sit the quarterly and six-monthly deep inspections, where wheels come off and the whole system is tested as one unit.
For the schedule to actually run, at least one of three triggers has to be built into the process. The first is a mileage threshold, read from the telematics system or the workshop check-in log, which opens the relevant layer. The second is a fixed date — the same day of the month or week, every time. The third is an event-based trigger: return from a heavy-load run, after a long descent on a mountain route, after a river crossing or a wash, a trailer swap, and post-incident inspections. A schedule tied to mileage alone quietly stalls on vehicles that barely move.
The question to answer when building the schedule is this: who runs this check, within what timeframe, with what equipment, and where does the result get written down? If any one of those four questions goes unanswered, the item exists on the schedule but not in the field. The single most common reason schedules collapse is putting a measurement on the list that the driver has no equipment to take.
How Is the Daily Pre-Trip Brake Check Done?
The daily check is the cheapest, highest-return step in a fleet's brake safety program. Keep it short — a long list starts getting rubber-stamped within a few weeks. The goal is not to diagnose the system, it is to catch obvious unsafe conditions and log early warning signs. The sequence below is run with the truck on level ground and the wheels chocked.
- Secure the vehicle. Stop on level ground, set the parking brake, chock the wheels, and make sure no one is in the cab during the check.
- Read the gauge pressure. Check whether the time to reach system operating pressure falls within the usual range; a noticeably longer fill time points to the compressor or a leak.
- Confirm the low-pressure warning. On key-on, verify that the audible and visual warning activate, and that both clear once pressure builds. If the warning circuit doesn't work, the truck does not leave.
- Drain the air tanks. Watch what comes out of the drain cocks — air and any water; a noticeable amount of water is an early sign of trouble on the air dryer side.
- Run the static leak check. With the engine off, the system fully charged and the brakes not applied, the gauge drop over a set time should stay within a negligible range; the acceptance criterion is defined in the OE manual.
- Run the applied leak check. With the brake pedal held down, watch the pressure drop; a larger drop with the pedal applied points to leaks on the chamber and valve side.
- Listen for leaks. With the engine off, listen around the underbody, the axle area and the trailer coupling for hissing; don't dispatch the truck with an audible leak whose source hasn't been found.
- Test the parking brake. Try to move the truck very slowly at low engine speed to confirm the parking brake holds; run this test in a wide, empty, level area.
- Try the service brake's bite. Apply the brakes at very low speed and check whether the truck pulls straight, whether pedal feel is normal, and whether there is any sense of lag.
- Do a visual sweep. Check the chamber bodies, hoses, chafing and crack marks, any obvious damage on the disc or drum surface, visible pad condition and the wear indicator.
- Confirm the warning lamps and trailer connection. Check that the ABS and electronic brake lamps light on key-on and clear once the system is ready; confirm the coupling heads are seated correctly, the seals aren't pinched, and the hoses aren't stretched taut on turns.
- Complete and sign the form. Mark every item as OK, monitor, or defective — leave no line blank.
Weekly Checks: The Layer Where the Eye Looks Closer
The weekly check picks up items that don't fit the pace of the daily list but don't require pulling a wheel either. In most fleets this layer runs when trucks return to the yard over the weekend, or right after a wash — a clean chassis shows leak and seepage marks far more clearly than a dusty one.
What this layer is looking for is not a fault, it is a sign of change. An oil stain that wasn't there last week, a new streak of rust, a wheel carrying more brake dust than it did the week before: none of these grounds a truck on its own, but together they tell the story of a trend.
- Leak sweep: with the system charged, hose fittings, valve bodies and chamber connections are checked using soapy water or by listening.
- Hose and line routing: checked for chafing, tension, kinking, broken clamps and contact points against the chassis.
- Chamber body: checked for dents, corrosion, deformation, a blocked drain hole, and the condition of the mounting nuts.
- Pads, discs and drums: thickness is compared by eye, and the difference between the two sides of the same axle is checked; the surface is assessed for heat cracking, bluing, deep grooving and uneven wear patterns.
- Automatic slack adjuster: the arm angles on each side of an axle are compared; if one clearly differs from the other, it goes into the measurement queue.
- Trailer side: coupling seals, hose retainers, the trailer parking brake lever and the ABS socket are checked.
- Driver feedback: notes on noise, smell, pulling or pedal feel reported during the week are collected and logged.
Nothing found in this layer stops at a verbal note. If the driver's comment — "there's a noise from the back" — never makes it into a record, no one remembers it two weeks later; once it's logged, the same comment turning up again automatically becomes a work order.
Monthly Checks: The Layer That's Measured, Not Just Looked At
The monthly check is the backbone of preventive maintenance, because it is the first layer that produces numbers. The daily and weekly layers collect qualitative observation; the monthly layer requires measuring equipment and records the result as a figure. A fleet's preventive-maintenance maturity can be read directly from how many numbers show up in its monthly records.
At least four values are measured and written down in this layer. Pad thickness is measured separately for each wheel at its thinnest point and logged against wheel position. Brake chamber pushrod stroke is recorded as the distance the pushrod travels under application, matched to axle and wheel position. Pressure build-up time is timed with a stopwatch, from a defined starting pressure to system operating pressure. Pressure drop rate is written down as a number from the static and applied leak tests, not as an estimate.
The monthly layer also captures the electronic side. Even when no warning lamp is lit, the ABS and electronic braking system memory is read; cleared but recurring intermittent codes are often the earliest sign of a connector or sensor problem that hasn't produced a symptom yet. In the same pass, the air dryer cartridge's installation date and time in service are checked — cartridge life depends far more on time and ambient moisture than on mileage.
Standards and further reading
This subject is governed by the equipment rules for air-braked commercial vehicles. In the United States the federal air brake standard, FMVSS 121 (49 CFR 571.121) defines the reservoirs, protection and timing a compliant system must provide, and Europe applies the equivalent limits of UNECE Regulation No. 13. For further detail, see the illustrated reference guide at airbrakecompressor.com. Always confirm specific figures against the current regulation and the vehicle manufacturer service data.
Inspection practice differs by country. In the United Kingdom the defect definitions and the pass or fail criteria for heavy goods vehicles are set out in the DVSA HGV inspection manual; in South Africa the underlying instrument is the National Road Traffic Act 93 of 1996.
Quarterly and Six-Monthly Deep Inspections
Deep inspections are the layer where the wheel comes off and the mechanisms are assessed while they're moving. This layer belongs in the shop and needs lifting equipment and a trained technician.
What's Covered in the Quarterly Package?
Once the wheel is off, pad thickness is measured at both ends — that's the only way to catch a taper-worn pad. Disc thickness and surface condition are checked, and drums are assessed for bore diameter and the depth of any heat cracking. On caliper systems, the free movement of the slide pins, the condition of their boots and the grease are inspected; a sticking slide pin is the single most common cause of one-sided pad wear. On drum systems, the S-cam shaft, its bushings and springs are checked; axial and radial play in the shaft throws off stroke no matter how well the slack adjuster is doing its job.
What's Added in the Six-Monthly Package?
In the six-monthly layer the system is tested as a whole. Air tanks are assessed for internal corrosion and water buildup, and drain valves are removed and cleaned. Foot valves, the trailer control valve and relay valves are function-tested. Where a roller brake tester is available, axle-level brake force and side-to-side imbalance within an axle are measured — an imbalance that is essentially impossible to catch by eye but that directly distorts braking behavior.
Some findings from a deep inspection turn straight into a repair decision; others produce symptoms that still need a root cause. One-sided wear, recurring stroke drift, a wheel that keeps running hot, or unexplained pressure loss all get handed to the diagnostic workflow — the symptom, cause and fix tables in the Air Brake Fault Diagnosis guide can be used to work through the match.
Check Item, Frequency, Owner and Where It's Logged
The table below is the one-page summary of the layered schedule. A fleet can shorten the frequency column to match its own duty profile, but the owner and record columns can't be left blank — those two columns are the only proof a check actually happened.
| Check item | Frequency | Who does it | Where it's logged |
|---|---|---|---|
| Gauge pressure, fill time and low-pressure warning | Before every trip | Driver | Daily pre-trip form |
| Air tank drain and water check | Daily, more often in winter | Driver | Daily form, separate note if water is found |
| Static and applied leak test | Daily observation, monthly measurement | Driver and technician | Daily form and monthly measurement card |
| Hoses, lines, clamps and chamber body | Weekly | Field technician | Weekly check form |
| Pad thickness measurement | Monthly; with wheel removed quarterly | Technician | Vehicle measurement card, by position |
| Chamber pushrod stroke measurement | Monthly | Technician | Vehicle measurement card, by axle |
| Pressure build-up time | Monthly | Technician | Vehicle measurement card |
| ABS and electronic brake diagnostic read | Monthly read, archived every six months | Technician | Diagnostic report, vehicle file |
| Disc, drum, caliper slide pins, S-cam and slack adjuster | Quarterly | Technician | Deep inspection report |
| Brake force and axle-side imbalance test | Six-monthly or before roadworthiness inspection | Authorized test station | Test printout, vehicle file |
Some items in the table show up in both the driver's row and the technician's. That's not duplication, it's a deliberate split: the driver assesses the same item by feel and marks it OK or suspect, the technician assesses the same item by measurement and writes down a number. Having both perspectives confirm each other is the most reliable quality preventive maintenance has.
Measurement Recordkeeping Discipline: One Reading Tells You Nothing
This is the most commonly misunderstood part of preventive maintenance. A single measurement only tells you the condition at that moment — it says nothing about how much life is left. Two measurements give you the wear rate, three confirm the trend. That's why measurement records need to be kept as a series to work on, not as an archive.
A pad thickness reading on its own only tells you whether it's above or below the minimum. Once the same pad has been measured the month before, you know the difference between the two readings and the mileage covered between them — from that, you get a wear rate per 1,000 km. Once the wear rate is known, one simple calculation is left: how many kilometers remain before the current thickness reaches the minimum. That figure sets the planned replacement window directly. What determines pad life and how to read the replacement threshold is covered in the When Should Brake Pads Be Replaced? guide.
The same logic applies to every other measurement, and each value's trend points to a different component. If chamber stroke lengthens month over month, the problem is usually not the chamber itself but the automatic slack adjuster or the S-cam mechanism. If pressure build-up time gets longer over the months, the compressor's output is dropping, or a leak somewhere in the system is growing. If the leak-test drop is still inside the acceptance limit but keeps rising month to month, the source is tracked down before it ever reaches that limit.
| Measured value | Frequency | What the trend tells you | Where to look if the trend turns bad |
|---|---|---|---|
| Pad thickness | Monthly | Wear rate per 1,000 km and remaining life | Caliper slide pins, slack adjuster, driving profile |
| Difference between two pads on the same axle | Monthly | Brake imbalance within the axle | One-sided sticking, slide pins, air distribution |
| Chamber pushrod stroke | Monthly | Whether clearance is being taken up correctly | Automatic slack adjuster, S-cam shaft and bushings |
| Pressure build-up time | Monthly | Compressor output and system tightness | Compressor, dryer, hose and fitting leaks |
| Axle-side brake force difference | Six-monthly | System balance and inspection risk | Valve adjustment, sticking, wear distribution |
Turning an Inspection Result into a Maintenance Decision: Threshold Logic
A checklist produces an observation; maintenance runs on a decision. What bridges the two is a threshold. Without a defined threshold, every finding is left to whichever technician is on shift that day, and the same measurement produces two different outcomes on two different vehicles; with a defined threshold, the decision stops depending on who's reading it.
In practice three tiers are enough. At Monitor, the finding gets logged, the truck stays in service, and the item gets priority attention at the next check. At Plan, the truck can keep running, but a work order is opened and it's pulled into the shop within a defined time or mileage window. At Stop, the truck doesn't leave; no job gets assigned until the repair is complete.
Threshold values always trace back to the manufacturer. A fleet can tighten them, never loosen them. Good practice sets the Plan threshold earlier than the OE minimum, with a safety margin built in — so the part gets replaced in a planned window well before it ever reaches the manufacturer's limit.
| Finding | Tier | Decision |
|---|---|---|
| Pad thickness approaching the plan threshold | Plan | Open a work order, schedule replacement based on remaining life |
| Pad thickness below the OE minimum | Stop | Truck doesn't leave, pads get replaced |
| Chamber stroke lengthening across two consecutive readings | Plan | Slack adjuster and S-cam mechanism go in for inspection |
| Chamber stroke at or beyond the OE limit | Stop | No job assigned until the mechanism is repaired |
| Leak test within limit but trending upward | Monitor | Increase check frequency, schedule a source sweep |
| Leak test outside the acceptance limit | Stop | No dispatch until the leak is found and fixed |
| Low-pressure warning not working | Stop | Truck doesn't leave until the warning circuit is repaired |
| Parking brake doesn't hold the vehicle | Stop | Pulled into the shop immediately |
Dividing Responsibility Across the Fleet: Driver, Workshop and Fleet Management
The most common reason a checklist collapses is putting a task on it that doesn't belong to the role running it. When responsibility is split correctly, each role only takes on the work it can actually do with its own equipment and time, and the list stays sustainable.
The driver is the system's eyes and ears. Driving the truck every day makes them the only person who really knows what "normal" feels like — they're the first to notice a change in pedal feel, a new leak sound, or the truck pulling slightly under braking. What's expected from the driver is observation and reporting, not measurement or a decision. In return, they need to be told back that their report was logged and acted on; a driver whose reports go nowhere stops reporting, and the most valuable early-warning channel goes quiet.
The workshop and technician side owns measurement, interpretation and the repair itself. A technician's job isn't only replacing the part — it's writing down what wore it out. "Pad replaced" carries no information; "left rear pad tapered, slide pin sticking, slide pin serviced" is what sets the next replacement interval.
Fleet management builds the schedule, allocates the resources, and reads the data. This role's real job isn't looking at one truck at a time, it's looking at patterns: why pad life is short on a particular route, why one group of drivers reports brake issues more than others, why one model keeps producing slack adjuster problems. These questions aren't visible in a single vehicle file — they only show up across the fleet.
What Fields Belong on the Inspection Record Form?
The record form is preventive maintenance's memory. It can live on paper or in a tablet app — the format matters far less than the content. The fields below are the minimum needed for the form to be useful after the fact.
- Vehicle identity: plate number and internal fleet number recorded together; a trailer gets its own separate record.
- Date, time, mileage and operating hours where applicable: mileage is a required field, since without it a measurement can never become a trend.
- Who ran the check: name and role — the only place anyone can go back to with a question later.
- Check layer: marked as daily, weekly, monthly, quarterly, six-monthly or seasonal.
- Item-level result: each line marked OK, monitor, or defective.
- Measured value, unit and position: all three written together for every numeric item.
- Previous reading and the difference: showing the previous value on the form makes trend interpretation possible right there in the field.
- Tier decision and work order: whether the finding is Monitor, Plan or Stop, along with the work order number opened for it.
- Parts used: description, position and, where applicable, batch information for the replaced part.
- Sign-off and photo attachment: signatures from whoever ran the check and whoever approved it; a photo attached for any doubtful finding.
Two rules govern how the form is designed. First, a blank field counts as a check that wasn't done — once that rule is announced, fill-in quality visibly improves. Second, the form has to be short enough to complete in the field: a thirty-item daily list starts getting rubber-stamped by the second week, while a genuinely used fifteen-item list is worth incomparably more.
Seasonal Add-On Checks and Winter Preparation
A seasonal package sits on top of the layered schedule twice a year. Its purpose is to cover the extra load the season puts on the system, and its content differs between summer and winter.
The summer package is weighted toward heat management. On trucks running long, hilly routes, disc and drum surfaces are checked for heat cracking and bluing, and caliper slide-pin grease is checked for high-temperature breakdown. Higher ambient temperature also increases condensation in air tanks, so drain frequency is adjusted accordingly. On long descents, correct use of the retarder or engine brake is the single biggest factor in how much heat load the service brakes end up carrying.
The winter package is weighted toward moisture, freezing and corrosion. Water that collects in the air system can freeze inside valve bodies and lines once temperatures drop, causing brakes to release slowly or not at all — which is why pre-winter drain discipline, the age of the air dryer cartridge, and drain valve function are priority items. On trucks running salted roads, corrosion targets chamber mounting points and mechanism shafts. Cartridge selection, moisture management, and how winter conditions affect the air dryer are covered in detail in the Air Dryer Cartridge and Moisture Management guide; winter-specific freezing scenarios and prevention are treated as a separate subject.
Keeping the Schedule Alive: Auditing, Data Quality and Continuous Improvement
Every preventive maintenance system erodes over time if left on its own. Forms keep getting filled in, but their content hollows out — measurement fields start getting copied from the previous month, items get marked OK without actually being checked. The only antidote to this erosion is regular, random auditing: a few times a month, pick a completed form and independently repeat the same check, then compare the two results. Once people know this happens, record quality improves on its own.
The second thing that keeps the schedule alive is a feedback loop. When a fleet has an unplanned brake-related breakdown, the question to ask isn't "which part failed" — it's "why didn't the schedule catch this." The answer usually falls under one of four headings: the item wasn't on the list, the frequency was too low, the threshold was too loose, or the check was marked done without actually being run. Every unplanned breakdown that turns into a one-line fix on the schedule makes the system self-correcting.
The third thing is measurable targets. Preventive maintenance's impact can be tracked with a handful of simple indicators: brake-related unplanned breakdowns per 100,000 km, the completion rate of planned maintenance, how often forms are filled in on time and in full, average pad and disc life, the rate of brake-related defects found at roadworthiness inspection, and the share of planned versus unplanned work in the maintenance budget. Compared period over period, these indicators settle the question of whether the schedule is working, without room for argument.
Finally, the cultural side of preventive maintenance is no weaker than the technical side. In a fleet where a driver's reported noise gets taken seriously, a technician's written cause gets read, and a manager decides based on data, the schedule stands on its own; break any one of those three links, and even the best-designed checklist ends up living only on paper. In every case, the intervals, thresholds and procedures applied here are finalized against the current OE service manual for the vehicle's make, model and chassis code, together with applicable roadworthiness inspection regulations.
Tying a finding from the maintenance round to the right cause is a separate exercise; to follow the symptom-cause-solution order, use our air brake fault diagnosis guide.
Alongside thickness measurement, the symptoms a driver can notice and the operating conditions that shape lining life are covered in detail in our article when should brake pads be replaced.
Shop this part: Brake System
Tags
Frequently Asked Questions
- What is preventive brake maintenance, and how is it different from repair?
- Preventive brake maintenance is planned inspection, measurement and recordkeeping carried out on the brake system before any fault symptom appears. Repair kicks in after a symptom shows up, and its timing is controlled by the fault rather than by the fleet. With preventive maintenance the truck is already in the shop, the part is ready, and time has been set aside for the job. The part and the labor are usually the same either way; the difference is that the towing, driver downtime, delay and substitute-vehicle costs that pile up around an unplanned breakdown disappear.
- How do you build a brake maintenance schedule for a fleet?
- A brake maintenance schedule that works is not a single long list — it is layers stacked on each other: a daily pre-trip check, a weekly visual inspection, a monthly measurement layer, and quarterly and six-monthly deep inspections. Each layer needs four questions answered: who runs this check, in what timeframe, with what equipment, and where does the result get logged. The schedule also needs to be tied to at least one trigger — a mileage threshold, a fixed date, or an event-based trigger; a schedule tied to mileage alone quietly stalls on vehicles that barely move.
- Is the brake maintenance interval based on mileage or on time?
- Both are used together, and whichever comes first sets the trigger. Mileage is the most direct measure for wear-driven items like pads, discs and drums. Time matters for items that age independently of mileage — rubber chambers, hoses, seals and the air dryer cartridge; even a rarely used spare truck stays on the full calendar for time-based items. Duty severity is the multiplier: urban stop-and-go, hilly routes, dusty or salted conditions and constant maximum load all shorten the interval. The exact interval always comes from the vehicle's OE service manual.
- What's checked in the daily pre-trip brake inspection?
- With the truck stopped on level ground and chocked, the sequence runs: read the gauge pressure and fill time, confirm the low-pressure audible and visual warning work, drain the air tanks and check for water, run the static and applied leak checks, listen for leaks, confirm the parking brake holds, test the service brake's bite and straight-line pull at very low speed, visually sweep the chambers, hoses, discs, drums and pads, and check the ABS and electronic brake lamps plus the trailer coupling. The result always gets recorded on the form.
- How do you check for leaks in an air brake system?
- Two separate tests are run. In the static test, the engine is off, the system is fully charged and the brakes aren't applied, and the gauge drop is watched over a set time. In the applied test, the brake pedal is held down and the drop is watched; a larger drop under application points to leaks on the chamber and valve side. The acceptable drop varies by vehicle and is defined in the OE service manual. Both tests are run with the truck chocked and no one standing nearby, since a system that has lost pressure can trigger spring brakes to apply on their own and lock the vehicle without warning.
- What measurements should be taken during the monthly brake check?
- The monthly layer is where numbers get produced. At least four values are measured and recorded: pad thickness for each wheel, chamber pushrod stroke matched to axle and wheel position, the time to reach system operating pressure, and the pressure drop measured in the leak tests. The ABS and electronic braking system memory is also read even if no warning lamp is lit — recurring intermittent codes are often the earliest sign of a connector or sensor problem with no symptom yet. The air dryer cartridge's installation date is tracked in this same layer.
- Why should pad thickness be logged every month?
- A single reading only tells you the condition at that moment, not how much life is left. Two readings give you the wear rate; three confirm the trend. Once the same pad has been measured twice, the difference between the readings and the mileage covered between them gives a wear rate per 1,000 km, from which the remaining kilometers to the minimum thickness — and the planned replacement window — can be calculated. For this to work, every line needs date, mileage, position and value together; if one is missing, the reading can't join the trend series.
- When does a finding from an inspection actually pull a truck out of service?
- The decision follows a predefined three-tier threshold. At Monitor, the finding gets logged and the truck stays in service, with priority attention at the next check. At Plan, a work order opens and the truck is pulled into the shop within a set time or mileage window. At Stop, the truck doesn't leave — this covers pad thickness below the OE minimum, chamber stroke at or beyond the limit, a leak outside the acceptance range, a non-functioning low-pressure warning, and a parking brake that doesn't hold. Thresholds always come from the manufacturer; a fleet can tighten them, never loosen them.
- What fields should a brake inspection form include?
- At minimum the form needs: plate number and internal fleet number, date and time, mileage and operating hours where applicable, who ran the check and their role, the check layer, an OK/monitor/defective result per item, the measured value with unit and position, the previous reading and the difference, the tier decision and work order number, the parts used, and sign-off with a photo for any doubtful finding. Two rules matter most: a blank field counts as a check not done, and the form has to be short enough to actually complete in the field.
- What extra checks does winter brake maintenance require?
- A seasonal package sits on top of the layered schedule twice a year. In winter it's weighted toward moisture, freezing and corrosion: air tank drain discipline is tightened, the age of the air dryer cartridge and the function of the drain valves get priority attention, and on trucks running salted roads, chamber mounting points and mechanism shafts are checked for corrosion. Water that collects in the system can freeze inside valve bodies and lines once temperatures drop, causing brakes to release slowly or not at all. Getting this preparation done before the first cold snap is best secured by tying it to a fixed calendar week in autumn.
Related Articles

Air Dryer: Faults, Replacement & Maintenance Guide
How a truck air dryer's charge and purge cycle keeps moisture and oil out of the brake system, and what a hissing purge valve or water in the tanks means.

Brake Chamber: Faults, Replacement & Maintenance Guide
Service and spring brake chambers on trucks and trailers: diaphragm-leak and stroke diagnosis, why caging is mandatory before removal, and safe replacement.
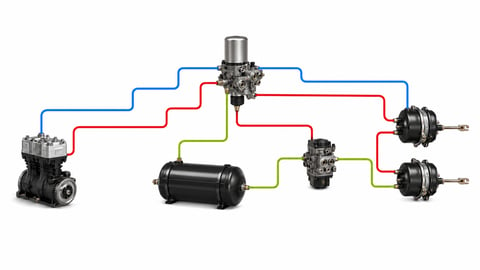
How to Read an Air Brake Diagram: Circuit Guide
How do you read an air brake system diagram? Symbol language, line colours, port codes, circuit split, trailer lines and fault-tracing, step by step.


