ECAS Solenoid Valve: Faults, Replacement & Maintenance Guide
A truck sitting low on one side or a trailer that will not settle to ride height points to the ECAS solenoid valve block: diagnosis, replacement and calibration.
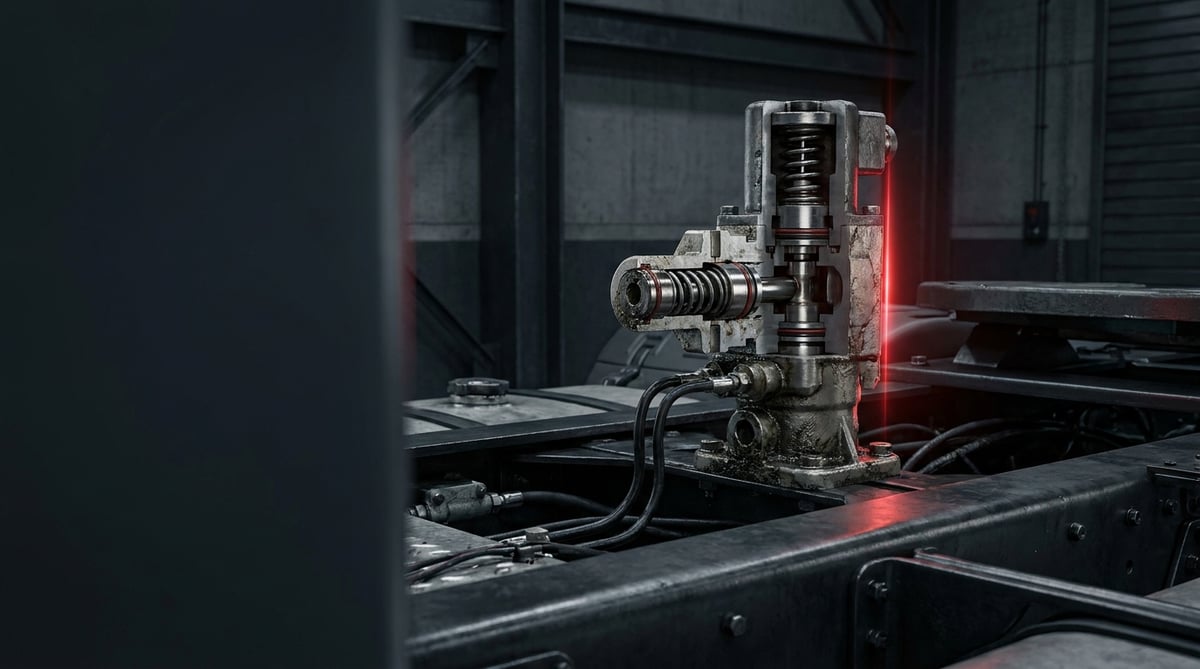
If the rear of a tractor unit is sitting lower on one side, an air spring is deflating on only one side, or the vehicle just won't settle to its ride height when you turn the ignition on, one of the first places to check in the field is the ECAS solenoid valve block. On heavy commercial vehicles and trailers, this valve is the "bridge between the brain and the muscles" of the air suspension; the ECU processes the signal coming from the height sensor, and the solenoids adjust chassis height by filling and venting the air springs. In this guide, we cover the valve's operating principle, fault symptoms, diagnosis and replacement steps, and maintenance points in plain field language and honestly.
What Is an ECAS Solenoid Valve (Electronic Level Control Valve)? Its Function and Operating Principle
The ECAS solenoid valve is the electro-pneumatic valve block that, in an electronic level control (Electronically Controlled Air Suspension) system, fills or vents the air springs (bellows/air cushions) according to the signals from the ECU, thereby automatically adjusting chassis/trailer height. In short, it is the electronic and far more precisely controlled version of the mechanical levelling valve (the mechanical "level valve").
The system works through the coordination of three main components: sensing (height sensors), decision (ECU) and actuation (the solenoid valve block and the air springs). The height sensor continuously measures the distance between the chassis and the axle; the ECU compares this value with the target ride height and, if there is a deviation, energises the relevant solenoid coil. When the solenoid opens, either air flows from the air tank into the air spring (the vehicle rises) or the air in the air spring is vented to atmosphere through the exhaust port (the vehicle lowers). Once the target is reached, the ECU de-energises the coil, the valve closes, and that height is maintained.
- Solenoid valve block: The coil-operated valve group that controls fill/vent direction; usually one channel per axle/air spring.
- Height (level) sensor: A sensor that measures the axle-to-chassis distance angularly/linearly, linked to the axle via a mechanical arm.
- ECU / ECAS module: The electronic control unit that processes the signals and drives the valves; it stores target heights and fault codes in its memory.
- Air spring (cushion): The elastic element that raises/lowers the chassis as its pressure changes.
- Supply line and tank: The circuit that delivers dry air, having passed through the dryer, to the valve.
The difference between the valve, the sensor and the module
These three parts are often confused in the field. The valve is the mechanical-electrical part that physically directs the air. The sensor only measures; it does not pass air. The module/ECU, on the other hand, is electronic; it has no contact with air and makes the decisions. In a "vehicle won't rise" complaint, the fault may lie in any of the three; that is why, in diagnosis, it is essential to read codes with a diagnostic tool and to verify signal and pressure.
Differences between solo tractor, trailer and bus applications
On tractor units, ECAS generally manages rear axle height and the lift axle function. On trailers, ramp alignment, raise-lower and single/dual level memory come to the fore. On buses, functions such as "kneeling" and door-side lowering are added. The number of channels on the valve block and the software vary accordingly.
The valve performs this task together with the air springs and levelling valves; to read a symptom at system level rather than component level, the heavy-duty air suspension failures guide is complementary.
System types and the aftermarket-equivalent context
| Criterion | Single channel / simple ECAS | Multi channel / full ECAS |
|---|---|---|
| Typical use | Trailer, light control | Tractor, bus, multi-axle |
| Number of channels | 1–2 | 3 and above |
| Function | Level maintenance | Level + lift axle + memory + kneeling |
| Number of sensors | 1 | 2–4 |
| Aftermarket-equivalent context | WABCO-type / Knorr-Bremse-type ECAS equivalent | WABCO-type / Knorr-Bremse-type ECAS equivalent |
Fault Symptoms and Diagnosis
ECAS faults are most often grouped under the heading "the vehicle won't settle to the correct height", but the root cause may be the valve, the sensor, an air leak or the electrics. The table below matches field symptoms with possible causes and verification methods.
| Symptom | Possible Cause | Check / Verification |
|---|---|---|
| Vehicle won't rise / lift at all | Valve fill channel blocked, coil faulty, no supply pressure | Measure tank pressure; check whether control voltage reaches the coil; read codes with a diagnostic tool |
| Vehicle won't lower / stays permanently high | Exhaust/vent channel stuck, valve seized, sensor signal fixed | Send a vent command from the diagnostic tool; listen for air escaping from the exhaust port |
| One side low / vehicle leaning to one side | Leak in the air spring on that side, blocked channel or faulty sensor arm | Compare the air spring pressures on both sides; check the sensor arm angle |
| Height constantly changing (hunting) | Unstable sensor signal, internal valve leak, loose connection | Monitor the sensor value in live data; look for fluctuation in air spring pressure |
| Air leaking constantly / compressor running too much | Internal valve leak, port O-ring, air spring/fitting leak | Foam/soap test; monitor pressure drop with the ignition off |
| ECAS warning lamp / fault code present | Coil open/short circuit, sensor out of range, supply fault | Read DTCs; verify wiring harness and connectors by resistance/voltage measurement |
| Lift axle not working | Relevant valve channel or control output faulty | Trigger the lift axle command from the diagnostic tool; test the relevant coil |
Reading codes with a diagnostic tool
The ECAS system stores its own fault codes (DTC). Work should always begin by reading codes with a diagnostic tool; codes such as wiring break, coil short circuit or sensor range fault narrow the search significantly. Clearing the codes and checking whether they return after a road test helps distinguish a permanent fault from an intermittent contact fault.
Actuator test and live data
Most diagnostic tools have an actuator test that triggers the valve channels one by one. In this test, when a fill/vent command is given, you observe whether the relevant air spring actually fills and vents. By monitoring the sensor height and the target value side by side in live data, you distinguish whether the sensor or the valve is at fault.
Mechanical and pneumatic verification
If the electronics are sound, the problem may be on the pneumatic side. Supply pressure, the health of the air dryer, port O-rings and air spring leaks are checked with a foam test. An internal valve leak most often reveals itself by the vehicle slowly sinking even with the ignition off.
Further reading
For a plain-language technical overview of this subject, see the reference article on Wikipedia. Always confirm specific figures and procedures against the vehicle manufacturer service data.
Replacement / Installation Steps
- Secure the vehicle: Park on level ground, apply the parking brake, chock the wheels; support the chassis mechanically if necessary.
- Switch off the ignition and depressurise the system: Set ECAS to the off position, and release the air tank and air spring pressure in a controlled manner at the point specified by the manufacturer.
- Disconnect the battery/supply: Cut the relevant supply to prevent electrical arcing and unintended valve triggering.
- Mark the valve and its connections: Label the electrical connector and every air line so they match the port numbers; take photographs. Connecting the wrong port is the most common mistake.
- Remove the electrical connector: Detach the connector without damaging the locking tab; note any corrosion/looseness on the pins.
- Remove the air lines: Loosen the fittings in port order; cap the line ends to prevent dirt/swarf from getting inside.
- Remove the old valve: Take out the mounting bolts/clamp and remove the valve block; inspect the condition of the gasket and O-rings.
- Prepare the new valve: Compare the port layout of the new VADEN valve with the old one; use new O-rings/gaskets and keep the port faces clean.
- Fit the valve: Seat the block in place and tighten the fasteners to the manufacturer's torque value, progressively; do not strain the body.
- Reconnect the lines and connector: Following the labels, connect each air line to the correct port, tighten the fittings to the specified torque, and lock the electrical connector.
- Pressurise, calibrate and test: Fill the system, carry out a leak test, perform the height calibration (ride height setting) with the diagnostic tool, and try the functions (raise/lower/lift) one by one.
Points to Watch Out For (Common Mistakes)
- Removing a fitting without releasing the system pressure — risk of sudden chassis movement and injury.
- Reusing old/worn O-rings and gaskets — internal leak and the compressor running constantly.
- Leaving the port openings uncapped and letting dirt/moisture in — internal valve seizure.
- Fitting an equivalent with an incompatible channel count/software — codes, faults and wrong function.
- Fitting the sensor arm at the wrong angle — wrong height reference.
- Over-tightening the fittings and straining the plastic body/threads — cracks and leaks.
- Handing the vehicle over after replacement without an actuator test and a road test.
Technical Values and Check Points
The values below are typical/general references for heavy commercial vehicle ECAS systems; exact values vary by vehicle and valve type, and the manufacturer's service manual takes precedence.
| Parameter | Typical Reference Range | Note |
|---|---|---|
| System/supply pressure | ~8–12.5 bar (~116–181 psi) | Tank and circuit pressure; varies with the regulator |
| Air spring working pressure | ~0.5–8 bar | Variable with load and level |
| Supply voltage | 24 V DC (heavy commercial) | 12 V systems also exist |
| Solenoid coil resistance | ~in the order of tens of ohms (typical) | OE data sheet for the exact value; check for open/short circuit |
| Operating temperature | ~ -40 °C to +80 °C | Depending on the component and ambient conditions |
| Ride height tolerance | The ± mm band specified by the manufacturer | Set by calibration |
Typical references for mounting torques (exact value in the service manual):
| Connection | Typical Torque Range | Note |
|---|---|---|
| Valve mounting bolt | ~8–25 Nm | Varies with bolt diameter and body |
| Air fitting / connection | Manufacturer's value (usually hand + specified torque) | Do not strain the plastic body |
| Electrical connector lock | No torque, locks with a click | Do not force |
Field checklist:
- Is the tank/supply pressure within the manufacturer's range?
- Is the air dryer healthy, and is there moisture/oil in the line?
- Are the connector pins clean, corrosion-free and locked?
- Is the sensor arm at the correct angle, free of play and undamaged?
- Does every channel fill and vent in the actuator test?
- After calibration, is the ride height equal on both sides?
Maintenance and Service Life
The greatest enemies of the ECAS solenoid valve are moisture, oil and dirt. A healthy air preparation circuit (a working air dryer, a clean filter, regular tank draining) directly extends the valve's service life. The valve rarely fails on its own; the dirty/moist air behind it seizes it internally and makes it leak.
- Replace the air dryer cartridge at the interval recommended by the manufacturer; moist air is the most frequent shortener of the valve's life.
- Drain the tanks automatically/manually on a regular basis, discharging accumulated water and oil.
- Periodically check the sensor arms and linkage joints; play leads to a height error.
- Inspect the connector and wiring harness for corrosion, chafing and looseness.
- At each service, read and clear the ECAS fault codes; track recurring codes.
- Carry out a periodic leak test around the fittings and ports.
With correct air preparation and regular checks, the ECAS valve runs trouble-free for many years. Taking early symptoms (a slowly sinking chassis, an uneven stance, frequent compressor running) seriously preserves the life of the valve and its neighbouring components and heads off bigger faults.
A robust ECAS solenoid valve that keeps chassis height stable and safe is a cornerstone of heavy commercial vehicle and trailer suspension. A replacement carried out with the right diagnosis, the right part and calibration preserves both ride comfort and load/brake balance. The VADEN ORIGINAL ECAS Solenoid Valve (Electronic Level Control Valve) product family provides reliable level control in heavy commercial vehicle and trailer air suspensions, with equivalent options that can be matched to WABCO/Knorr-type systems.
Shop this part: ECAS Solenoid Valve
Related categories: ECAS Solenoid Valve · ECAS Solenoid Valve · Repair Kit · Ecas Height Sensor · Sensor
Related technical guides: Cab Tilt Pump: Faults, Replacement & Maintenance Guide · Levelling Valve: Faults, Replacement & Maintenance Guide · Cab Suspension (Shock Absorber, Air Bellow, Leveling Valve): Faults & Repair
Application and compatibility: Vehicle compatibility catalogue · Engine compatibility catalogue
Tags
Frequently Asked Questions
- How do I tell whether the ECAS valve is faulty or the height sensor?
- Look at live data with a diagnostic tool. If the sensor value changes smoothly when the actuating arm is moved but the vehicle still does not respond, the problem is most likely on the valve side. If the sensor value is stuck fixed or out of range, the sensor and its wiring are checked first. The actuator test makes this distinction clear.
- The vehicle stays low on one side — is it always the valve?
- No. The most common causes of one-sided lowness are a leak in the air spring or fitting on that side, a blocked channel, or a faulty sensor arm. Blaming the valve without comparing the air spring pressures on both sides and carrying out a leak test leads to replacing the wrong part.
- Is calibration essential when the ECAS valve is replaced?
- Yes. After a valve or sensor replacement, a ride height calibration must be carried out with a diagnostic tool. Otherwise the vehicle stays at the wrong height; this affects driving safety, axle load and brake balance.
- Can an equivalent be used instead of a WABCO/Knorr ECAS valve?
- As long as channel count, port layout and software/function compatibility are met, a suitable equivalent valve can be used. Here WABCO and Knorr-Bremse are cited only to define the system type. What matters is choosing the equivalent that matches the correct OE part number; verify this with the vehicle information and the reference on the existing valve.
- The vehicle slowly sinks with the ignition off — is the valve leaking?
- Probably. A drop in air spring pressure with the ignition off indicates either an internal valve leak or an air spring/fitting/port O-ring leak. Distinguish the source with a foam test and by tracking the pressure drop; if the source is inside the valve, the valve is renewed.
- The ECAS fault lamp has come on — can I keep driving the vehicle?
- The system usually tries to stay at a safe fixed height in a fault condition, but the height and suspension behaviour cannot be guaranteed. In this situation there can be risk on bridge/ramp crossings and in load balance; you should have the codes read with a diagnostic tool and the fault rectified as soon as possible.
- Can the solenoid valve be saved by cleaning, or must it be replaced?
- In temporary sticking caused by light dirt/moisture, the valve may recover once the air preparation circuit is corrected and the system is cleaned. However, if there is internal wear, a permanent internal leak or a coil fault, the valve must be renewed. In a recurring fault, the permanent solution is valve replacement.
- I fitted a new valve but the vehicle reacts in reverse (it lowers when it should raise), why?
- This is the classic symptom of a port mix-up. The fill/vent/air spring lines may have been connected to the wrong ports. If labelling was not done before disassembly, reconnect the lines to the correct port layout according to the service diagram.
- What shortens the life of an ECAS solenoid valve the most?
- Moisture, oil and dirt. The valve rarely fails on its own; the dirty, damp air behind it seizes it internally and makes it leak. Replacing the air dryer cartridge at the manufacturer's interval, draining the tanks regularly and keeping the filter clean directly extend its service life. Check the sensor arms, linkage joints and the connector periodically as well, because play and corrosion produce height errors.
- What safety steps must not be skipped before removing the valve?
- The air suspension holds pressurised gas, and the chassis drops fast if an air spring vents suddenly. Park on level ground, apply the parking brake, chock the wheels and support the chassis with suitably rated stands if needed. Set ECAS to off, release tank and air spring pressure in a controlled way at the point the manufacturer specifies, and cut the relevant supply. Wear goggles and gloves, and open no air fitting before the pressure is gone.
Related Articles
Levelling Valve: Faults, Replacement & Maintenance Guide
An air-suspended truck or trailer sitting low on one side or not holding ride height points to the levelling valve lever setting: diagnosis and replacement.
Heavy-Duty Air Suspension Failures: Air Springs, Leveling Valves and ECAS
Heavy-duty air suspension explained: air springs, leveling valve vs ECAS faults, leak diagnosis, and maintenance for trucks, trailers and buses.
What Is a Shock Absorber? Bushing, Failure Symptoms, and Service Life
What is a shock absorber? Heavy-duty bushing wear, failure symptoms, field tests, the pair-replacement rule, and realistic service life.


