What Is a Radiator? Function, Core Blockage and Maintenance
What is a radiator and how does it work? Core blockage, airflow, leak testing, cap pressure and cleaning rules for heavy-duty trucks, explained in full.
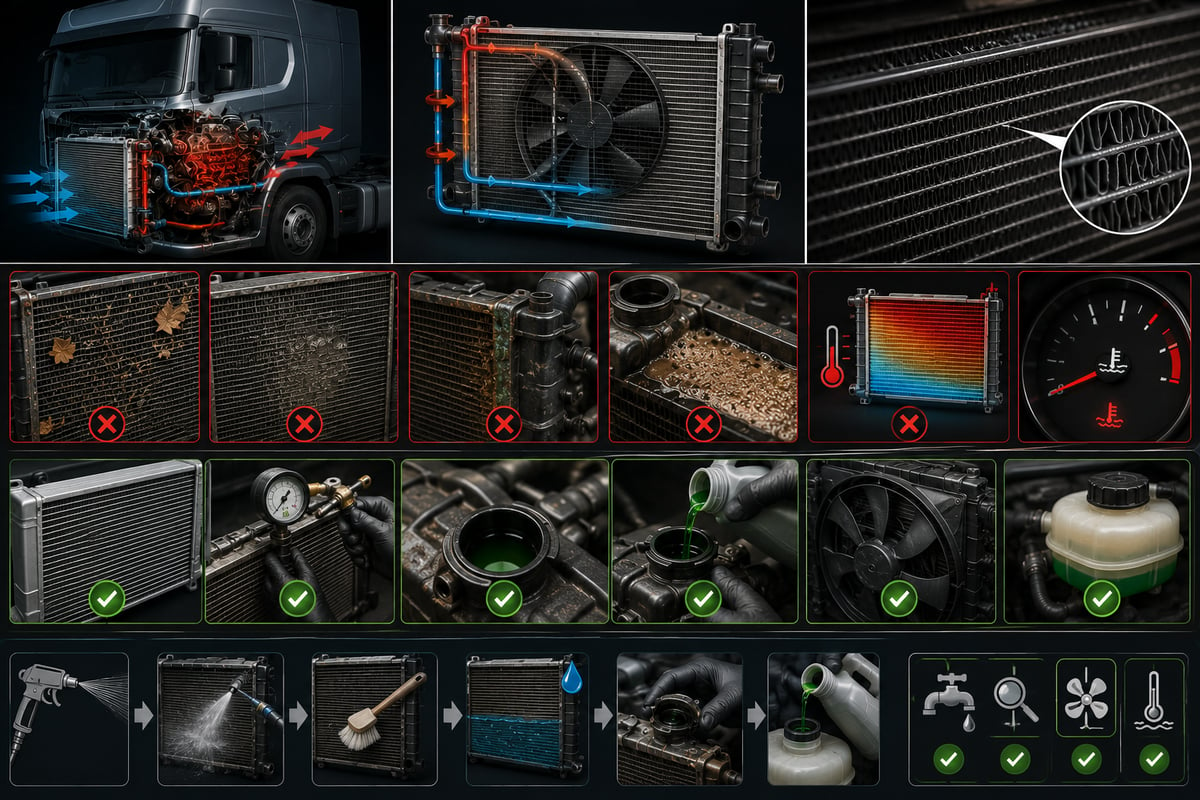
How the needle behaves when a loaded tractor unit hits a long grade in August heat tells you more about that truck's cooling system than the service file ever will. A vehicle with no complaints on flat highway can push the gauge up within a few minutes once load and grade combine, then quietly settle back down once the grade ends and speed picks up again — and when that happens, the fault is rarely inside the engine itself; it's wherever the heat is supposed to be getting rid of. The radiator is the last stop in that chain: a heat exchanger with no moving parts, one that never announces itself while it's working, yet can pull a whole truck onto the shoulder the moment it's blocked. This guide covers what a radiator is, how it works, why and how the core gets blocked, and which field checks actually pay off.
What Is a Radiator? The Heat Exchanger That Hands the Engine's Heat to the Air
A radiator is a liquid-to-air heat exchanger that transfers the heat carried by the engine's circulating coolant into the air passing through the vehicle, across a large surface built from thin tubes and fins. It doesn't generate cooling on its own; it only moves heat from one medium to another. Water that has absorbed heat from the engine gives up part of that heat to the air as it passes through the radiator, then returns to the engine cooler to complete the loop.
The scale of that job is visible in a diesel engine's energy balance. Only part of the fuel's chemical energy ends up as work at the crankshaft; the rest leaves through the exhaust and through the coolant. Roughly speaking, the heat power the cooling system has to reject in a heavy-duty engine is in the same order of magnitude as the power the engine sends to the wheels. The radiator moves that flow into the air without a sound, and it gives no warning while it's doing its job — the first sign that it isn't comes from the gauge.
Its position in the system matches that job description. The water pump pushes coolant into the passages in the block and cylinder head, the coolant heats up there, the thermostat routes it to the radiator once it opens, it cools in the radiator, and returns to the pump. While the thermostat is closed, the radiator is out of the loop; coolant short-circuits back to the pump so the engine reaches operating temperature quickly. In other words, the radiator only comes into play when it's needed — which is why "is the radiator working" is only a meaningful question once the engine is warm.
Radiator or Core? Clearing Up a Common Mix-Up
In the field, the radiator is often just called the "core." Strictly, the core is the tube-and-fin matrix at the centre of the radiator; the radiator is the whole assembly — core, tanks, side brackets and fittings included. The heater core that warms the cab has a core of its own, and it gets called a "core" too: one dumps the engine's heat outside, the other carries a small share of that heat into the cab. Oil coolers for engine or transmission oil look like a core as well, but oil runs through them instead of water. Throughout this guide, "radiator" always means the engine cooling radiator.
How a Radiator Works: The Coolant Side, the Air Side, and Heat Transfer
Inside a radiator, two flows move side by side without touching: hot coolant circulating through the tubes, and air passing between the fins. Heat conducts from the tube wall into the fin, then releases from the fin into the air. For the air to keep carrying heat away, it has to keep being replaced; still air quickly approaches fin temperature and transfer stops. The radiator's whole design is built around these two facts: a large contact surface and uninterrupted airflow.
Three things set the size of the heat transfer. First is the temperature difference: the bigger the gap between coolant and air, the faster the transfer, which is why the same radiator rejects noticeably less heat in summer than in winter, and why faults tend to surface in the hot months. Second is the heat transfer surface: fins multiply the tube's effective surface area many times over. Third is the mass airflow rate — the volume of air passing through the core per unit time — and every layer of dirt packed between the fins cuts that flow, and the radiator's capacity with it, directly.
Air comes from two sources. At road speed, ram air entering through the front grille is usually enough on its own. Once speed drops — on a grade, in low gear, or manoeuvring on a site — that flow disappears and the fan takes over. On a heavy-duty truck the fan is typically engine-driven through a viscous clutch: it spins freely when it isn't needed and engages once temperature rises. For the fan to use that air efficiently, the shroud wrapped around the core is essential; without one, or with a torn one, the fan pulls air from directly in front of its own diameter rather than across the whole core face, and the edges of the core never get cooled at all.
Why Is a Heavy-Duty Truck Radiator Different From a Passenger Car Radiator?
The operating principle is the same in every vehicle, but the workload isn't. A passenger car engine uses a small share of its power, and only in short bursts. A loaded tractor unit climbing a long grade runs its engine at full load for minutes at a time, at low road speed and therefore with no ram air to help. That's the moment the cooling system is under the most strain, and it's the moment a heavy-duty truck radiator is sized around.
| Criterion | Passenger car | Heavy-duty truck |
|---|---|---|
| Heat power to reject | Relatively low, short peak loads | High and sustained without a break |
| Core area and thickness | Limited by bonnet width, thin | Close to cab width, thick, multiple rows |
| Fan diameter and drive | Small, mostly electric | Large diameter, engine-driven, viscous clutch |
| Neighbours in the pack | Condenser, sometimes a small cooler | Charge air cooler, oil cooler, condenser, retarder cooler |
| Operating environment | Mostly asphalt, low dust | Construction sites, fields, dusty routes, high-insect corridors |
The practical consequence of those differences: on a heavy-duty truck, radiator capacity is chosen close to the working point rather than with a generous margin. Losing even a small share of capacity is felt directly. Dirt that fills half the space between fins goes unnoticed on a passenger car but pushes the gauge up on the very first long grade a loaded tractor unit climbs. For the same reason, a heavy-duty radiator is typically designed with wider fin spacing and with serviceability in mind — the goal isn't the highest theoretical capacity, but the capacity that's still standing after the core gets dirty.
Core Construction: Tubes, Fins, Tanks, and Row Count
Seen from the outside a radiator looks like one part, but it's built from several functional sections. The tanks are the inlet and outlet volumes; they spread coolant across all the tubes and collect it again. In down-flow designs they sit at the top and bottom, in cross-flow designs at the sides. The core is the matrix of thin tubes connecting the tanks, with fins stacked between them. Side brackets, fittings, an air-bleed nipple, a drain plug and, depending on the design, a fill neck or an expansion tank connection are added on top of that. A flat tube presents far more surface to the air than a round tube of the same cross-section; the louvres and corrugations pressed into the fins are there to keep breaking up the still-air layer at the surface. That fine geometry is what gives the radiator its power — and what makes it vulnerable to fouling.
The balance between fin density and row count is the most practical design decision in a heavy-duty application. Packing the fins tighter increases surface area but raises air resistance and clogs the core faster once dirt starts building up. Adding more rows raises capacity, but the rear rows become harder to clean, and because air arriving at the back rows has already picked up heat from the front ones, the gain isn't linear. There's no single right answer to "how many rows cool better" for that reason; the right answer is whichever design still holds up once it gets dirty in that particular operating environment.
| Property | Copper-brass soldered core | Aluminum core, plastic tank |
|---|---|---|
| Heat conduction | High on a material basis | Lower, offset by thin wall and geometry |
| Repairability | Solder repair and local patching possible | Limited; usually core or full assembly replacement |
| Typical leak point | Tube-to-header solder joint and tank seam | Plastic tank gasket and crimp seam |
| Corrosion behaviour | Stable with the right fluid, sensitive to electrolysis | Rapid pinholing with the wrong fluid or a grounding fault |
| Fluid compatibility | Additive package must suit copper-brass | Aluminum-compatible additive package is mandatory |
The Cooling Pack: A Radiator Never Works Alone
On a heavy-duty truck, the radiator isn't alone behind the front grille. It shares the same airflow with a whole stack: the A/C condenser, the charge air cooler, the engine oil cooler, a transmission or retarder oil cooler, and on some applications a fuel cooler. Air passes through all of them in sequence, picking up heat and losing pressure at every layer.
That has two consequences. First, fouling in any one layer of the pack affects all of them: once the front-most condenser's fins close up, no air reaches the radiator behind it. Second, dirt collects most in the narrow gap between the layers — a pack that looks spotless from the outside can be hiding a finger-thick felt of debris between the layers. A proper clean, for that reason, usually means separating the pack.
The third component on the air side of the pack is the fan. Even a perfectly sound fan can leave a spotlessly clean radiator overheating at low speed if its clutch isn't engaging on time — a picture that often gets the radiator blamed unfairly. For how to check a viscous clutch and the signs it isn't engaging, see the Viscous Fan Clutch: Fault, Replacement & Maintenance Guide; confirming the fan is doing its job before blaming the radiator is one of the cheapest steps you can put first in the diagnostic order. The same guide covers shroud seals, baffle panels and the seals around the pack: if any one of them is missing, the fan draws air around the core instead of through it.
Radiator Blockage: Telling Internal From External Apart
A radiator gets blocked in two distinct ways, and the causes — and the fixes — are different for each. External blockage is dirt closing up the gaps between fins; airflow drops. Internal blockage is the inside of the tubes narrowing from scale, corrosion products, gelled additive, or oil residue; coolant flow drops. Both produce the same result — a tendency to overheat — which is exactly why a wrong diagnosis is expensive here: running a chemical flush on a radiator that's blocked from the outside wastes time and money, and washing and refitting one that's blocked from the inside just brings the same fault back shortly after.
The causes of internal blockage are almost entirely maintenance-related. Tap water introduces scale straight into the system, and scale settles in the narrowest section available — the radiator tubes. Coolant left in past its change interval runs out of additive package; once protection ends, corrosion starts, and its by-products settle in the radiator too. Mixing different coolant types can cause gelling. A cylinder head gasket leak mixes combustion gas into the coolant, while an internal leak from an oil cooler leaves an insulating film on the tube wall. Careless use of stop-leak chemicals produces permanent narrowing by coating the inside of the tubes as well as the spot it was meant to seal.
| Symptom | Likely cause | How to check |
|---|---|---|
| Overheats only on grades under load, normal on flat road | Capacity loss; external blockage or fan clutch | Look at the core face against light, watch fan engagement |
| Overheats at low speed or idle, clears when speed picks up | Insufficient airflow; fan, shroud, fin fouling | Check shroud integrity, seals and fan clutch engagement |
| Cold patches on the core face | Internal blockage; no flow through that tube bank | Map the surface with an infrared thermometer on a warm engine |
| Almost no difference between upper and lower hose | Thermostat not opening, or coolant bypassing the radiator | Confirm thermostat behaviour and circuit direction |
| Constant bubbling and rising level in the expansion tank | Combustion gas leaking into the system | Run a combustion (exhaust gas) leak test on the coolant |
| Oil film or brown haze on the coolant surface | Internal leak from an oil cooler or a gasket | Inspect a fluid sample, pressure-test the oil side |
| Level keeps dropping with no wetness outside | Internal leak, evaporation, or a weak cap | Run a pressure test together with a cap test |
The most useful discriminating check in that table is scanning the core face with an infrared thermometer on a warm engine. On a healthy radiator, temperature drops steadily from inlet to outlet; a sudden, localized cold patch means coolant isn't passing through the tubes in that area. The method makes internal blockage visible without pulling the radiator off the truck. Always take the reading at operating temperature with the thermostat open — a scan on a cold engine is misleading.
Further reading
For a plain-language technical overview of this subject, see the reference article on Wikipedia. Always confirm specific figures and procedures against the vehicle manufacturer service data.
What Cuts Off Airflow — and the Limits That Get Overlooked
A radiator's capacity is usually lost not in the core itself but in the air that's supposed to reach it. The causes are cheap-looking, easy-to-dismiss details, which is exactly why they build up unnoticed for years.
- Insects and plant debris: A summer route builds up a visible layer on the front face within a few thousand kilometres; once it's dried on, a simple blast of air won't shift it.
- Oil film: A fine oil mist from the engine, an oil cooler, or the turbo plumbing makes the fins sticky and lets dust stick to them.
- Fins laid over by gravel impact: A crushed fin closes off airflow permanently; even a radiator that looks clean can be hiding a serious capacity loss this way.
- Winter covers or cardboard left over the grille: Left on past spring, it causes overheating on the first hot day; it's unnecessary anyway on a modern thermostatically controlled system.
- Missing or damaged shroud and baffle panels: The air the fan pulls comes from around the core rather than through it.
None of these produce a fault code. The capacity loss only shows up on a hot day, loaded, on a grade. That's why the air side needs to be checked on a scheduled basis, not left to reveal itself.
Signs of Radiator Trouble: What the Driver Actually Notices
Radiator-related problems rarely start suddenly. More often they show up as a small shift in the vehicle's own habit, one the driver normalizes as "it runs a bit warm now." Signs caught early save far more expensive parts of the engine downstream.
- Load-dependent overheating: Normal on flat road, rising on a grade and under load. The most typical sign of lost capacity.
- Warming up at low speed: The needle climbs in traffic or manoeuvring and drops at road speed — points to the airflow side.
- Coolant level dropping quietly: Even with no drips on the ground, a falling level means evaporation, pressure loss, or an internal leak.
- White crust and dry streaks: A salty residue at a tank seam, around a fitting, or under a clamp is what's left of a leak that has since dried.
- Heater blowing cold: When there's air in the system or coolant is low, cabin heat is usually the first circuit to weaken.
- Fan running constantly: The system is trying to make up a capacity shortfall with the fan; it shows up in fuel consumption too.
Not every one of these signs points to the radiator. The same picture can come from the thermostat, the water pump, the fan clutch, the cylinder head gasket, or even a low oil level. The Engine Overheating in Heavy-Duty Trucks: Causes & Fixes guide covers every likely cause of overheating, the first checks to run without stranding the truck, and the differential diagnosis behind a rising needle on a grade — it lines up the suspects that need ruling out before the radiator gets blamed.
Finding a Radiator Leak: Pressure Testing and UV Dye
If coolant is disappearing, the first question is whether the leak is external or internal. An external leak leaves a trace; an internal leak sends coolant into the combustion chamber, the oil sump, or the transmission fluid, and nothing shows up outside at all. The most reliable way to tell them apart is a system pressure test: with the system cold, it's pressurized to close to its working pressure and watched to see whether that pressure holds.
- Confirm the engine is fully cold and secure the vehicle; set the parking brake and chock the wheels.
- Top the coolant up to the level the manufacturer specifies; a low system gives an unreliable pressure test.
- Remove the cap, wipe the sealing surface clean, and fit the test pump with the correct adapter.
- Pressurize the system slowly, never beyond the value printed on the cap; excessive pressure can force a new leak even on a sound core.
- Watch the gauge for several minutes. Steady pressure means no external leak; a falling reading means one has to be found.
- With the system under pressure, inspect the tank seam, fittings, drain plug, hose clamps, water pump weep hole, and heater lines one by one with a torch.
- If no leak point is visible, add a suitable fluorescent (UV) dye to the system, run the engine to operating temperature for a while, then let it cool and scan the same areas with a UV lamp.
- If pressure drops with no trace outside, investigate an internal leak: oil emulsion on the dipstick, continuous white exhaust smoke, and bubbling in the tank all point that way.
- Check the coolant for combustion gas with a suitable test fluid; a positive result moves the search from the radiator to the cylinder head side.
- Test the cap separately: it should open at its rated value and hold below it. Once testing is done, release the pressure slowly, bleed the system, and confirm the result with a short load test.
A radiator leaks from three places most often: the crimped gasket seam between the plastic tank and the aluminum core, the point where the tubes are soldered into the header, and a single tube punctured by gravel impact. The first two are age- and vibration-related; the third is external mechanical damage. Once a leak is confirmed to be coming from the radiator itself, the sequence moves to removal, installation, and servicing the expansion tank side — the step-by-step procedure for that, along with the bleeding routine after refilling, is covered in detail in the Truck Radiator & Expansion Tank: Faults, Replacement & Care guide.
The Radiator Cap and System Pressure: A Small Part With a Big Job
Why does a cooling system run under pressure at all? The answer sits in a single physical fact: raising pressure raises the boiling point of the coolant. A mixture that would boil at atmospheric pressure stays liquid to a noticeably higher temperature under a few tenths of a bar, and that widens the engine's safe operating window. The part that sets and limits that pressure is the radiator cap.
The cap is more complex than it looks, and it carries two valves. The pressure valve opens once system pressure reaches the value printed on the cap and vents the excess to the expansion tank. The vacuum valve opens under the low pressure created as coolant volume shrinks while the engine cools, and draws fluid back from the tank. If the vacuum valve fails to work, the system collapses on itself — the most visible result is a crushed lower hose once things have cooled, and the lasting result is the tanks and core being repeatedly stressed by vacuum.
| Cap condition | Symptom | Result |
|---|---|---|
| Pressure valve weak, opens early | Boils early, overflows from the tank, level drops | Overheating and constant top-ups even with normal capacity |
| Pressure valve stuck, won't open | Excess pressure, hose swelling | Stress and leaks at the core, tank and gasket seams |
| Vacuum valve stuck | Hoses crushed after cooling | System collapse, tank fluid can't be drawn back |
| Wrong-rated cap fitted | Symptoms can go either way | Either early boiling or the system constantly over-stressed |
The cap is one of the cheapest parts in the system and one of the most commonly skipped diagnostic steps. If a pressure test comes back clean but the truck still loses coolant and occasionally runs warm, the cap is almost always the first suspect. When it's replaced, confirm the rated pressure printed on it matches the vehicle; the idea that a higher-rated cap cools better is wrong, and on a plastic-tank radiator it can cause permanent damage.
Cleaning a Radiator: Wash Direction, Pressure Limits, and Chemicals
The one rule for external cleaning is to wash against the direction the dirt came in. Since dirt enters the core from the front, it has to be washed from the engine side toward the front. Washing from the front pushes dirt deeper in and leaves a packed layer in the rear rows; if access allows, pulling the fan or the shroud is worth doing rather than taking the short route with a quick front wash.
- Let the engine cool, switch off the ignition, and protect the electrical connectors and the air intake from moisture.
- Blow the front and rear faces first with low-pressure air to remove loose dirt and dried insect shells.
- Wet the surface with low-pressure water and let the dirt soften; trying to knock off a dry crust directly lays the fins over.
- If there's an oily deposit, apply a non-abrasive cleaner rated for aluminum and solder, and don't let the chemical dry on the surface.
- Wash with a wide fan-angle nozzle, at low pressure, keeping proper distance; the water stream should hit the fins straight on, never at an angle.
- Once rinsing is done, dry the surface with low-pressure air, straighten any laid-over fins with a proper fin comb in one direction without forcing them, and hold a light behind the core to confirm it's open again.
A pressure washer is the most common cause of radiator damage. A high-pressure, narrow-angle jet lays the fins over within seconds, and that damage is permanent — a cleaning job ends up permanently cutting capacity. Steam cleaning and aggressive alkaline cleaners can also dull and start corrosion on an aluminum surface. The rule is simple: low pressure, wide angle, proper distance, and patience while the dirt softens.
Internal cleaning calls for even more restraint. If the system has been serviced regularly with the right fluid, internal cleaning is rarely needed at all. If scale or corrosion buildup is confirmed, use a cleaner compatible with the material for the time the manufacturer specifies, then flush thoroughly with clean water, preferably in the reverse direction. The rinse water needs to run clear; leftover chemical breaks down the new coolant's additive package. Always refill with the correct antifreeze type and demineralized water at the manufacturer's ratio — putting plain water into the system leaves neither freeze nor corrosion protection in place, and it's about the fastest way to damage a radiator.
Technical Values and General Reference Ranges
The table below collects the figures most often asked about on the cooling system side, as general reference only. None of them replaces an OE value; the point is being able to judge quickly whether a measured figure is in the expected range.
| Item | General reference | Note |
|---|---|---|
| Normal operating temperature | Roughly 80-95°C | Varies by engine and calibration; the gauge band is authoritative |
| Radiator cap opening pressure | Roughly 0.7-1.2 bar | The value is printed on the cap; only that value is valid |
| Antifreeze-to-water mixture ratio | 50/50 by volume is a common starting point | Adjusted for regional climate and OE instructions |
| Upper-to-lower hose temperature difference | A clear, measurable difference is expected | A difference that disappears points to a flow or thermostat fault |
| Antifreeze change interval | Depends on fluid type and OE instructions | Whichever comes first, mileage or time, applies |
| Radiator mount condition | Elastic, uncracked, full set | A hardened mount carries vibration straight into the core |
That table carries one rule: no figure for a cooling system can be used independent of the engine and chassis code. The real benchmark is whether that particular vehicle has drifted from its own historical normal.
Habits That Shorten a Radiator's Life
Run on the right fluid with clean air passing through it, a radiator can last close to the life of the vehicle. Behind almost every radiator that fails early sits the same handful of habits.
- Using tap water: Scale settles in the narrowest section — the radiator tubes — and starts internal blockage.
- Running on plain water: Antifreeze isn't only about freeze protection; it also handles corrosion protection and lubricating the water pump seal.
- Running past the change interval: Once the additive package is used up, protection ends — even if the fluid still looks clear, the system is open to corrosion.
- Using stop-leak chemicals: They seal a leak temporarily while narrowing the heater core and radiator tubes.
- Ignoring an oil leak: An oil film turns the core into a surface that holds onto dust; cleaning it without fixing the leak first doesn't last.
- Ignoring a source of electrolysis: A loose or corroded chassis ground strap can let current find its way through the coolant and pinhole the core from the inside. Any recurring pinhole leak with no obvious cause should always start with checking the grounding connections.
Maintenance Schedule and the Radiator's Place in the Cooling Chain
The radiator doesn't have a maintenance schedule of its own; its maintenance is the cooling system's maintenance. The routine below is a field-usable checklist. Shorten the intervals for the operating environment — dusty routes, construction sites and agricultural work all call for checking the air side far more often.
- Before every trip: Check the coolant level on a cold engine and look for drip marks on the ground.
- Weekly: Give the front face of the core a visual check; clear off insects or chaff before it builds up further.
- Monthly: Squeeze the hoses by hand to check for hardening, swelling and cracking; check clamps and fittings for dry residue.
- At scheduled service: Check the radiator cap's seal, and test or renew it if there's any doubt.
- At scheduled service: Clean the core against the direction dirt entered, at low pressure; check for dirt between pack layers, shroud seals and radiator mounts.
- At each season change: Measure antifreeze protection with a refractometer; remove a winter cover before the weather turns warm.
- At the manufacturer's specified interval: Change the coolant with the correct type and ratio, and complete the bleeding procedure fully after refilling.
- After any overheating event: Run a pressure test on the system and log the event.
The radiator sits at the end of the cooling chain, and it carries the health of the whole chain on its back. If the water pump can't establish enough flow, the radiator can't cool; if the thermostat won't open, the radiator's presence is meaningless; if the fan clutch doesn't engage on time, the core is useless at low speed; if the cap can't hold pressure, the coolant boils early; if the fluid itself is the wrong type, the radiator gets eaten from the inside. That's why a truck coming into the shop with an overheating complaint shouldn't have its diagnosis start with the radiator — it should end there. The right order is fixed: fluid level and external leaks first, then airflow and the fan, then the thermostat and pump, and the radiator's internal and external condition last. In every case, the vehicle's current OE service documentation for its engine and chassis code is authoritative.
Shop this part: Radiator
In-depth technical guide: For fault diagnosis, step-by-step replacement and service intervals: Truck Radiator & Expansion Tank: Faults, Replacement & Care
Main guide: Water Pump: Faults, Replacement & Maintenance Guide
Tags
Frequently Asked Questions
- What is a radiator, and what does it do?
- A radiator is a liquid-to-air heat exchanger that transfers the heat carried by the engine's circulating coolant into the air passing through the vehicle, across a large surface built from thin tubes and fins. It doesn't generate cooling on its own; it moves heat from one medium to another. On a heavy-duty truck, the heat power the cooling system has to reject is in the same order of magnitude as the power the engine sends to the wheels; the radiator is the last stop for that flow.
- Why does a radiator core get blocked?
- A core gets blocked in two distinct ways. In external blockage, the gaps between fins close up with insects, dust, chaff, road salt residue and oil film from the engine; airflow drops. In internal blockage, the inside of the tubes narrows from scale, corrosion products, gelled additive or oil residue; coolant flow drops. The causes of internal blockage are almost entirely maintenance-related: tap water, expired antifreeze, mixing different fluid types, and stop-leak chemicals.
- How do I know if my radiator is blocked?
- The most typical sign is load-dependent overheating: the truck runs normally on flat road, then the gauge climbs once it's loaded on a grade and drops back once the grade ends. A picture where it warms at low speed and clears at road speed points more toward airflow and the fan. The most practical check for internal blockage is scanning the core face with an infrared thermometer on a warm engine; a localized cold patch means coolant isn't passing through those tubes.
- How do I clean a radiator from the outside, and can a pressure washer damage it?
- The one rule is to wash against the direction the dirt came in — from the engine side toward the front, since dirt enters from the front. A high-pressure, narrow-angle jet lays the fins over within seconds, and that damage is permanent, turning a cleaning job into a permanent capacity loss. The right method is low pressure, a wide fan-angle nozzle, proper distance, and letting the dirt soften first.
- Can I put tap water in a radiator?
- No. Tap water puts scale and minerals straight into the system, and scale settles in the narrowest section available — the radiator tubes — starting internal blockage. Use demineralized or distilled water for the mixture. Running the system on plain water is also a mistake: antifreeze isn't only about freeze protection, it also provides corrosion protection and lubricates the water pump seal.
- Is a copper-brass radiator better than an aluminum one?
- Each has its own strengths. A copper-brass core offers high heat conduction on a material basis and allows solder repair; an aluminum core with plastic tanks is lighter and common on current production, but repair options are limited. What matters more than the material is the coolant's additive package: a fluid that isn't compatible with aluminum starts corrosion from the inside where it can't be seen.
- What does a radiator cap do, and what happens when it fails?
- The cap holds the system under pressure; the higher the pressure, the higher the coolant's boiling point, which widens the engine's safe operating window. It carries two valves: the pressure valve vents excess pressure to the expansion tank, and the vacuum valve draws fluid back from the tank as the engine cools. A weak cap causes early boiling and constant coolant loss; a stuck vacuum valve crushes the hoses after cooling and collapses the system on itself.
- How do you find a radiator leak?
- The most reliable method is a system pressure test: with the system cold, it's pressurized to close to its rated value, printed on the cap, and the gauge is watched for several minutes. If pressure drops, the tank seam, fittings, drain plug, clamps and heater lines are checked with a torch; if no point is visible, a fluorescent (UV) dye is added and the same areas are scanned with a UV lamp. If pressure drops with no trace outside at all, an internal leak should be investigated.
- Can I open the radiator cap while it's hot?
- No. The system is under pressure, and the instant the cap is loosened, coolant above its normal boiling point flashes to steam and sprays out violently, causing severe burns. The cap should only be opened once the system has cooled, wearing gloves and eye protection, releasing it to the first detent and letting the pressure bleed off. In the same way, never reach into the fan area with the engine running — a viscous-clutch fan can spin even with the engine stopped.
- How long does a radiator last, and when should it be replaced?
- A radiator has no fixed replacement interval; its life is set by the quality of the fluid running through it and the cleanliness of the air reaching it. Run on the right antifreeze type, changed on schedule, with regular attention to the air side, a radiator can last close to the life of the vehicle. The decision to replace is made on evidence, not the calendar: an unrepairable leak, widespread crushed fins, or internal blockage that cleaning can't recover are the typical triggers.
Related Articles

Engine Overheating in Heavy-Duty Trucks: Causes & Fixes
Learn why heavy-duty truck engines overheat, how to read the gauge, step-by-step diagnosis, and how coolant, water pump, thermostat, and fan clutch fail.
Fan Belt Tensioner: Failure, Replacement & Maintenance
What a truck fan belt tensioner does, why it squeals or vibrates, how to measure belt tension and how to replace a worn tensioner pulley bearing.
Water Pump: Faults, Replacement & Maintenance Guide
How the heavy-duty water pump keeps engine temperature in check, what fluid colour at the weep hole reveals about a failing seal, and safe replacement.


