Truck Oil Pan Group: Faults, Replacement & Maintenance Guide
Heavy-duty truck oil pan guide: leak diagnosis, gasket and drain plug faults, step-by-step replacement, torque values, capacities and maintenance tips.
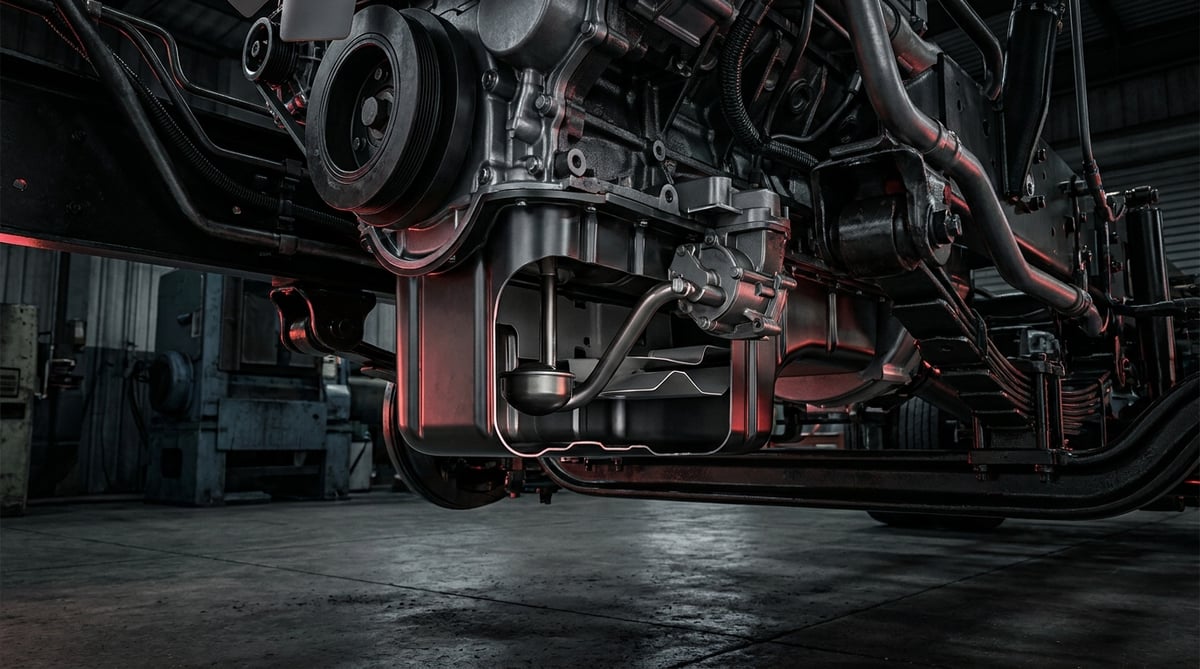
On a heavy commercial vehicle, the oil pan is one of the parts that most often arrives at the workshop with a "it's dripping" complaint, yet remains one of the least understood. A driver who looks under the tractor unit and spots an oil stain immediately blames the pan gasket; in reality, in a significant share of the cases we see in the field the problem is not the gasket at all, but the load reaching the pan, the tightening torque, the crankcase ventilation system, or impact damage to the sump floor. On construction-site and mining vehicles, stone strikes dominate; on long-haul tractors, thermal fatigue and incorrect installation come to the fore. This guide explains — in workshop language — what the oil pan group does, how to diagnose a fault correctly, how to carry out the replacement, and which maintenance practices extend its service life.
What Is the Oil Pan Group? Function and Operating Principle
The oil pan group is the sealed reservoir bolted to the lower engine block that stores and cools the engine oil and maintains a stable oil level for the oil pump to draw from — together with all of its associated components: the gasket, drain plug, pickup tube and level-sensing elements.
The operating principle looks simple at first glance: when the engine stops, oil drains down into the pan by gravity; when the engine runs, the oil pump draws oil through the pickup strainer, pressurises it and feeds it to the galleries. Once the circulating oil has done its job, it returns to the pan. On a heavy commercial vehicle, however, this cycle operates under far tougher conditions: oil volumes of up to 25–40 litres, an oil mass that surges on gradients and under braking, oil mist and crankcase pressure generated by the crankshaft, plus impact and vibration loads from below.
That is why a heavy-duty oil pan is not a single pressed vessel but a group. Inside it are baffles that prevent oil surge, a strainer positioned so the pickup never draws air, a level-measuring point, on some engines a level/temperature sensor, and the drain plug. The pan is also a cooling surface; while the vehicle is moving, the airflow passing underneath lowers the oil temperature. In some heavy-duty applications this is not enough, and a separate plate-type oil cooler (heat exchanger) is added.
- Pan body: Pressed steel sheet, cast aluminium, or a composite/plastic body. Varies with engine architecture.
- Pan gasket / sealing: Moulded elastomer gasket, steel-reinforced gasket, or liquid sealant (RTV/anaerobic) application.
- Drain plug and washer: Typically a metric-threaded plug plus a crushable copper/aluminium washer, or an integrated O-ring.
- Oil pickup tube and strainer: The suction line running to the pump; the wire mesh at its end traps coarse particles.
- Baffles and surge plates: Prevent oil from moving away from the pickup during braking, on gradients and in corners.
- Dipstick guide tube: The tube the dipstick seats in, and its O-ring.
- Level/temperature sensor (where fitted): Common on EURO 5/6 engines; screwed into the side face of the pan.
- Skid plate / guard: The underplate that protects the pan from stone strikes on site and off-road vehicles.
Which Engine Family, Which Pan? The OE Context
The 11–13 litre class diesels that form the backbone of long-haul tractor units are all built for "the same job", but their oil pans are not the same part. The typical European representatives of this class are the Mercedes-Benz OM470/OM471, Scania DC13, DAF MX-13, Volvo D13, MAN D26 and Iveco Cursor 13 families. Some of these families, for example, use a deep-drawn pressed steel pan, while others use a cast aluminium pan that adds stiffness to the block; and although their fill capacities all sit in the ~30–40 L band, they can differ from one another by several litres depending on the family and body type. In other words, the assumption "12-litre engine, so the pan must be the same" fails at the very first bolt.
Nor do the differences end at family level: even within the same family, the chassis type (tractor / construction / bus), model year, sensor or non-sensor specification and pan depth each correspond to a different OE number. That is why every "cross-check against the OE number" warning in this guide describes a concrete task:
- Read the number off the part, don't write it from memory: The OE number is usually cast/stamped into the side face of the pan body, or printed on a label. The vehicle's engine code is read from the plate/stamping on the engine block.
- Use three data points together: VIN + engine code + the OE number on the part currently fitted. If the three do not agree, the vehicle may have been repaired with a different pan in the past; in that case the VIN takes precedence.
- Compare the body type physically: Depth, number of bolt holes, presence of a sensor boss and plug thread size — the new part must match the old one exactly on these four points.
Pan Body Types: Steel, Aluminium and Composite
The pressed steel pan is the most common and cheapest solution; it flexes under impact, dents, but usually does not crack. Its drawbacks are that a dent alters the pickup strainer clearance, and that it radiates resonance and noise. A cast aluminium pan adds stiffness to the engine block, dissipates heat better and reduces noise; in return, under a hard impact it cracks rather than flexes. Composite (glass-fibre reinforced polyamide) pans offer weight and insulation advantages on the latest generation of engines; however, they are highly torque-sensitive and their threaded bosses strip when overtightened.
The Relationship Between Pan, Pickup Strainer and Oil Pressure
This is the point most often missed in the field: a deformation in the pan can present itself directly as an oil pressure problem. The pickup strainer sits at a defined distance (typically a few millimetres) from the pan floor. If the floor is pushed inwards, this clearance closes up, the pump cannot draw enough oil, and a low-pressure warning appears — especially at idle. Conversely, if the strainer ends up above the oil level (level low, or vehicle on a slope), the pump draws air, pressure fluctuates and bearing damage begins.
Symptoms Confused with Crankcase Ventilation (Blow-by)
Combustion gases leaking past the piston rings into the crankcase raise crankcase pressure. That pressure has to escape somewhere; if the breather is blocked, it pushes oil out at the weakest point — that is, past the pan gasket or the crankshaft seal. If you replace the gasket of a vehicle that arrives with a "the pan gasket is leaking" complaint while ignoring the blow-by problem, the new gasket will also leak within a few thousand kilometres. Confirming, before gasket replacement, that the crankcase ventilation is clear and that blow-by is within reason is the only way to avoid repeat work.
| Application / Engine class | Typical pan body | Typical oil capacity (general reference) | Key risk |
|---|---|---|---|
| Long-haul tractor, 11–13 L EURO 5/6 diesel (OM471, DC13, MX-13, D13 class) | Pressed steel sheet or aluminium | ~30–40 L | Thermal fatigue, gasket hardening, plug thread stripping |
| Distribution truck, 5–8 L medium-class diesel | Steel sheet or composite | ~14–24 L | Stop-start vibration, bolt loosening |
| Construction / tipper truck (off-road) | Steel sheet + skid plate | ~28–38 L | Stone strike, floor denting, loss of strainer clearance |
| Bus (horizontal/rear engine) | Aluminium or deep-drawn steel | ~25–35 L | Restricted access, surface cleanliness during assembly |
| Tractor / trailer application with PTO | Steel sheet | ~30–40 L | Continuously high oil temperature, oxidation |
Fault Symptoms and Diagnosis
Oil pan group faults are rarely sudden and dramatic; they usually arrive as a leak that grows over weeks or a pressure behaviour that slowly deteriorates. The secret to correct diagnosis is to look not at the stain, but at the source of the stain.
| Symptom | Possible cause | Check / Verification |
|---|---|---|
| Oil drips under the pan in the parking bay, engine otherwise clean | Drain plug washer crushed/missing, or plug thread stripped | Remove the plug, inspect the washer and thread visually; refit with a new washer to the specified torque, recheck after 30 min of idling |
| Wetness along the pan flange, oil accumulating on the lower edge | Pan gasket hardened/crushed, or bolts loosened | Clean the flange, monitor for one day with UV dye + black light or talcum powder; check bolt torques in sequence |
| Leak returns shortly after the gasket has been renewed | Crankcase ventilation blocked, excessive blow-by, high crankcase pressure | Open the oil filler cap with the engine running — if there is strong gas pressure/smoke, carry out a blow-by measurement; check the breather line |
| Low oil pressure at idle, normalising as revs rise | Pan floor dented - pickup strainer clearance closed, or strainer blocked | Inspect the underside of the pan visually; if in doubt, drop the pan, measure the strainer and the flatness of the floor, confirm pressure with a mechanical gauge |
| Oil pressure warning lamp flickers momentarily on gradients/under hard braking | Oil level low, or baffle/surge plate damaged, oil moving away from the pickup | Cold level check on level ground; if the level is normal, check the integrity of the internal baffles |
| Dent, scoring or fresh impact mark on the outer surface of the pan | Stone/kerb/obstacle strike; site use | After lifting, sweep the entire floor surface by hand; use liquid penetrant or a soapy water test for dent depth and cracks |
| Foamy, milky or brown oil on the dipstick | Water/coolant contamination, condensation; not pan-related but collects in the pan | Drain the oil, look for sludge/water at the bottom of the pan; isolate the source with a cooling system pressure test |
| New, sharp metallic noise / vibration from under the engine | Pan bolts loosened, pan contacting the block, or an internal baffle broken loose | Check bolt torques in a crosswise sequence; look for metal debris/broken baffles at the bottom when the oil is drained |
| Leak from the sensor boss (pan with level/temperature sensor) | Sensor O-ring aged, or sensor overtightened | Remove the sensor, inspect the O-ring; check the boss thread and sealing face, refit the sensor to the specified torque |
Correctly Identifying the Source of the Leak
Most of the oil under the pan has in fact come down from above. The crankshaft rear seal, front cover seal, oil cooler gasket, oil filter housing, turbo oil return line, even the cylinder head gasket — every one of them creates a stain that collects at the pan flange. So the correct method is this: wash the underside of the engine thoroughly with an industrial cleaner, dry it, add UV tracer dye, run the vehicle on its normal duty for a day, then find the highest wet point with a black light. The source of the leak is the highest point of the wetness; the lower edge is merely where it drips.
When to Treat the Pan as a Suspect in an Oil Pressure Complaint
With a pressure complaint, oil viscosity, filter condition, pressure sensor and pump/relief valve are checked first. Adding the pan to the suspect list requires a trigger: the vehicle's off-road/site history, a visible dent in the floor, a recent towing/recovery operation, or a departure from the road. Without such triggers, the pan is usually last in line. If a trigger is present, dropping the pan after confirming the real pressure with a mechanical gauge is the fastest route to a solution.
Crankcase Pressure and Blow-by Measurement
With recurring gasket leaks, a blow-by measurement is essential. Using a gauge/blow-by meter connected to the oil filler neck or the dipstick tube, crankcase pressure is compared against the limit stated by the manufacturer. If the reading is above the limit, replacing the gasket is not a fix — merely a temporary postponement. In that case, ring wear, turbo seal or a blocked breather must be isolated. Because the measurement limit varies by engine family, take the figure from the service manual.
One of the sources described as running down to the sump flange is the crankshaft seal; its leak symptoms and causes are examined in depth in the crankshaft seal oil leak guide.
Further reading
For a plain-language technical overview of this subject, see the reference article on Wikipedia. Always confirm specific figures and procedures against the vehicle manufacturer service data.
Replacement / Installation Steps
- Preparation and verification: Using the VIN/engine code, confirm the correct part numbers for the pan, gasket, plug washer and, where fitted, the sensor O-ring. Read the OE number on the pan currently fitted and match it via the VADEN catalogue cross-reference search; compare the result against the product data in the Oil Pan Group category. Also compare the new gasket physically with the old one (hole count, depth, sensor boss). Keep the torque and tightening sequence page of the service manual to hand.
- Position the vehicle safely: Level ground, parking brake, chocks, lift or stands. The engine should be warm (oil fluid, but not hot enough to burn — typically around 40–50 °C). Disconnect the battery negative.
- Drain the oil: Place a drain tray of adequate capacity (typically over 40 L) and remove the drain plug. Opening the oil filler cap speeds up the flow. Hold the drained oil up to the light and assess it for metal particles, water and burnt smell — this information is part of the diagnosis.
- Remove obstructions: If the skid plate/underguard, an exhaust section, the steering drag link, the front axle cross-member or an oil cooler line is in the way, remove it. Label every bolt you remove according to its position; on heavy commercial vehicles, bolts of different lengths are used together.
- Disconnect the sensor and pipework: Disconnect the level/temperature sensor connector, the heater line and the dipstick guide tube (where fitted) from the pan. Release connectors by their latch; do not pull on the wiring.
- Remove the pan bolts: Slacken from the centre outwards, in a crosswise sequence and in stages. Support the pan before fully removing the last 4 bolts. If the pan is stuck, free it with a plastic wedge and a rubber mallet — never lever the flange joint apart with a screwdriver or chisel, as this will ruin the sealing plane.
- Lower the pan and inspect internally: Lower the pan squarely. Inspect the pickup strainer, its gasket/O-ring, the baffles and any deposits at the bottom of the pan. If the strainer is blocked, clean or replace it. The strainer gasket is generally single-use.
- Prepare the surfaces: Remove all old gasket residue from the block and pan flange completely, using a plastic scraper and a suitable cleaner. Do not use a wire brush or abrasive disc — they ruin the sealing plane and the loosened particles enter the engine. Degrease and dry the surfaces; even a fingerprint can cause a leak with some liquid sealants.
- Fit the gasket: If a moulded gasket is used, fit it dry (unless the manufacturer states otherwise) and apply liquid sealant at the corner/junction points exactly as the manual specifies. If it is a full liquid-sealant application, lay a continuous bead of the diameter stated by the manufacturer (typically 2–4 mm) on the correct side; excess sealant squeezes inwards and blocks the pickup strainer. If you have applied liquid sealant, complete the assembly within the open time (typically 10–20 min).
- Fit the pan and torque it: Seat the pan on its guide dowels and run all bolts in by hand. Then tighten from the centre outwards, in a spiral/crosswise sequence and in at least two stages (e.g. ~50% torque first, then full torque). If the manual calls for angle tightening (torque + angle), use an angle gauge. On composite pans the torque tolerance is very narrow — a calibrated torque wrench is essential.
- Plug, refill and leak test: Tighten the drain plug with a new washer to the specified torque. Reconnect the sensor and pipes. If you used liquid sealant, observe the cure time (typically 1–24 hours, product dependent) and do not add oil before it has elapsed. Fill with oil of the correct specification to the manual's capacity, check the level, start the engine and wait for the oil pressure lamp to go out; after 10–15 min of idling, check the entire flange and the plug. Stop the engine, wait 5 min, then measure the level again and top up.
Points to Watch (Common Mistakes)
- Reusing the drain plug washer: The crushable copper/aluminium washer is single-use. A reused washer will drip even if the plug is at the correct torque — and the technician, thinking "the plug is loose", tightens it further and strips the thread.
- Separating the pan with a pry bar/chisel: A single nick opened up in the flange makes every subsequent gasket change a leaky one. Use a plastic wedge and a rubber mallet.
- Cleaning old gasket residue with abrasive paper/a wire brush: This ruins the sealing plane and sends abrasive particles into the engine. A plastic scraper + chemical cleaner is the correct method.
- Ignoring blow-by: A new gasket fitted while the crankcase ventilation is blocked will come back as your warranty job. Verify crankcase pressure before replacing the gasket.
- Leaving a dented pan because "it's only on the outside": An apparently small dent may have closed the pickup strainer clearance inside. If there is a dent, the pan comes down and the strainer clearance gets measured.
- Not renewing the strainer gasket/O-ring: An air leak in the pickup line comes back as pressure fluctuation at idle, and it is very difficult to diagnose. If the strainer has been removed, its gasket is renewed.
- Wrong oil capacity and level measurement: A level measured immediately after the engine stops reads low, and the technician adds too much oil. Excess oil is churned by the crankshaft, foams, and pressure drops. Observe the settling time described in the manual.
- Mixing up the bolts: A bolt of the wrong length going into the wrong hole either bottoms out against the block or fails to engage enough thread. During removal, lay the bolts out according to the pan's layout (use a cardboard template or a labelled box).
- Sending the vehicle out to site without fitting the skid plate: On off-road and site vehicles, the skid plate is not an accessory — it is the pan's life insurance.
Technical Values and Inspection Points
The values below are typical/general reference ranges encountered on heavy commercial diesel engines. There are significant differences by engine family, model year and specification; for the exact value, the vehicle manufacturer's current service manual is definitive.
| Parameter | Typical range (general reference) | Note |
|---|---|---|
| Pan oil capacity (11–13 L diesel; OM471, DC13, MX-13, D13 class) | ~30–40 L (including filter) | Even within the same class it varies by litres depending on family and body type; the manual value is definitive |
| Pan oil capacity (5–8 L diesel) | ~14–24 L | Compact pans sit near the lower limit |
| Idle oil pressure (hot engine) | ~0.8–1.5 bar (≈12–22 psi) | Below the lower limit, inspect strainer/pump/relief valve |
| Oil pressure at operating speed (hot) | ~3.0–5.0 bar (≈45–72 psi) | Varies with viscosity and oil temperature |
| Normal pan oil temperature | ~90–110 °C | May be temporarily higher under heavy load/on gradients |
| Critical oil temperature (warning zone) | above ~120–130 °C | Continuous operation in this zone consumes oil life rapidly |
| Crankcase pressure (blow-by), healthy engine | Slight vacuum to ~a few mbar positive pressure | The limit value is specific to the engine family; take it from the manual |
| Pickup strainer — pan floor clearance | ~3–8 mm | Its reduction after denting is the hidden cause of low pressure |
| Liquid sealant bead diameter | ~2–4 mm, continuous | Excess squeezes inwards and blocks the strainer |
| Liquid sealant open time / cure | Application ~10–20 min; cure ~1–24 hours | The product technical data sheet is definitive |
| Oil change interval (long-haul, EURO 6) | ~60,000–120,000 km or once a year | Varies with duty profile and oil specification |
| Oil change interval (site/heavy duty) | ~20,000–45,000 km or based on engine hours | Dust, idling and load factor shorten the interval |
Torque values are the deciding factor in sealing. The ranges below are compiled from typical heavy commercial applications and do not replace the manual value:
| Joint | Typical torque range (general reference) | Application note |
|---|---|---|
| Pan bolt — pressed steel pan (M8) | ~20–28 Nm | Centre outwards, crosswise sequence, at least 2 stages |
| Pan bolt — aluminium pan (M8–M10) | ~22–45 Nm | Torque + angle on some engines; an angle gauge is required |
| Pan bolt — composite pan | ~10–22 Nm | Tolerance is narrow; overtightening strips the threaded boss |
| Drain plug (M12–M18, steel pan) | ~25–45 Nm | A new crushable washer every time |
| Drain plug (M22×1.5 and larger plugs, steel pan) | ~60–80 Nm | Common on heavy commercial vehicles; the value is markedly higher than for small plugs — always take it from the manual |
| Drain plug (aluminium/composite pan) | ~20–35 Nm | Stay near the lower limit; the risk of thread damage is high |
| Oil pickup tube / strainer bolt | ~10–25 Nm | Treat its gasket/O-ring as single-use |
| Level / temperature sensor | ~15–30 Nm | Overtightening cuts the O-ring and causes a leak |
- With the engine cold and the vehicle on level ground, is the oil level between min and max, preferably close to max?
- Is there wetness or dust-and-oil sludging along the pan flange (particularly at the rear corners)?
- Is the area around the drain plug dry; is the crush pattern on the plug washer even?
- Is there a dent, scoring, weld mark or fresh impact on the pan floor?
- Is the skid plate in place with all its bolts present?
- Is there excessive gas pressure/smoke when the oil filler cap is opened (an indicator of blow-by)?
- Is the crankcase breather hose blocked, crushed or full of oil?
- Are the sensor connector and wiring intact, and is the connector free of oil ingress?
- Has the oil pressure warning ever flickered — particularly on a gradient, under hard braking or in a sharp corner?
Maintenance and Service Life
Used correctly, the oil pan is a part that is never replaced throughout the engine's life. Almost every pan that needs replacing in the field arrives there because of either an impact or an assembly error. "Pan maintenance", therefore, is really the discipline of protecting the pan and keeping the system around it healthy.
- Change the oil and filter according to duty profile: The catalogue mileage applies to long-haul work. Site work, short-distance distribution, heavy idling and dusty environments shorten the interval markedly. On such vehicles, tracking by engine hours is a more honest measure than mileage.
- Use oil of the correct specification: The requirement for low-ash (low-SAPS) oil exists primarily for the DPF (particulate filter); on applications with SCR but no DPF, the manufacturer's specification is decisive. The wrong oil hits both the exhaust after-treatment system and the oil's life in the pan.
- Use a new plug washer at every oil change: Its cost is trivial; the dripping and thread damage it prevents are expensive.
- Check crankcase ventilation periodically: A blocked breather finishes off all of the pan's sealing elements (gasket, seals) prematurely.
- Don't neglect the skid plate: On off-road/site vehicles, a missing or loose skid plate finishes the pan at the first big stone.
- Make the oil level check a weekly routine: A low level causes the pickup to draw air on gradients/under braking, while a high level leads to churning and foaming. Both shorten bearing life.
- Read the drained oil: Metallic sheen, a milky appearance, a burnt smell or sludge at the bottom — these are the early warnings the pan is giving you.
- Act immediately if there is a leak: Oil degrades rubber boots/mounts and engine fasteners; moreover, oil dripping onto a hot exhaust is a fire risk and will be recorded as a defect at a roadside inspection.
- Question a gasket that leaks a second time: A leak recurring at the same point is a problem with the system, not the gasket.
In summary: the service life of the pan group depends as much on the discipline of the installation and the health of the system around the pan as it does on the quality of the gasket. Calibrated torque, a clean flange, a new washer, clear ventilation and a skid plate in place — these five items eliminate the vast majority of pan-related failures before they are even born.
The VADEN ORIGINAL Oil Pan Group product family is supplied to production tolerances matched to OE dimensions and sealing behaviour, covering the pan body, pan gasket, drain plug and washer, pickup tube/strainer and sealing elements for heavy commercial vehicle engines. To select the right part for your vehicle, verify it through our catalogue cross-reference search using the VIN/engine code and the current OE number; for any match you are unsure about, contact the VADEN technical team.
Related categories: Oil Sump · Pipe · Oil Sump · Oil Pan · Gasket · Pipe
Related technical guides: Exhaust Manifold: Cracks, Leaks, Replacement & Torque Guide · Engine Cylinder Head Group: Faults, Replacement & Maintenance · Exhaust / Engine Brake: Faults, Replacement & Maintenance Guide · Oil Cooler: Failure Symptoms, Replacement & Maintenance Guide · Engine Valve Train & Adjustment Shim: Faults, Replacement, Care
Application and compatibility: Vehicle compatibility catalogue · Engine compatibility catalogue
Vehicles and engines mentioned in this guide: Volvo D13 · MAN D2676 · Mercedes-Benz OM470 · Iveco Cursor 13
Main guide: Low Engine Oil Pressure: Symptoms, Causes, and the Role of the Oil Pump
Tags
Frequently Asked Questions
- My oil pan gasket is leaking — is replacing just the gasket enough?
- Most of the time, no. Before replacing the gasket, verify that the crankcase ventilation is clear, that blow-by is within reason, and that the flange is true and the bolts undamaged. A new gasket fitted without these checks will usually leak again within a few thousand kilometres. Also use UV dye to establish whether the leak really comes from the pan, or whether it comes down from a seal above and simply collects at the pan flange.
- How long does an oil pan replacement take, and when should I suspect a seal rather than the pan?
- The time depends far more on access than on the pan itself. On a tractor unit with open access, dropping the pan, renewing the gasket and refitting is typically on the order of half a working day; if the front axle, steering drag link or underguard is in the way, or if there is a restricted layout such as a bus/rear engine, it can extend to a full working day. On engines using liquid sealant, the cure time (typically 1–24 hours, product dependent) is added to that — the vehicle sits without oil for that period, so plan accordingly. The typical signs that you should suspect a seal rather than the pan are these: the oil is running down from a point above the pan flange; the stain is concentrated around the flywheel housing/bell housing or in the pulley-front cover area; the pan flange stays dry after cleaning while wetness reappears from above. For a definitive distinction, wash the underside, add UV tracer dye and use a black light to find the highest point of the wetness: that is the source. If the leak really is at the crankshaft rear seal, the job is no longer a pan job; because it requires removing the gearbox, the time and cost move into a completely different class — which is exactly why clarifying the diagnosis without removing parts is the most profitable step.
- Can a dented oil pan be repaired, or must it be replaced?
- A superficial, shallow, crack-free dent in a steel pan can in theory be straightened; in practice, however, flange flatness and pickup strainer clearance cannot be guaranteed during straightening. If the dent is deep, if the floor has moved closer to the strainer, if there is a crack/weld mark, or if the pan is aluminium/composite, replacement is the right call. Taking on an oil pressure risk to save the price of a pan is not worth it.
- How tight should I torque the pan bolts?
- Strictly with a calibrated torque wrench, to the value and in the sequence given in the service manual. Typical ranges are around 20–28 Nm for M8 on a steel pan and 10–22 Nm on a composite pan; but these are a general reference and do not replace the manual value. Tightening a pan with an air gun is the most common cause of the permanent leaks we see in the field.
- How much oil should I add after an oil pan replacement?
- Take the "including filter change" capacity stated in the manual as the basis; on heavy commercial 11–13 L diesels (OM471, DC13, MX-13, D13 class) this is typically in the 30–40 L range, and two engines in the same class can differ by litres. Fill to roughly 90% of the capacity first, start the engine and confirm pressure, stop it and wait for the period the manual requires, then top up to the level on the dipstick. Adding too much oil is as damaging as adding too little.
- Can I use liquid sealant (silicone) instead of a pan gasket?
- Only if the manufacturer specifies liquid sealing for that engine. Applying liquid sealant to a flange designed for a moulded gasket fills the flange gap and takes up the bolt torque in the wrong place. Where liquid sealant is specified, an approved product, the correct bead diameter (typically 2–4 mm), continuous application and observance of the cure time are all essential. Over-applied liquid sealant can block the pickup strainer and destroy the engine.
- Oil pressure is low at idle — could the pan be involved?
- Yes, but towards the end of the list. Oil viscosity/level, filter, pressure sensor and pump are assessed first. If the vehicle has an off-road history, or if there is a visible dent in the pan floor, add the pan to the suspect list: a dented floor closes up the pickup strainer clearance and produces exactly this symptom. Do not replace parts before confirming the real pressure with a mechanical gauge.
- The drain plug thread in my pan is stripped — what should I do?
- Temporary fixes (rubber plugs, overtightening, silicone) are unacceptable in terms of road safety. The correct approach, depending on the extent of the damage, is an approved thread repair/helicoil application or pan replacement. If a thread repair is carried out, the pan must be removed so that swarf does not get into the engine — which is why replacement is faster and safer in most cases.
- Which parts of the oil pan group should be renewed together?
- If the pan is being dropped: the pan gasket (or approved liquid sealant), the drain plug washer, the pickup strainer gasket/O-ring and, where fitted, the sensor O-ring must all be renewed. If the strainer is blocked or deformed, the strainer itself is also replaced. Renewing the oil and oil filter in the same operation is the cheapest way of not having to go back underneath a second time.
- There is oil on the pan flange, so how do I tell whether the pan is leaking or something above it is?
- Wash the underside of the engine thoroughly with an industrial cleaner, dry it, add UV tracer dye, run the vehicle on its normal duty for a day, then look for the highest wet point with a black light. The source is the highest point of the wetness; the lower edge of the flange is merely where it drips. The crankshaft rear seal, front cover seal, oil cooler gasket, filter housing, turbo oil return line and head gasket all create the same stain.
Related Articles

Oil Filter Cap and Housing: Leaks, Cracks and Seal Replacement
Truck engine oil filter cap and housing: why plastic caps crack, O-ring leak causes, bypass valve faults, and correct torque and seal replacement steps.
Piston Rings: Oil Consumption, Compression Loss and Replacement
Ring-related oil consumption and compression loss in truck diesel engines: how rings seal, blow-by and leak-down tests, ring gap and replacement.
Intake Manifold and Intake Pipe: Faults, Diagnosis, Repair
How the intake manifold and charge air pipe work on truck diesel engines, how to spot boost leaks, run a pressure test and fit them leak free.


