Heavy-Duty Truck Gearbox: Faults, Replacement & Maintenance
Heavy-duty truck gearbox guide: fault symptoms, diagnosis, step-by-step replacement, torque values and maintenance intervals from the VADEN technical team.
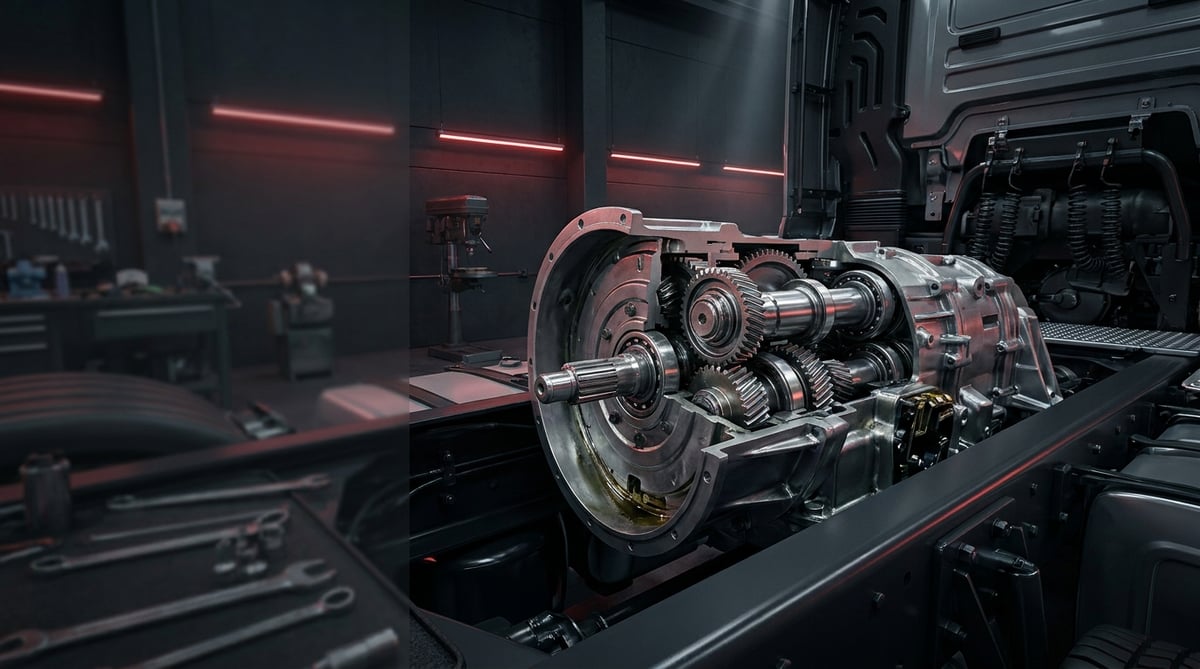
The gearbox is the main link that transfers engine torque to the road in a heavy commercial vehicle, and when it fails the truck stops dead. The sentence we hear most often in the field is this: "It won't go into gear, reverse is a fight, and it rattles at idle." Some of these symptoms genuinely point to internal gearbox damage, but a significant share originate outside the gearbox altogether — clutch adjustment, clutch hydraulics, shift lever/linkage play or oil level. Removing, lowering and refitting a heavy-duty transmission is costly and time-consuming work; that is why an accurate diagnosis is worth as much as a good repair. This guide summarises the operating logic of the heavy-duty gearbox, the fault symptoms seen in the field, the diagnostic reasoning, the replacement steps and the maintenance discipline, drawing on the field experience of the VADEN technical team.
E-E-A-T note: This document was prepared by the VADEN ORIGINAL technical team, based on field and product experience with heavy commercial vehicle driveline components. The values given here are typical reference ranges; for exact figures such as torque, oil capacity and tolerances, the vehicle/transmission manufacturer's current service manual must always be taken as the authority. Last updated: September 2026.
Component sizing is based on the relevant international standard family (ISO/EN/DIN/SAE) and the manufacturer OE specification.What Is a Heavy-Duty Gearbox? Function and Operating Principle
A heavy-duty gearbox is an enclosed mechanical unit made up of gear sets, shafts, synchronisers and transfer elements that multiplies or reduces the torque produced by the engine within a narrow speed band through different gear ratios and delivers it to the drive axle, establishing the torque/speed balance required for pulling away, climbing, cruising and reversing.
The operating principle is simple in essence: the engine transmits rotary motion to the gearbox input shaft through the clutch. The gear on the input shaft is permanently engaged with the layshaft (countershaft). The gears of different diameters on the layshaft are in constant mesh with the freely rotating gears on the mainshaft. Selecting a gear amounts to locking the chosen gear to the mainshaft via the synchroniser ring and sliding sleeve. The power flow therefore follows the path input shaft - layshaft - selected gear - mainshaft - output flange. In heavy-duty applications this basic structure is multiplied by a "main box + rear group (range)" and, in most cases, a "front group (splitter)" to reach 12–16 forward gears: a 3- or 4-speed main box, a low/high range and a half-step splitter together produce a wide spread of ratios.
In modern heavy commercial vehicles, gear changes are largely managed pneumatically and electronically rather than by a mechanical lever. Compressed air (usually a separate circuit fed from the vehicle air system) moves the shift forks via cylinders; the TCU (transmission control unit) processes engine speed, road speed, accelerator pedal and gradient data to determine the shift point. For this reason a heavy-duty transmission is not only mechanical but also a pneumatic and electronic system — and diagnosis requires thinking about all three layers together.
- Housing (case/casing): Usually aluminium or cast iron; it carries the gear train and forms the oil bath and the mounting interface.
- Input shaft and layshaft(s): Distributes torque from the engine to the gear sets; in heavy-duty boxes twin layshafts share the load.
- Mainshaft and gear set: Helical gears form the ratio steps; the mainshaft output connects to the propshaft through the flange.
- Synchronisers and sliding sleeves: Equalise speeds so that gear engagement is quiet and damage-free.
- Shift forks and selector rails: Slide the sleeve onto the correct gear; wear here shows up as delayed or incomplete engagement.
- Range/splitter group: Multiplies the number of ratios with a planetary group or an additional gear set.
- Pneumatic actuators and valve block: Cylinders that drive the forks with air pressure; ZF/Knorr-Bremse/Wabco type valve and solenoid groups are common.
- TCU and sensors: Input/output speed sensors, position sensors, oil temperature sensor.
- Seals, gaskets and the breather: Oil tightness and internal pressure balance.
- PTO interface: Power take-off for bodies such as tippers, mixers and cranes.
Manual, Automated (AMT) and Fully Automatic Gearboxes
Three main architectures are seen in the field. In a manual box the driver performs the shift himself with the clutch and lever; it is the simplest, the most repairable and still the preferred layout in severe duty such as construction and mining. An automated manual (AMT) box is mechanically identical to a manual one; the difference is that the clutch and shift forks are driven by pneumatic actuators under TCU control — ZF TraXon/AS-Tronic type and Mercedes PowerShift type systems fall into this class and are close to standard on European tractor units. Fully automatic gearboxes, on the other hand, work with a torque converter and planetary sets; Allison type boxes are widespread on city buses, fire appliances and vehicles with frequent stop-start duty. The fault logic differs across all three: mechanical wear in the manual, air/electronics in the AMT, and hydraulic pressure and oil quality in the fully automatic are the first places to look.
Gear Ratio, Gradeability and Cruising Balance
In heavy-duty vehicles the transmission ratio is not meaningful on its own; it is assessed together with the differential ratio as the "overall drive ratio". For a loaded start the first gear ratio is high (typically in the 11:1–16:1 range), while for motorway cruising the top gear is chosen as direct (1.00) or overdriven (around 0.78–0.85). A wrong ratio choice runs the engine outside its speed band even when the gearbox is perfectly healthy; the result is fuel consumption, a burnt clutch and a TCU permanently hunting for shifts. If a vehicle is to be reassigned to a new duty (for example from long haul to a construction site), ratio suitability must always be checked.
Because these control elements sit on the gearbox housing, their sealing is a maintenance item of its own; for the control valve and gasket set, see the transmission housing repair kit and valve guide.
The Relationship Between Oil, Heat and Service Life
Transmission oil does not merely lubricate; it carries the pressure on the gear tooth surface, removes heat and filters wear particles. If oil temperature in a heavy-duty gearbox runs constantly above 100–110 °C, oxidation accelerates and the film strength of the oil drops. In boxes with an oil cooler (retarder-equipped or severe duty), a blocked cooler can halve gear and bearing life without any mechanical problem inside the box at all. In short, heat is the transmission's real enemy.
| Vehicle class / duty | Typical engine torque | Common gearbox type | Typical speeds | Critical point |
|---|---|---|---|---|
| Long-haul tractor unit (Actros / TGX / FH / R-series equivalent) | ~2,000–2,600 Nm | AMT, ZF TraXon type / PowerShift type | 12–16 forward | Air quality, clutch actuator, TCU software |
| Construction / tipper truck | ~1,700–2,300 Nm | Manual or AMT + off-road software | 9–16 forward | PTO load, oil temperature, fork wear |
| City bus | ~1,200–1,700 Nm | Fully automatic (Allison type), torque converter | 4–6 forward | Oil life, cooler, heat from frequent stop-start |
| Medium-duty distribution truck | ~800–1,300 Nm | Manual or AMT | 6–9 forward | Synchroniser wear, linkage play |
| Tractor unit + heavy trailer (mega/low-bed) | ~2,300–3,000 Nm | Severe-duty AMT with crawler gear | 16 forward | Starting ratio, retarder heat, range group |
| Coach / touring bus (with retarder) | ~1,500–2,100 Nm | AMT + integrated retarder (Voith/ZF type) | 12 forward | Retarder oil sharing and cooling |
Part number verification is essential: The same vehicle model and the same engine power output do not mean the same gearbox. The box type varies according to differential ratio, PTO interface, presence of a retarder, output flange type and TCU software level. Before ordering, the vehicle chassis number, the type/serial plate on the gearbox and the existing OE part number must be verified together. The cross-reference in the VADEN catalogue is for matching purposes only; the vehicle manufacturer's parts catalogue is the authority for final approval.
Fault Symptoms and Diagnosis
The great majority of transmission complaints can be resolved without dropping the gearbox. The correct order is this: oil level and condition first, then air pressure and the clutch, then electronic fault codes, and internal mechanical damage last. Skipping this order ends with a perfectly healthy gearbox being removed for nothing.
| Symptom | Possible Cause | Check / Verification |
|---|---|---|
| Hard to select a gear, reverse is a struggle | Clutch not fully releasing; clutch hydraulics/actuator, linkage play, synchroniser wear | Measure clutch release travel; check the clutch slave cylinder for leakage; inspect lever play and linkage adjustment. If gears engage easily with the engine stopped, the problem is in the clutch, not the gearbox. |
| Jumps out of gear (self-disengages) | Shift fork wear, rounded sleeve/gear dog teeth, weak detent spring, damaged engine mount | Observe whether it jumps out under load and on engine braking; remove the top cover and inspect the forks and detents; check the engine/gearbox mounts for play by levering them by hand. |
| Rattle at idle that stops when the clutch is depressed | Input shaft bearing or layshaft bearing wear; internal clearance | If the noise stops when the clutch is depressed, suspect the input side; if it does not stop in neutral, suspect the layshaft. Look for metal swarf on the drain plug/magnetic plug. |
| Whine in a specific gear / noise rising with speed | Damage to the gear or bearing of that ratio only (pitting, spalling) | Record in which gear and at which engine speed the noise appears; test whether it changes on the overrun or under load; examine an oil sample and the magnetic plug. |
| Oil leak (front/rear seal, cover, casing) | Hardened seal, wear groove on the shaft, blocked breather, excessive oil level | Clean the gearbox and trace the source with UV dye or dry tracing; remove the breather and check air passage — a blocked breather will blow out even a healthy seal. |
| AMT will not shift, stays in neutral, warning lamp on | Low air pressure, valve/solenoid failure, speed sensor signal loss, TCU supply/calibration fault | Read fault codes with a diagnostic tool; measure the air pressure reaching the gearbox with a gauge; check sensor resistance and connector corrosion; repeat the clutch calibration. |
| Oil overheating / temperature warning | Blocked cooler, low oil level/wrong type, prolonged crawling under high load, retarder heat | Monitor oil temperature via live data; measure the cooler inlet/outlet temperature difference; compare the oil type with the vehicle manual. |
| Vibration when driving, judder on pulling away | Propshaft balance/universal joint, loose output flange, collapsed gearbox mount | Check the flange nut torque and the propshaft universal joint; inspect the mounts visually and by levering. The gearbox internals are not the first suspect. |
Internal or External? The Logic of Telling Them Apart
The most expensive mistake in the field is to assume an external fault is internal and drop the transmission. Apply a simple elimination: if gears engage easily with the engine off but not with the engine running, the problem is almost always that the clutch is not fully releasing. If all gears are affected, suspect a common element (clutch, air supply, main valve); if only one gear is affected, suspect the synchroniser, fork or gear of that ratio. If the noise is present only in neutral, the input shaft/layshaft comes first; if only under load, the gear tooth flanks do.
Oil and the Magnetic Plug: The Cheapest Diagnostic Tool
The most honest way to look inside without opening the box is the oil. If the oil is dark and smells burnt, there has been overheating. Fine, fuzz-like dust on the magnetic plug is normal wear; however, flaky metal particles or bright swarf point to gear/bearing damage, and in that case no approval should be given without opening the box. If there is water/emulsion in the oil, an internal cooler leak or water ingress during washing must be investigated.
AMT and the Electronic Diagnostic Sequence
On AMT gearboxes, do not pass mechanical judgement before reading fault codes. The order: (1) vehicle air pressure and air dryer condition, (2) supply pressure reaching the gearbox, (3) fault codes and freeze-frame data, (4) live data from the speed sensors, (5) clutch wear and calibration values. Only if even the fifth step is clean do you move on to mechanical inspection. Moisture and oil in the compressed air, locking the valve block from the inside, is the most common false fault that gives the impression of a "broken gearbox" — on a vehicle with a neglected air dryer cartridge, this must be the first thing you look for.
Further reading
For a plain-language technical overview of this subject, see the reference article on Wikipedia. Always confirm specific figures and procedures against the vehicle manufacturer service data.
Replacement / Installation Steps
Personal protective equipment and safety: A heavy-duty transmission can weigh between 200–350 kg; it must never be handled by hand. Use a transmission jack/lift of adequate capacity and certified slings. The vehicle must be unladen, the parking brake applied, the wheels chocked and the battery terminals disconnected. The air system must be fully exhausted — a circuit under pressure can throw a hose during removal. Safety glasses, cut-resistant gloves, steel-toe boots and precautions against hot oil are mandatory. Oil in a hot gearbox can be above 100 °C; wait for it to cool.
- Preliminary diagnosis and sign-off: Base the replacement decision on a finding verified with the elimination logic above. Record the fault codes, the oil condition and the complaint in writing; looking for the "real cause" after removal is far too late.
- Part and interface verification: Compare the type plate, output flange, PTO cover, sensor connectors and clutch interface of the new/remanufactured gearbox one-to-one with the old one. If there is any difference, do not start the installation.
- Preparing the vehicle: Disconnect the battery terminals, exhaust the air system and raise the vehicle to a suitable height in a stable manner. If the cab is to be tilted, secure the tilt mechanism.
- Draining the oil: Drain the gearbox oil into a suitable container and note the quantity; less oil than expected is an important clue to the origin of the fault. Inspect and photograph the magnetic plug.
- Disconnecting the connections: Mark the propshaft before removing it (a position mark is essential for balance) and label and disconnect the air lines, electrical connectors, clutch actuator, speed sensor, PTO and the retarder connections if fitted. Removing without labelling costs hours during reassembly.
- Supporting the gearbox: Seat the transmission jack under the centre of gravity of the box and secure it with a strap. The gearbox must be fully supported before the bellhousing bolts are removed.
- Removal and lowering: Loosen the bellhousing bolts in a crosswise sequence. Withdraw the gearbox straight back along its axis out of the clutch hub — forcing it at an angle will damage the input shaft and the clutch disc.
- Checking the clutch assembly: With the gearbox out, inspect the clutch disc, pressure plate, release bearing and flywheel face. Leaving a clutch at its wear limit because "it will last a bit longer" means repeating the same labour before long. Flywheel air gap and alignment must be checked.
- Preparing the new gearbox: Remove the transport plugs and apply a thin film of the oil/grease type specified by the manufacturer to the input shaft splines (excess will fling onto the disc and cause slip). Fit new seals, gaskets and, if required, a new breather.
- Installation and torque: Seat the gearbox straight along its axis; no bolt must be tightened before the box is fully home against the bellhousing — pulling it in with the bolts will crack the housing. Tighten the bolts in a crosswise sequence to the torque figure specified by the manufacturer. Refit the propshaft according to the removal marks.
- Oil filling and initial check: Fill with oil of the type and viscosity specified by the manufacturer up to the level plug. Refit the connections and connectors and pressurise the air system.
- Calibration and road test: On AMT gearboxes, perform clutch and gear position calibration with the diagnostic tool and clear the fault codes. Then carry out a laden and unladen road test; observe shifting, noise and temperature in every gear. After the test, re-check for leaks and re-check the oil level.
Points to Watch (Common Mistakes)
Never pull the gearbox in with the bolts. If the transmission does not seat against the bellhousing by hand, there is an alignment problem — the input shaft is not properly centred in the clutch hub. Pulling the box in by tightening the bolts cracks the aluminium housing and permanently bends the clutch disc. This is the most frequent and most expensive installation error seen in the field.
The wrong oil kills a gearbox quietly. In synchronised heavy-duty gearboxes, an oil with the wrong additive package (for example using a yellow-metal-incompatible GL-5 type product where the manufacturer specifies GL-4) attacks the synchroniser bronze. The fault comes back months later as "hard to select a gear" and its cause can no longer be traced. In oil selection the decisive factor is not the brand but the manufacturer's approval/specification list.
- Forgetting the breather: A blocked breather creates internal pressure in a hot gearbox and pushes oil out through the weakest seal. Fitting a new seal without cleaning the breather guarantees the same leak.
- Removing the propshaft without marking it: A propshaft refitted in the wrong position causes vibration and shortened universal joint life due to imbalance.
- Closing up without checking the clutch assembly: With the gearbox out, checking the clutch is almost free; once it is back in, the same labour has to be done all over again.
- Overfilling with oil: The "more is better" logic is wrong; excess oil foams, heats up and overflows through the breather. The level plug is the reference.
- Ignoring the air dryer: A system sending moist, oily air to an AMT gearbox will fail the valve block on a new box just as quickly. Replacing the gearbox without replacing the dryer cartridge is buying the fault back.
- Skipping the engine/gearbox mounts: A collapsed mount upsets alignment and finishes off the new gearbox's input shaft bearing early.
- Handing over without calibration: If an AMT vehicle is handed over without calibration, shifts are harsh, the clutch wears early and the customer says "the new gearbox is faulty".
- Too much grease on the splines: Excess grease is flung onto the clutch disc by centrifugal force and causes slip; a thin film is enough.
Technical Values and Check Points
The values below are typical/general reference ranges observed in the field on heavy commercial vehicle transmission systems. There may be significant differences depending on gearbox type, manufacturer and vehicle configuration; for exact figures, the current service manual of the vehicle and transmission manufacturer is the authority.
| Parameter | Typical reference range | Note |
|---|---|---|
| Gear actuation air pressure (AMT) | ~7.5–9.5 bar (≈110–140 psi) | Fed jointly with the vehicle air system; low pressure causes shift faults. |
| System cut-out pressure (compressor/regulator) | ~10–12.5 bar (≈145–180 psi) | The regulator setting on heavy-duty vehicles is typically in this band. |
| Normal oil operating temperature | ~70–100 °C | Prolonged operation above 110 °C markedly shortens oil life. |
| Temperature warning threshold (typical) | ~120–130 °C | On retarder-equipped boxes, momentary peak values can be higher. |
| Oil capacity (main box, type dependent) | ~10–16 litres | A retarder and PTO increase the capacity; the manual figure is the authority. |
| Transmission weight (dry) | ~200–350 kg | Lifting equipment capacity must be selected accordingly. |
| Shift fork – sliding sleeve clearance | ~0.2–1.0 mm (wear limit type dependent) | Clearance above the limit causes jumping out of gear and delayed shifts. |
| Mainshaft end float | ~0.05–0.30 mm | Measured with a dial gauge; a value above the limit indicates a bearing/shim problem. |
| Gear tooth backlash | ~0.10–0.40 mm | Type dependent; checked when a whine is reported. |
| Clutch lining thickness (remaining) | Wear indicator/limit value is the authority | The best moment to check is with the gearbox out. |
| Joint | Typical torque range | Application note |
|---|---|---|
| Bellhousing – gearbox bolts (M12–M16) | ~80–200 Nm | Tightened in a crosswise sequence, in stages. |
| Output flange nut | ~350–600 Nm | Type dependent; a single-use locking element in most applications. |
| Propshaft flange bolts (M10–M14) | ~60–140 Nm | New locking elements recommended. |
| Oil drain / level plug | ~50–90 Nm | With a new gasket/washer; overtightening strips the casing. |
| Top cover / valve block bolts | ~20–40 Nm | Low torque; overtightening strips the aluminium thread. |
| Gearbox mount bolts | ~150–300 Nm | The vehicle manufacturer's figure is the authority. |
Field tip: The torque and clearance values above are general bands for comparison; none of them should be used as an exact figure for a specific gearbox type. The output flange nut and the bellhousing bolts in particular differ significantly from manufacturer to manufacturer and require single-use bolts/nuts in many applications. Check the calibration date of your torque wrench as well — you cannot tighten "to the manual" with an uncalibrated wrench.
- Measure the air pressure reaching the gearbox with a gauge, with the engine running and the system fully charged — the dashboard reading is not sufficient evidence.
- Check the oil level with the vehicle on level ground and the oil cold; hot oil expands and misleads.
- Inspect and photograph the magnetic plug at every service; keeping records is the only way to see the wear trend.
- Clean or replace the breather; a few minutes' work prevents a seal replacement.
- If an oil cooler is fitted, measure the inlet/outlet temperature difference; no difference means the cooler is not doing its job.
- On AMT vehicles, read the clutch wear percentage and calibration values periodically.
- Check the engine and transmission mounts visually and with a lever test at every major service.
Maintenance and Service Life
A heavy-duty transmission is a product that, with the right oil and reasonable use, can run for the life of the vehicle without a major overhaul. In practice the reason this target is not reached is almost never the gearbox itself: delayed oil changes, the wrong oil type, a neglected air dryer, a worn clutch and operation outside the engine speed band all show up inside the box as damage. In other words, transmission maintenance is largely a discipline that takes place "outside the transmission".
- Oil change interval: Typically 200,000–500,000 km or 2–3 years in long-haul use; in demanding duty such as construction sites, tippers and tractor + heavy trailer work, this interval shortens markedly. The manufacturer's table is the authority.
- Oil selection: Follow the specification on the manufacturer's approval list. Synthetic oil offers heat resistance and extended interval advantages; but the "synthetic" label alone does not mean suitability.
- Oil filter: On boxes with a filter, the filter is replaced together with the oil. On a filterless box, the magnetic plug is the only protection.
- Magnetic plug inspection: Cleaned and inspected at every oil change; an increasing amount of swarf is an early warning.
- Breather maintenance: An annual check is recommended on vehicles working in dusty environments.
- Air dryer cartridge: Replace at the manufacturer's interval — the service life of an AMT gearbox's valve block depends directly on it.
- Clutch discipline: Pulling away on a slipping clutch and resting on the clutch tires both the clutch and the input shaft bearing.
- Driver behaviour: Unnecessary intervention in manual mode on an AMT, slipping the clutch on a gradient and driving outside the engine speed band are the biggest variables in gearbox life.
- PTO use: While the body is working, gearbox oil heats up and normal cruising lubrication is reduced; on vehicles with intensive PTO use, the oil interval must be shortened.
- Record keeping: Oil changes, plug findings and calibration values must be entered in the vehicle file; with these records, diagnosing the next fault takes minutes.
The most honest summary in terms of service life is this: a gearbox lives as long as the quality of the oil that reaches it, the dryness of the air and the habits of the driver allow. If the maintenance plan keeps these three inputs under control, expecting over 1,000,000 km of trouble-free service from a heavy-duty gearbox is realistic. Conversely, in a vehicle where the correct oil has been skipped, even the highest-quality gearbox will come back within a few hundred thousand kilometres.
In its own catalogue VADEN ORIGINAL holds a stocked range of gearbox components for heavy commercial vehicles: gearbox housing repair kits, gaskets and gasket kits, gearbox valves and solenoid valves, shifting, split and transmission cylinders together with their repair kits, gear lever and gear control cables, gearshifting control units, lever actuators, retarder repair kits and valves, PTO valves, oil cooler hoses and pressure sensors; the products are cross-referenced by vehicle type, gearbox type and PTO interface. To identify the right part for your vehicle, check the match in the VADEN product catalogue using the chassis number, the gearbox type plate and the existing OE part number; in case of any doubt, the VADEN technical team is on hand to verify.
Related categories: Gearbox · Gearbox Housing
Related technical guides: Truck Retarder: Faults, Replacement & Maintenance Guide · Transmission Shift Cylinders: Failure, Replacement & Care · Transmission Shift Tower: Faults, Replacement & Maintenance · Transmission Control Unit (TCU): Faults, Replacement, Care
Application and compatibility: Vehicle compatibility catalogue · Engine compatibility catalogue
Vehicles and engines mentioned in this guide: MAN TGX I (2007-2020) · Mercedes-Benz Actros
All our technical guides on this topic
- Automated Manual Transmission (AMT) and Shifting Cylinder: Gear Shift Failures
- Transmission Control Unit (TCU): Faults, Replacement, Care
- Transmission Shift Tower: Faults, Replacement & Maintenance
- Transmission Housing Repair Kit & Valve: Faults & Replacement
- Transmission PTO: Faults, Replacement and Maintenance Guide
- Transmission Shift Cylinders: Failure, Replacement & Care
- Truck Retarder: Faults, Replacement & Maintenance Guide
- What Is a Retarder? How Does It Work and What Does It Do?
VADEN ORIGINAL products
- Gearbox — 319 products
- Gearbox Housing — 99 products
- Retarder — 46 products
- Gearbox Housing Repair Kit — 34 products
Tags
Frequently Asked Questions
- When should transmission oil be changed?
- Typically every 200,000–500,000 km or 2–3 years in long-haul use; on construction sites, tippers and with intensive PTO use this interval shortens. For the exact figure, the vehicle manufacturer's service table is the authority. If the oil has darkened or smells burnt, change it even if the mileage has not been reached.
- Why is it hard to select a gear?
- The most common cause is not the gearbox but the clutch failing to release fully: clutch hydraulics/actuator, linkage play or a disc problem. If gears engage easily with the engine stopped but not with the engine running, you are almost certainly on the clutch side. If it is also stiff with the engine stopped, suspect synchroniser or fork wear.
- How many km does a gearbox last?
- With the right oil, dry air and reasonable use, over 1,000,000 km of service can be obtained from heavy-duty gearboxes. But this is not a guarantee — it is the result of maintenance discipline; the wrong oil or a neglected air system can cut that figure to a third.
- Is a transmission oil leak dangerous?
- Yes, for two reasons. First, the level drops and lubrication becomes inadequate — this is the fastest route to gear and bearing damage. Second, if the leaking oil reaches the clutch disc it causes slip. Even a leak at drip level must have its source found and rectified; the first place to look is a blocked breather.
- Can the vehicle be towed if the AMT transmission fails?
- Generally yes, but conditionally. Most heavy-duty vehicle manufacturers require the propshaft to be removed if the vehicle is towed with the drive axle on the ground; otherwise, because the engine is not running, the oil pump does not turn and the gearbox is damaged by running dry. The towing instructions in the vehicle manual must always be read before towing.
- Is a rebuilt gearbox safe?
- A quality remanufacturing process — full disassembly, measurement, replacement of every part beyond its wear limit, running on a test bench — gives reliable results and offers a serious cost advantage. The decisive factor is whether the remanufacturer can document the measurement and test records. Stay away from an "overhauled" gearbox with no documentation.
- Is the noise from the transmission internal or external?
- A simple distinction: if the noise is present at idle and stops when the clutch is depressed, it is the input shaft/layshaft bearings; if it is absent in neutral and appears only in a specific gear and rises with speed, it is the gear of that ratio; if it appears only as vibration when pulling away, suspect the propshaft, flange or mount. Swarf on the oil plug is the most concrete evidence of internal damage.
- Should the clutch be replaced when the gearbox is replaced?
- It is not compulsory, but it is almost always the right decision. With the gearbox out, replacing the clutch requires no extra labour; once the gearbox is refitted, the whole removal has to be repeated for the same job. If the clutch is approaching its wear limit, replace it at the same time.
- I replaced the gearbox and the same fault came back. Why?
- In this scenario the root cause is usually outside the gearbox: a neglected air dryer contaminates the valve block again, a collapsed mount upsets alignment, the wrong oil attacks the synchronisers, and handover without calibration makes shifts harsh. Always eliminate these four items before fitting a new gearbox.
- How hot is too hot for transmission oil?
- If oil temperature runs constantly above 100–110 °C, the gearbox is overheating: oxidation accelerates and the film strength of the oil drops. On boxes with an oil cooler (retarder-equipped or severe duty), a blocked cooler can halve gear and bearing life with no mechanical problem inside the box at all. Measure the cooler's inlet and outlet temperature difference; no difference means it is not doing its job. Dark, burnt-smelling oil carries the same warning.
Related Articles
Transmission PTO: Faults, Replacement and Maintenance Guide
A workshop guide to truck transmission PTO units: how they work, why they fail to engage, correct backlash setting on fitting and habits that extend life.
Transmission Housing Repair Kit & Valve: Faults & Replacement
Understand how the pneumatic shift valve and its seal kit work, spot air leaks early, replace the parts correctly and extend service life on trucks.
Transmission Shift Tower: Faults, Replacement & Maintenance
Transmission shift tower faults, diagnosis, replacement steps, torque and pressure values, maintenance and FAQ for heavy commercial vehicles — VADEN guide.


