Truck Air Compressor Overhaul Kit: Head, Valve Plate, Gasket
Compressor overhaul guide for heavy trucks: when to renew the cylinder head, valve plate and gaskets, fault diagnosis, torque values and fitting steps.
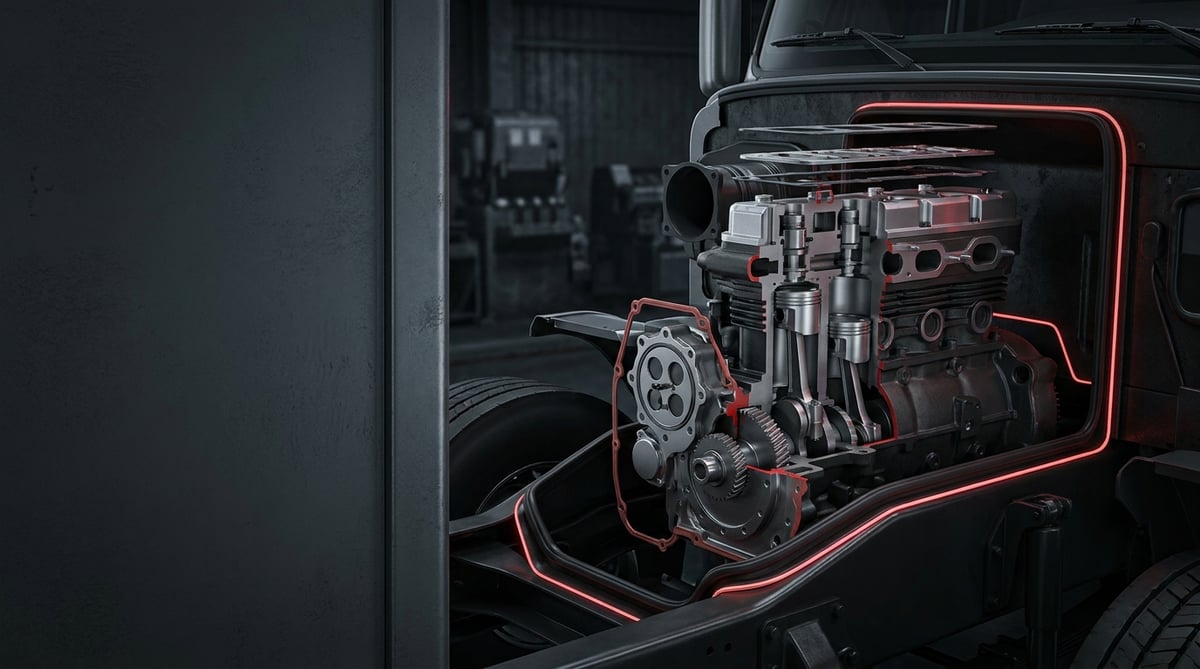
One of the sentences we hear most often in the field is this: "The compressor isn't building air, let's replace the whole unit." Yet on heavy commercial vehicles, the majority of air compressors lose performance simply because the top end is worn out, while the housing and crank assembly are still perfectly sound. The reed leaves on the valve plate fatigue, the air passages in the cylinder head carbonise, and the head gasket starts to leak pressure. In this situation, scrapping the complete compressor is both expensive and unnecessary. A correctly diagnosed overhaul kit — cylinder head, valve plate and gasket set — can restore the compressor to a charging performance close to factory condition. This guide explains when an overhaul is the right call and when it isn't, which symptom points to what, and where the mistakes are made during assembly.
What Is a Compressor Overhaul (cylinder head/valve plate/gasket)? Function and Operating Principle
A compressor overhaul is the restoration of the charging performance of a heavy commercial vehicle air compressor by renewing the pressure-generating top end — the cylinder head, valve plate and gasket set — without replacing the complete compressor.
In a reciprocating air compressor, the work actually comes down to two surfaces: the volume swept by the piston, and the valve plate through which that volume breathes. The crank is driven by the engine (in most applications from the timing gear, or via a belt/coupling); as the piston travels down, the vacuum created inside the cylinder opens the intake reed on the valve plate and air is drawn in. As the piston rises, the intake reed closes; once the compressed air reaches a certain pressure, the discharge reed opens and the air is delivered through the outlet passage in the cylinder head to the dryer (air dryer / pressure regulator group). The head also handles cooling: on water-cooled types the engine coolant circuit passes through the head, while on air-cooled types the fins dissipate the heat.
This cycle repeats thousands of times per minute, even at idle. As a result, the valve reeds are subject to steel fatigue, the head face to thermal stress, and the gaskets to temperature cycling. The "ageing" of a compressor usually begins not in the crank or the housing, but precisely in these three parts — and that is exactly where the logic of the overhaul kit comes from.
- Cylinder head: Carries the intake and discharge passages, the cooling jacket/fins and (where fitted) the unloader port connections. It may be aluminium or cast iron.
- Valve plate: Containing the intake and discharge reeds, the reed seating faces and the leaf stops, this is the most critical dynamic part of the compressor.
- Gasket set: Head gasket, valve plate gasket, intermediate gaskets and, where required, the O-ring/seal group. Their thickness directly affects dead volume and therefore efficiency.
- Reed leaves and springs: Generally supplied as a set together with the valve plate; replacing them individually is not recommended.
- Fixing bolts: Stretched or necked bolts must be reviewed during the overhaul.
The Difference Between Single-Cylinder and Twin-Cylinder Compressors
Single-cylinder compressors are common on mid-segment trucks and buses, while twin-cylinder units are widespread on tractor units with high air consumption, articulated buses and multi-axle vehicles. On twin-cylinder types the valve plate has separate reed groups for each cylinder; on these units, when the reeds on one side fatigue, the compressor is not cut out completely — the charging time simply becomes noticeably longer. This in turn causes the fault to be noticed late, and exposes the system to moist/oily air for a longer period.
Water-Cooled and Air-Cooled Head Assemblies
On air-cooled heads, the fin structure dissipates heat into the surroundings; compressor temperature varies more with ambient conditions and load. On water-cooled heads, engine coolant circulates through the head and the outlet air temperature stays more stable. The critical point during an overhaul is this: on water-cooled heads, if the gasket is fitted incorrectly, coolant can enter the compressed air circuit. If an unexpected smell of antifreeze or an emulsion is seen in the dryer and air tanks, one of the first places to suspect is the head/valve plate gasket line.
Unloader Design and Energy Saving
Most modern compressors have an unloading arrangement that runs the compressor off-load once the air system reaches cut-out pressure. On some types this arrangement is built directly into the cylinder head (pneumatic pistons in the head hold the intake reed open). When overhauling the head of such a compressor, the condition of the unloader pistons, springs and O-rings must always be checked; otherwise the compressor may show "constantly building" or "not building at all" behaviour.
| Use / Application | Typical Compressor Design | OE System Context | Key Point During Overhaul |
|---|---|---|---|
| Mid-segment truck, distribution vehicle | Single-cylinder, air-cooled | Knorr-Bremse / Wabco (today under the ZF umbrella) type air treatment group | Fin cleaning and head face flatness |
| Long-haul tractor unit (high consumption) | Twin-cylinder, water-cooled | Knorr / Bendix equivalent systems, external air dryer | Simultaneous renewal of both reed groups |
| City bus (door + suspension consumption) | Twin-cylinder, with unloader | Voith / ZF transmission and Knorr type brake group context | Unloader pistons and O-ring set |
| Construction / earthmoving vehicle (dusty environment) | Single- or twin-cylinder | Intake fed from the engine air filter | Intake path and intake reed wear |
| Head connected to the cooling system | Water-cooled head assembly | Mahle / Behr equivalent cooling circuit | Coolant transfer gasket and leak tightness check |
Failure Symptoms and Diagnosis
Almost all compressor top-end faults arrive at the workshop with the complaint "the air builds up slowly". However, the same complaint can also be caused by the dryer, the regulator, a hose or a system leak. That is why the order of diagnosis matters: first eliminate the system leak, then look at the compressor.
| Symptom | Possible Cause | Check / Verification |
|---|---|---|
| Air charging time has become noticeably longer, the warning lamp goes out late | Valve plate reeds fatigued/broken, head gasket leaking internally | Once a system leak has been ruled out, measure the charging time from empty tanks up to cut-out pressure and compare it with the reference in the service manual |
| The compressor runs continuously and never reaches cut-out pressure | The discharge reed does not close fully, the unloader is stuck, or there is a major leak in the system | Blank off the regulator outlet and test the compressor on its own; check the control pressure in the unloader line |
| Excessive oil coming from the air tanks and the dryer, oily water from the drain valve | Ring/cylinder wear or oil carry-over due to overheating; loss of top-end sealing | Inspect the dryer cartridge and the tank drain valve; if the amount of oil is very high, the problem may not be limited to the top end — evaluate the bottom end as well |
| The compressor discharge pipe/hose overheats, paint discolouration is visible | Carbonised discharge passage, continuous operation under load, insufficient cooling | Measure the outlet line temperature with a non-contact thermometer; assess passage blockage from the outside before removing the head passage |
| Metallic rattling / knocking noise from the compressor | Broken reed fragment, loose head bolt, leaf stop damage | Remove the head and visually inspect the plate face and the reed leaves; a broken fragment may have entered the cylinder |
| Air leak / hissing sound around the head | The head gasket is crushed, or the face is leaking due to an incorrect tightening sequence | Check around the head with soapy water while running; if there is a leak, the gasket and the face flatness must be addressed together |
| Coolant level dropping, traces of antifreeze in the air circuit | Damage to the coolant transfer gasket on a water-cooled head | Pressure-test the cooling circuit; look for emulsion when draining the air tank and dryer |
| Air blowing back / kick-back from the intake area with the engine at idle | The intake reed does not close, or the seating face is damaged | Remove the intake line (filter/intake hose) and check whether there is any blow-back |
Eliminate the System Leak First
The air system is brought up to cut-out pressure, the engine is stopped, and the pressure drop over a set period is monitored without pressing the brake pedal. The acceptable drop varies by vehicle manufacturer; but if the difference is significant, the problem is not in the compressor but in the circuit. Before looking at the compressor top end, air bellows, door cylinders, the park brake line and trailer connections must be ruled out.
Measuring Charging Time: The Most Objective Test
Once the tanks have been fully drained, the engine is held at a specified speed and the time taken for the system to reach cut-out pressure is measured with a stopwatch. A value significantly longer than the reference in the service manual is the strongest indicator of top-end performance loss. Always repeat the measurement under the same conditions (same engine speed, same ambient temperature).
Overhaul or Complete Replacement?
The decision comes down to this distinction: if the problem originates from sealing and valves, the overhaul kit is the right solution. If the problem is crank bearing clearance, cylinder wear, excessive oil consumption or a cracked housing, an overhaul provides only temporary relief and the vehicle will be back before long. If, once the head is removed, there is visible scoring on the cylinder wall, permanent damage on the piston crown or perceptible play in the crank, the honest answer is complete replacement. Fitting an overhaul kit despite this picture means making the customer pay twice.
Standards and further reading
This subject is governed by the equipment rules for air-braked commercial vehicles. In the United States the federal air brake standard, FMVSS 121 (49 CFR 571.121) defines the reservoirs, protection and timing a compliant system must provide, and Europe applies the equivalent limits of UNECE Regulation No. 13. For further detail, see the illustrated reference guide at airbrakecompressor.com. Always confirm specific figures against the current regulation and the vehicle manufacturer service data.
Readers outside the United States should work from their own national framework: in the United Kingdom the braking system must be maintained under regulation 18 of the Road Vehicles (Construction and Use) Regulations 1986, and in India the governing rules are published by the Ministry of Road Transport and Highways.
Replacement / Installation Steps
- Exhaust the system and secure the vehicle: Drain all air tanks via the drain valves and confirm that the gauge reads zero. Chock the vehicle and disconnect the battery. If the head is water-cooled, release the pressure in the cooling circuit as well.
- Clean the work area: Remove dust, oil and dirt from around the compressor before taking the head off. A single speck of dust or a fragment of gasket dropped into the cylinder can damage the new valve plate on first start-up.
- Mark and disconnect the connections: Label or photograph the intake hose, discharge pipe, unloader control line and (where fitted) the coolant hoses before removing them. Plug all open ports.
- Remove the cylinder head in the correct sequence: Loosen the head bolts from the centre outwards, in a crosswise sequence and in stages. Fully loosening them in one go can warp the head. Do not lever the head off with a screwdriver; you will permanently ruin the faces.
- Remove the valve plate and the gaskets: When taking the plate off, always note which face was pointing up — most plates have a geometry that allows them to be fitted upside down, and if fitted the wrong way round the compressor will not build air at all. Make sure all of the old gasket material has been removed.
- Assess and clean the faces: Remove carbon deposits from the head and housing faces with a soft scraper and a suitable cleaner. Do not use abrasive paper or grinding; it destroys the face flatness and abrasive residue finds its way into the cylinder. Check face flatness with a straight edge and feeler gauge.
- Inspect the cylinder and piston (decision point): If there is damage on the piston crown, deep scoring on the cylinder wall, a broken ring or heavy oil build-up, stop and reconsider the overhaul decision. With this picture, a top-end overhaul will not be a lasting solution.
- Fit the new gaskets dry and the correct way round: Unless otherwise specified, do not apply liquid gasket or silicone to compressor head/plate gaskets. The holes in the gaskets must line up exactly with the port geometry; blocking a single oil or coolant hole will burn out the compressor in a very short time.
- Seat the valve plate and the head: Locate the plate on its dowel pins and make sure the reeds move freely. Lower the head straight down, do not slide it — if the gasket shifts, the port alignment is lost.
- Tighten the bolts in the torque sequence: First seat the bolts by hand, then tighten them from the centre outwards in a crosswise sequence, in at least two or three stages, up to the torque value given by the manufacturer. Applying full torque in a single step warps the head and the new gasket leaks on day one.
- Complete the connections and test: Refit the intake, discharge, control and coolant lines. Start the engine and charge the system; measure the time to reach cut-out pressure and leak-test around the head with soapy water. On water-cooled types, check the coolant level and any sign of mixing. Refer to the manufacturer's instructions regarding a torque check when cold after a short run.
Points to Watch (Common Mistakes)
- Dirty assembly: A single crumb of gasket that gets into the cylinder can damage the new plate within the first few minutes. Cover the cylinder bore with a clean cloth while the head is off.
- Reusing the old gasket: A gasket that has been crushed once will not give the same seal a second time. The gasket set is single-use.
- "Correcting" the face with abrasive paper: If the head face is outside the flatness tolerance, the solution is not abrasive paper but head replacement.
- Reusing a fatigued bolt: A necked bolt or one with thread damage will not hold the correct torque; if the manufacturer specifies a limit, renew it.
- Skipping the air dryer: If the compressor is overhauled but a saturated dryer cartridge is left in place, moisture continues to be carried into the system and the valves are damaged again.
- Ignoring the intake path: On vehicles working in dusty environments, a blocked or holed intake line will wear the intake reed in a short time.
- Not checking the drive side: Gear backlash, coupling wear or belt tension causes vibration and premature damage in the compressor.
- Handing over without testing: An overhaul carried out without measuring the charging time cannot be counted as "completed"; demonstrate with figures that the performance has come back.
Technical Values and Check Points
The tables below give typical / general reference ranges for heavy commercial vehicle air systems. They vary by vehicle and compressor manufacturer; for exact values, the relevant service manual is decisive.
| Parameter | Typical Reference Range | Explanation / Note |
|---|---|---|
| System cut-out (governor/regulator) pressure | approximately 8.0 – 12.5 bar (≈115 – 180 psi) | Varies with the vehicle and brake system architecture; set at the regulator |
| Cut-out – cut-in differential (hysteresis) | approximately 0.6 – 1.5 bar | A significant narrowing of this differential may indicate a regulator problem |
| Compressor outlet air temperature (under load) | approximately 130 – 200 °C | Continuously high values accelerate carbonisation and valve damage |
| Pressure drop after the engine is stopped | manufacturer tolerance is decisive — typically a negligible drop over a period of minutes | If there is a significant drop, the problem is not the compressor but a system leak |
| Charging time from empty tanks to cut-out pressure | the reference value in the service manual | Exceeding the reference significantly is the main indicator of top-end fatigue |
| Head / housing face flatness | manufacturer tolerance — usually very tight, in the order of tenths of a mm | Checked with a feeler gauge; if out of tolerance, the head is renewed |
| Coolant operating temperature (water-cooled head) | approximately 80 – 95 °C | Shared with the engine cooling circuit; a high value stresses the compressor too |
| Connection | Typical Torque Order of Magnitude | Application Note |
|---|---|---|
| Cylinder head bolts | in the order of approximately 20 – 45 Nm (varies by type) | Crosswise sequence from the centre outwards, in 2–3 stages; for the exact value, the service manual |
| Valve plate / intermediate plate fixings | in the order of approximately 15 – 30 Nm | Over-tightening warps the plate and upsets reed seating |
| Discharge pipe union | in the order of approximately 25 – 50 Nm | The pipe must seat without stress; a strained pipe cracks |
| Coolant hose / cooling connections | manufacturer value | Over-tightening strips the thread in an aluminium head |
- Has the area around the head passed a soapy-water leak test?
- Has the charging time been measured and compared with the reference value?
- Have the cut-out and cut-in pressures been verified on the gauge?
- Have the condition of the air dryer cartridge and the drain valve been assessed?
- Have the intake line, filter and hose tightness been checked?
- On water-cooled types, have the coolant level and any sign of mixing been checked?
- Have the drive (gear/coupling/belt) clearance and tension been checked?
- Is there excessive oil/emulsion in what comes out of the tank drain valves?
- Is the outlet line temperature within a reasonable range under load?
Maintenance and Service Life
What determines the life of an air compressor is not mileage but the time it spends under load. A compressor that is constantly feeding a leak keeps building air at times when it should be running off-load; the temperature rises, the oil carbonises and the valve reeds fatigue far earlier than normal. That is why the most effective compressor maintenance is actually the maintenance carried out outside the compressor: closing system leaks, replacing the dryer cartridge on time and keeping the intake path clean.
- Air dryer cartridge: Replace it at the interval specified by the manufacturer (usually annually, or at a set km/operating-hour interval). A saturated cartridge carries moisture straight to the valves and the tanks.
- Tank drain valves: Drain them regularly and look at what comes out — clear water is close to normal, heavy oil and emulsion are a warning.
- Intake line: Check the integrity of the filter and hose periodically; more often on vehicles working in dusty environments.
- Engine oil and its interval: In most applications the compressor is lubricated with engine oil; a delayed oil change is reflected directly in the compressor.
- Cooling circuit: On water-cooled heads, if cooling performance drops the compressor temperature rises; radiator/thermostat maintenance is part of compressor maintenance.
- System leak survey: Carry out a pressure drop test at every service — this single test is the practice that extends compressor life the most.
- Discharge pipe: Assess it for carbon build-up and restriction; a blocked outlet line will render the overhaul pointless.
A top-end overhaul that has been correctly diagnosed and carried out with clean assembly will run the compressor trouble-free for a long time. But an overhaul is not a "reset": if the bottom end of the compressor (crank, bearings, cylinder, rings) is worn out, renewing the top end only buys time. The honest approach is to decide according to the picture you see once the head is off — when an overhaul is appropriate it is economical and lasting; when it is not, it is an expensive way of postponing a complete replacement.
VADEN ORIGINAL offers its Compressor Overhaul (cylinder head/valve plate/gasket) product family, consisting of cylinder heads, valve plates and gasket sets for heavy commercial vehicle air compressors, in stock in its own catalogue. To identify the correct overhaul kit using your vehicle's compressor manufacturer number and chassis details, to obtain compatibility confirmation or to get an opinion on assessing the bottom end, you can make use of the VADEN ORIGINAL product family and our technical support line.
Related categories: Cylinder Head · Valve Plate · Gasket Kit · Valve Kit · Crankcase
Related technical guides: Compressor Piston-Ring & Connecting Rod: Repair Guide · Compressor Crankshaft & Drive Assembly: Failure & Replacement Guide · Compressor Valve & Unloader: Fault, Replacement & Care Guide · Compressor Cooling Plate & Water Cooling: Faults, Repair & Care
Application and compatibility: Vehicle compatibility catalogue · Engine compatibility catalogue
Main guide: Air Brake Compressor: Faults, Replacement & Maintenance Guide
Tags
Frequently Asked Questions
- What does a compressor overhaul kit do, and what is its advantage over buying a complete compressor?
- An overhaul kit restores charging performance by renewing the pressure-generating top end of the compressor — the cylinder head, valve plate and gasket set. If the housing, crank and piston assembly are sound, it is significantly more economical than a complete compressor replacement and the job takes less time. However, if the bottom end is worn out, the advantage disappears.
- If the compressor isn't building air, does the compressor always have to be replaced?
- No. Behind the complaint "it isn't building air" you very often find a system leak, a faulty pressure regulator, a saturated air dryer or a stuck unloader. First the system leak should be ruled out with a pressure drop test, and only then should the compressor itself be assessed.
- Why does the valve plate fatigue?
- The reed leaves open and close thousands of times per minute, and this is a classic steel fatigue cycle. High operating temperature, carbonised oil, moisture carried into the system and continuous operation under load all accelerate this fatigue. If a fragment of a broken reed enters the cylinder, the damage may not stay limited to the top end.
- How can a compressor head gasket failure be identified, and what are the symptoms?
- A hissing sound around the head and bubbles in the soapy-water test, a longer charging time, a dropping coolant level on water-cooled types and emulsion appearing in the air circuit are typical symptoms. When renewing the gasket, face flatness must also be checked; if the face is out of true, the new gasket will leak as well.
- To how many Nm are compressor head bolts tightened?
- Values in the order of 20–45 Nm are typically seen, but that is only an idea of the order of magnitude. The value varies with the head material, the bolt size and the manufacturer. Tighten with a calibrated torque wrench, in a crosswise sequence from the centre outwards and in stages; verify the exact value from the relevant service manual.
- Does the air dryer also need to be replaced when overhauling the compressor?
- If the condition of the cartridge is unknown, or its interval has passed, replacement is strongly recommended. A saturated dryer continues to carry moisture into the system and shortens the life of the new valve plate. What makes an overhaul lasting is curing the root cause as well.
- If oil is coming from the compressor, will an overhaul kit solve it?
- Partly. Where the oil carry-over is due to overheating or loss of top-end sealing, an overhaul provides a clear benefit. But if the oil consumption comes from ring and cylinder wear, a top-end overhaul will not solve the problem — in that case the cylinder wall and piston must be assessed once the head is off.
- What should I look out for when choosing a compressor overhaul kit?
- The manufacturer number on the compressor housing, the vehicle chassis number, the cooling type (air/water), the number of cylinders and whether an unloader arrangement is fitted must all be verified together. Even on the same engine, head and plate geometry can vary with the year of production; a kit is not considered compatible just because the bolt holes line up.
- Can silicone or liquid gasket be applied to the head and valve plate gaskets?
- No. Unless the manufacturer specifies otherwise, these gaskets are fitted dry. Excess silicone travels into the passages and blocks the dryer and the valves, which is one of the three most expensive mistakes on this job. The holes in the gasket must line up exactly with the port geometry, and a gasket that has been crushed once is never refitted: the set is single-use.
- How do I confirm that performance has come back after the overhaul?
- Drain the tanks completely, hold the engine at a specified speed and time with a stopwatch how long the system takes to reach cut-out pressure, then compare that figure with the service manual reference; repeat the measurement at the same speed and ambient temperature. Also leak-test around the head with soapy water and verify cut-out and cut-in pressures on the gauge. Without a measured charging time the job is not finished.
Related Articles
Compressor Connection Hardware: Faults, Replacement, Care
How truck air compressor adapters, bolts, plugs and hoses fail, how to diagnose leaks and blockages, replace them correctly and extend service life.
Compressor Repair and Gasket Kit: Faults, Replacement, Care
Diagnosing air compressor gasket failure on trucks: choosing the right repair kit scope, preparing surfaces, torquing correctly and extending seal life.
Compressor Cooling Plate & Water Cooling: Faults, Repair & Care
Diagnose, replace and maintain the heavy-truck air compressor cooling plate and water cooling: symptoms, internal-leak testing, torque values and FAQ.


