Brake Master Cylinder: Faults, Replacement & Care Guide
A commercial vehicle brake pedal that slowly sinks to the floor or goes soft points to the dual-circuit master cylinder: diagnosis, replacement, bleeding.
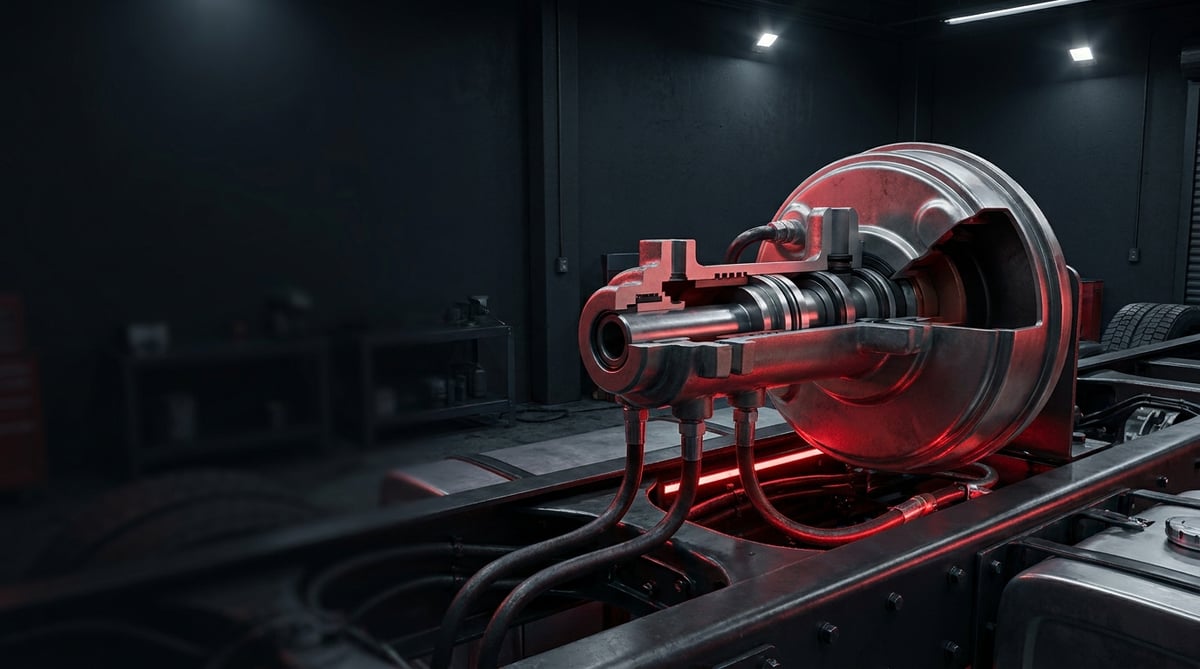
If the brake pedal slowly sinks toward the floor under your foot, or if it feels firm in the morning yet "goes soft" during the day, on most heavy commercial vehicles the first place to look is the brake master cylinder. In the field it is known as the "master", the "brake master cylinder", the "dual-circuit master" or simply the "cylinder". In the hydraulic or air-over-hydraulic brake groups of trucks, tractor units, buses and construction machinery, this is often the part behind complaints such as pedal travel, delayed braking, a dropping reservoir level or one axle braking weakly. Drawing on the field experience of the VADEN technical team, this guide brings together the function of the brake master cylinder, its fault symptoms, the correct diagnostic method, the replacement steps and its service life in one place.
What Is the Brake Master Cylinder? Function and Working Principle
The brake master cylinder is a dual-circuit (tandem) master brake cylinder that converts the mechanical force the driver applies to the pedal into hydraulic pressure and delivers this pressure independently to two separate brake circuits.
In the hydraulic and air-over-hydraulic brake systems of heavy commercial vehicles, the master cylinder takes the force coming from the pedal — usually amplified by a brake booster or an air/hydraulic assist unit — and pushes the pistons inside it. The pistons pressurize the brake fluid coming from the reservoir and send it to the brake lines, and from there to the calipers or wheel cylinders. When the pedal is released, the return springs bring the pistons back to their initial position, pressure drops and the brakes release.
For safety reasons, modern vehicles split the brakes into two separate hydraulic circuits: typically one circuit feeds the front axle and the other the rear axle (or in a diagonally split layout). A tandem master cylinder manages these two circuits within a single body, with two pistons arranged in series (primary and secondary). The purpose of this separation is dual redundancy: if one circuit loses pressure due to a burst line or a leak, the master cylinder's other piston continues to operate independently and the vehicle can still stop with partial braking force. This is precisely why the master cylinder is one of the most safety-critical parts of the system.
- Cylinder body and bore: The precision-machined bore in which the pistons move without leaking.
- Primary and secondary pistons: Generate the independent pressure of the two circuits.
- Primary and secondary cups/seals: The sealing elements that hold pressure and manage hydraulic transfer on the return stroke.
- Return springs: Return the pistons to the rest position, enabling rapid brake release.
- Reservoir and feed/compensation ports: Store the fluid; balance expansion and wear allowance.
- Outlet ports and safety/residual-pressure valves: Feed the circuits; on some types maintain a low residual pressure.
Tandem (Dual-Circuit) Logic
At the heart of the master cylinder are two independent hydraulic chambers. When the pedal is pushed, the primary piston moves first and, through the hydraulic cushion between them, also pushes the secondary piston; thus both circuits are pressurized simultaneously. If one of the circuits leaks, the piston seats mechanically against its stop and the intact circuit keeps working. This behavior reveals itself as the pedal traveling deeper than normal.
Relationship with Air-Over-Hydraulic
On many medium and heavy commercial vehicles there is an air-over-hydraulic booster or a vacuum/hydraulic servo in front of the master cylinder. This unit amplifies the pedal force; the master cylinder then converts the amplified force into hydraulic pressure. During diagnosis, if braking is weak despite low pedal effort, it must be determined whether the fault lies in the assist unit or in the master cylinder.
OE Context and the Concept of Equivalents
In heavy commercial brake hydraulics, master cylinders of the Bosch, TRW, Wabco (ZF), Knorr-Bremse and Bendix type are common on the OE side. VADEN products are positioned as equivalents/types suitable for these systems; an expression such as "Bosch type" or "TRW type" means the form-and-function equivalent of the relevant OE master cylinder, not that it is an original-brand product.
| Application / Segment | Typical Design | Common System Context |
|---|---|---|
| Medium-duty truck (distribution) | Tandem master cylinder, integrated or separate reservoir | Air-over-hydraulic, ABS |
| Bus / midibus | Tandem, large-diameter bore | Hydraulic assist + ABS/EBS |
| Construction machinery / off-road | Tandem, reinforced dust protection | Harsh environment, hydraulic brakes |
| Light-heavy commercial (van-based) | Tandem, vacuum-servo output | Vacuum/hydraulic servo, ABS |
Fault Symptoms and Diagnosis
Brake master cylinder faults mostly fall into two groups: internal leakage (the piston bypassing within itself, fluid passing without generating pressure) and external leakage/mechanical binding. Internal leakage is the most insidious fault because the pedal slowly sinks with no visible dripping. The table below is a quick field-diagnosis reference; always confirm each symptom by monitoring pedal behavior and fluid level.
| Symptom | Possible Cause | Check / Verification |
|---|---|---|
| Pedal slowly sinks to the floor under the foot when held down | Master cylinder internal leakage (piston cup bypass) | Hold the pedal at constant pressure for 15–30 s; if the pedal drops with no external leak, the master is suspect |
| Soft/spongy pedal, holding near the floor | Air in the system, low fluid, internal leak | Purge (bleed); if it does not improve and the level is dropping, look for master/line leakage |
| Fluid level continuously dropping, no external drip | Internal leak from the master's rear seal into the servo/body | Check the servo-to-master joint and the rear of the body for fluid traces |
| Master cylinder body / reservoir base wet, fluid dripping | Torn external seal/cup, reservoir gasket failure | Wipe the body dry, verify the leak point visually after a short drive |
| One axle brakes weakly, braking unbalanced | Internal leak in one circuit, port/valve issue | Test the circuits separately; compare the output behavior of the two circuits |
| Brake pedal releases slowly, wheel drags/overheats | Blocked compensation port, piston not returning, residual pressure | With the pedal released, check free wheel rotation and hub temperature |
| Brake warning lamp lit, level low | Circuit pressure loss, low fluid level | Verify the level switch and the pressure of both circuits |
Distinguishing Internal Leakage (Pedal Sink Test)
The most reliable symptom is the pedal slowly sinking under constant force with no external leak whatsoever. With the engine running (servo active), apply moderate force to the pedal and hold its position. In a healthy master cylinder the pedal stays put; in a master with an internal leak the fluid bypasses behind the cup, so the pedal gradually sinks toward the floor. This test is the most practical way to separate a master cylinder fault from line/caliper leakage.
Circuit Separation: Master or System?
A soft pedal does not always originate from the master. Air in the system, worn pads, a caliper return problem, line/hose swelling or an assist-unit fault can produce a similar feel. Before replacing the master, verify that proper bleeding has been done, that pad/disc condition is acceptable and that there is no external leak.
Suspicion Arising from the Assist Unit
On vehicles with air-over-hydraulic or vacuum servos, a "hard/weak brake" complaint often comes from the assist unit. Observe the difference in pedal force with the engine off versus running: if the pedal noticeably softens when the engine starts, the servo is working. When the servo is sound, an internal leak in the pedal points to the master.
Standards and further reading
This subject is governed by the equipment rules for air-braked commercial vehicles. In the United States the federal air brake standard, FMVSS 121 (49 CFR 571.121) defines the reservoirs, protection and timing a compliant system must provide, and Europe applies the equivalent limits of UNECE Regulation No. 13. For further detail, see the on-road braking performance requirement in 49 CFR 393.52. Always confirm specific figures against the current regulation and the vehicle manufacturer service data.
Outside the United States the equivalent duties sit in national law. In the United Kingdom, regulation 18 of the Road Vehicles (Construction and Use) Regulations 1986 requires every part of the braking system to be maintained in good working order. In Canada, air brake systems fall under the Motor Vehicle Safety Regulations, which contain CMVSS 121.
Replacement / Installation Steps
- Secure the vehicle: Park on level ground, chock it, set the parking brake to the appropriate position; on air-over-hydraulic systems relieve the relevant pressure.
- Empty/protect the reservoir: Lower the fluid level with a syringe/suction device; lay cloth/protection to prevent overflowing fluid from contacting paint and surrounding surfaces.
- Mark the connections: Before disconnecting, label or photograph each brake line and the reservoir hose by port position; incorrect connection is the most common mistake.
- Disconnect the brake lines: Loosen the line fittings with the proper wrench (flare/line wrench); use the correct size to avoid rounding the corners, and collect the leaking fluid.
- Disconnect the electrical/switch connection: Carefully separate the level switch and connectors, if any.
- Remove the old master cylinder: Undo the servo/flange bolts, take the master out; clean the seating surface, the flange and the pushrod area.
- Compare the new master cylinder: Compare the new VADEN master with the old part one-to-one in terms of bore diameter, port layout, thread size, flange hole and pushrod clearance (rod clearance).
- Verify the pushrod clearance: If the manufacturer specifies it, measure/adjust the clearance between the servo pushrod and the piston; incorrect clearance causes dragging or a slack pedal.
- Bench bleed: If possible, fill and bleed the master on the bench before installation; this significantly shortens the bleeding time in the system.
- Install the new master cylinder: Seat the master on the flange, tighten the bolts to the manufacturer's torque in steps; be careful not to strain the body. Connect the lines to the correct port per the labels, avoiding overtightening.
- Fill, bleed and test: Fill the reservoir with approved fluid, bleed the system in the correct sequence, check all connections for leaks; verify pedal firmness and fluid level.
Points to Watch (Common Mistakes)
- Fitting a master just because it "looks similar", installing it without verifying the OE number, bore diameter and flange match.
- Loosening the line fittings with the wrong wrench, rounding the corners and leaving a connection that later leaks.
- Skipping the bench bleed and struggling with air inside the system for a long time.
- Installing without checking the pushrod clearance, creating constant dragging or a slack pedal.
- Leaving the reservoir cap open and allowing moisture-saturated fluid (moisture lowers the fluid's boiling point).
- Putting the vehicle back into service after replacement without a leak check and a brake road test.
Technical Values and Checkpoints
The values below are typical/general references for heavy commercial vehicles. For your vehicle's actual operating pressure, torque and tolerances, the OE service manual is authoritative.
| Parameter | Typical / General Reference Range | Note |
|---|---|---|
| Brake fluid type | Usually DOT 4 type (varies by vehicle) | Manufacturer specification is essential; do not mix |
| Peak braking hydraulic pressure | approx. 80–130 bar (≈1160–1890 psi), higher under hard braking | Depends on system/servo assistance |
| Fluid boiling point (dry) | typically ≈ above 230 °C for DOT 4 | Drops noticeably as moisture increases |
| Operating temperature range | roughly -40 °C to around +120 °C at the component area | Line temperature rises under intense braking |
| Pushrod clearance | Small value within manufacturer tolerance | Too much clearance causes a slack pedal, too little causes dragging |
| Static pedal sink (engine running) | Negligible; the pedal should stay put | Slow sinking is an indicator of internal leakage |
| Fluid change interval | Typically ≈ 2 years / manufacturer interval | Regular change against moisture retention |
Installation torques vary by master type, flange and bolt size; the values below are general references only.
| Connection | Typical Torque Range (general reference) |
|---|---|
| Flange/servo bolts (M8 class) | approx. 20–30 Nm |
| Flange/servo bolts (M10 class) | approx. 40–55 Nm |
| Brake line fittings (flare nut) | approx. 12–20 Nm; manufacturer value is authoritative, avoid overtightening |
- Perform the pedal sink test at constant pressure (internal-leak check).
- Check the reservoir level and the level switch.
- Look for fluid traces on the master body, the reservoir base and the servo joint.
- Check all line fittings for leaks with foam/visual inspection.
- With the pedal released, verify that the wheels rotate freely and the hubs are not heating up.
- Check the moisture/color condition (darkening) of the brake fluid; replace if necessary.
Maintenance and Service Life
The brake master cylinder is a long-lasting part when correctly installed and the fluid is kept clean and dry. The biggest factor determining its life is fluid quality: DOT-based fluids are hygroscopic, meaning they draw moisture from the air. As moisture increases, the fluid's boiling point drops, corrosion begins on the inner surface and the piston cups fatigue. Maintenance therefore focuses largely on fluid hygiene.
- Change the brake fluid at the manufacturer's interval (typically every two years); cut moisture off at the source.
- Keep the reservoir cap and its gasket intact; do not leave the system open for long periods.
- At periodic servicing, check the master body and the servo joint for fluid traces.
- If a change in pedal feel, slow sinking or a level drop is noticed, diagnose early.
- Make the pedal sink test a routine part of periodic brake maintenance.
- Track pad/disc wear; worn pads naturally lower the reservoir level, do not confuse this with an internal leak.
Once internal leakage begins, the master cylinder is usually replaced as a complete unit; in field conditions, renewing the cups/seals may not be practical and safe for every type, because corrosion formed on the bore surface will also wear a new cup rapidly. Since it is a safety-critical part, replacing a suspect master with a correct equivalent is the safest approach rather than "getting by" with it.
A correctly diagnosed brake master cylinder fault is resolved with a safe and compatible equivalent. The VADEN ORIGINAL brake master cylinder product family is offered in stock with OE-type configurations suitable for the dual-circuit hydraulic and air-over-hydraulic brake systems of heavy commercial vehicles, meeting fleet maintenance and service needs. Select the part suited to your vehicle by verifying it with an OE-number or chassis cross-reference.
Related categories: Brake Master Cylinder
Related technical guides: ABS Wheel Speed Sensor & ECU: Faults, Replacement & Care · Brake Caliper Overhaul Kit: Guide Pins, Boots & Adjuster · Air Processing Unit (APU/EAC): Faults, Replacement & Care · Pressure Limiting Valve: Faults, Replacement & Maintenance · Four-Circuit Protection Valve: Faults, Diagnosis & Replacement
Application and compatibility: Vehicle compatibility catalogue · Engine compatibility catalogue
Main guide: Disc Brakes vs. Drum Brakes: A Heavy-Duty Vehicle Comparison
Tags
Frequently Asked Questions
- How can I tell the brake master cylinder is faulty?
- The most typical sign is the pedal slowly sinking to the floor when held down while there is no external leak whatsoever. Alongside this, a spongy/soft pedal, a dropping reservoir level with no external drip and braking imbalance may be seen. For a definitive diagnosis, perform the pedal sink test at constant pressure with the engine running.
- The brake pedal goes all the way to the floor — is the master cylinder the cause?
- It is one of the common causes but not the only possibility. The pedal going to the floor can also be due to air in the system, a fluid leak, excessive pad wear or a caliper problem. Before replacing the master, verify that proper bleeding has been done and that there is no external leak.
- No fluid drips from the master but the level is dropping — why?
- This is the classic picture of internal leakage: the fluid does not flow out, it bypasses from the master's rear seal into the servo/body or passes through the piston. Check the servo-to-master joint and the rear of the body for fluid traces; a master with an internal leak is usually replaced.
- Can I replace the master cylinder myself?
- The job is not mechanically difficult; however, the brake is a safety system and correct bleeding is critical. Bench bleeding, the manufacturer's bleed sequence and the correct fluid type are essential. If you lack the equipment and experience, it is recommended to have it done by an authorized heavy-vehicle service.
- How do I find which master cylinder fits my vehicle?
- The most reliable way is to cross-reference the catalog using the OE part number of the removed master or the vehicle's chassis information. The cylinder bore, number/thread of ports, flange hole layout and pushrod geometry must match one-to-one; visual similarity alone is not enough.
- Which brake fluid should I use?
- The type specified by the manufacturer is essential; heavy commercial hydraulic brake systems mostly use DOT 4 type. Never mix different standards, and especially never mix mineral oil with DOT-based fluid; unsuitable fluid swells the seals and fails the master.
- Is the VADEN master cylinder a Bosch / TRW equivalent?
- VADEN products are manufactured as equivalents/types suitable for the relevant OE systems. The expression "Bosch type" or "TRW type" means the form and function equivalent of that OE master; it is not an original-brand product but a compatible equivalent to it.
- Can I keep using a master cylinder with an internal leak for a while?
- Not recommended. Internal leakage leads to the pedal sinking during braking and insufficient pressure in an emergency stop; this is a direct safety risk. A suspect master should be tested as soon as possible and replaced if necessary.
- Braking is weak but there is no external leak at all — is the fault in the booster or the master cylinder?
- Separate the two by pedal effort. Press the pedal with the engine off, then with it running: if the pedal noticeably softens once the engine starts, the assist unit is doing its job. With a sound servo, a pedal that slowly sinks under constant force points to internal leakage in the master cylinder. On air-over-hydraulic vehicles a hard or weak brake complaint usually comes from the assist unit.
- How often should the brake fluid be changed?
- Follow the manufacturer's interval; in heavy commercial use that is typically every two years. DOT-based fluid is hygroscopic and draws moisture from the air: as moisture rises the boiling point falls, corrosion starts on the bore surface and the piston cups fatigue. Keep the reservoir cap and its gasket intact, do not leave the system open, and change the fluid early if it has darkened.
Related Articles

Brake Caliper Mechanism: Camshaft, Bearings, and Return Spring
Inside the truck air disc brake caliper: how the camshaft, thrust bearings, return spring and automatic adjuster turn push-rod force into pad pressure.
Tachograph Explained: Driver Cards, Symbols, Rest Times
How tachographs work in trucks and buses: analogue, digital and smart types, driver and company cards, symbols, download rules and roadside checks.
ADR Guide: Vehicle & Driver Rules for Dangerous Goods Transport
Learn what ADR means for heavy trucks: hazard classes, required vehicle equipment, driver certification, orange plate labeling, and inspection documents.


