Air Brake Systems: Working Principle, Maintenance and Safety Tips
How does an air brake system work? Pre-trip inspection, long descents, winter drain discipline and a fleet maintenance schedule for heavy commercial vehicles.
A coach pulls away from the depot the moment the ignition comes on; the driver releases the clutch without checking the gauges, the vehicle rolls a few metres and then lurches to a hard stop on its own while a warning sounds in the cab. This is not a fault: the system has not yet reached working pressure, so the spring-applied park brakes are still holding. The same morning, on another vehicle, water left undrained in a tank overnight has frozen and partially seized a valve. Neither incident is a component failure — both come down to operating discipline. Most breakdowns and accidents involving air brake systems trace back not to a part wearing out, but to the system's logic being misunderstood. This guide treats the air brake not as a catalogue of faults, but as a set of daily habits for drivers and fleets: what to expect, what to listen for, what to check, and at what symptom to stop.
Why Do Heavy Commercial Vehicles Use Air Brakes?
A loaded tractor and trailer weigh dozens of times more than a passenger car, so the force needed to slow that mass grows in the same proportion. What the driver's foot can produce, on the other hand, stays constant. That is why, in a heavy commercial vehicle, the pedal is not the component that generates braking force — it is the control that governs an energy store that is already sitting ready. The pedal only answers the question of "how much"; the work itself is done by the compressed air that an engine-driven compressor has already loaded into the tanks.
Air is free and effectively unlimited; once used, it simply returns to the atmosphere. Because it is compressible, a small leak at a fitting does not collapse the system instantly, the way the same size leak would send a hydraulic pedal straight to the floor. Connections between tractor and trailer that get coupled and uncoupled on every trip are also far easier to build around air. The same compressed air often runs the suspension, the doors and the gear selector too — the reservoir pressure is a shared resource for several of the vehicle's systems, not just the brakes.
The feature that matters most to the driver is the system's fail-safe logic. The park and secondary brakes are not applied by air — they are released by air. A powerful spring inside the spring brake chamber is constantly trying to apply the brakes; system air compresses that spring and holds the brakes off. Once pressure falls below a critical threshold, the spring is free to act and the vehicle brakes itself. A heavy commercial vehicle that runs out of air does not lose its brakes — it stops. That is the system's single biggest safety feature, but it becomes a hazard in its own right if it happens in the wrong place. The driver's job is to never let it get that far.
How Does an Air Brake System Work, from the Driver's Seat?
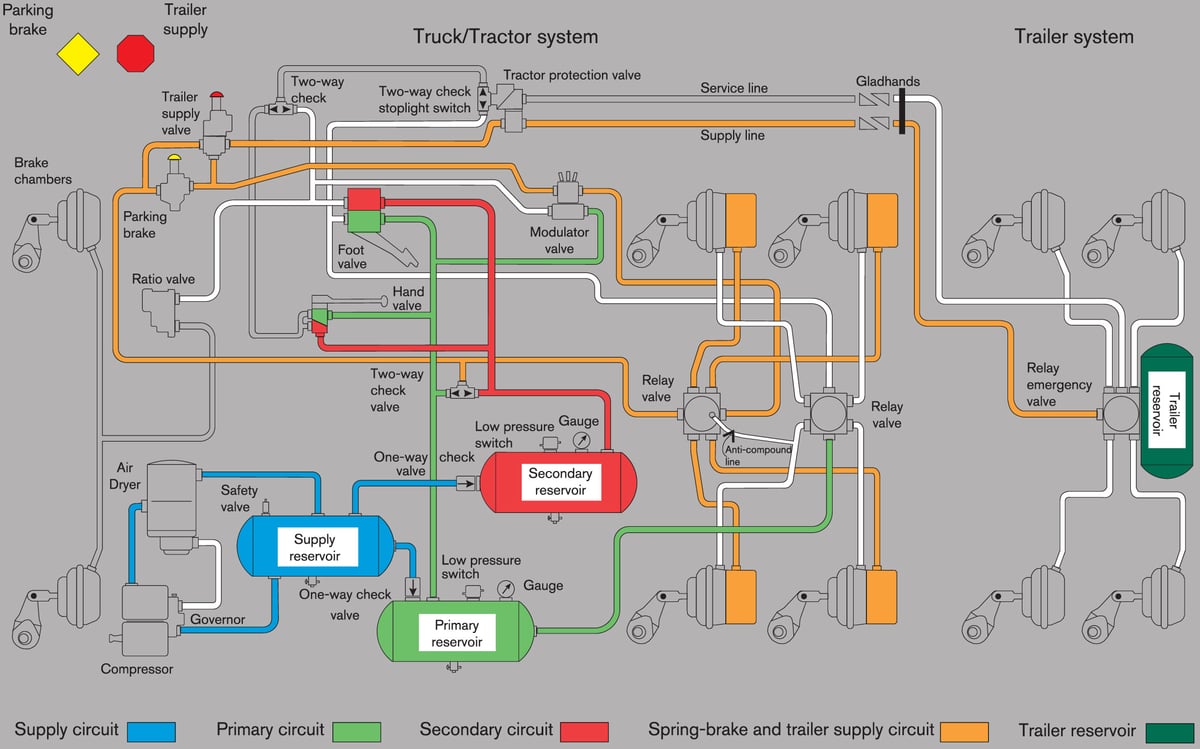
The valve-by-valve architecture of the system, and the faults that can affect each component, are a separate subject; what follows is only enough to make sense of what happens on the road. From the driver's seat, the practical answer to how does an air brake system work is a four-stage chain: production, conditioning, storage and control.
Production. A compressor driven off the engine compresses the air. It turns whenever the engine runs, but it does not pump continuously: a pressure governor unloads the compressor once the tanks reach the upper threshold and puts it back on load at the lower one. The short release sounds heard in the cab are usually just this switch happening, and they are normal.
Conditioning. Freshly compressed air is hot and carries moisture and a trace of oil vapour. The air dryer captures this moisture and periodically vents it with a noisy purge. That purge sound is also normal; it becoming continuous, or disappearing altogether, is not.
Storage. Conditioned air is stored in tanks split across independent circuits: a typical layout feeds the front axle, rear axle, park/secondary brake and trailer circuit separately. If one circuit is lost, the others keep working, so a single leak does not leave the vehicle with no brakes at all — but it does cut braking capacity seriously.
Control. Pressing the pedal moves the foot brake valve, which meters line pressure in proportion to pedal position and sends it out to the circuits. Relay valves boost that signal on its way to the brake chambers. The diaphragm inside each chamber turns pressure into push force; on a drum brake, that force works the shoes through the slack adjuster and S-cam, while on a disc brake it works the pads through the caliper mechanism. Releasing the pedal dumps the line air quickly — that is the release sound heard after braking, and its absence can mean the brake is not letting go.
For the component-by-component operation, the role of each valve and comprehensive troubleshooting, the air brake systems guide for heavy commercial vehicles is the technical companion to this content. From here on, everything comes back to a single question: how do the driver and the fleet work safely with this system?
What Does the Difference Between Air and Hydraulic Brakes Mean for the Driver?
The most common mistake made by a driver moving from a car to a heavy commercial vehicle is carrying hydraulic-brake habits across unchanged. The two systems do the same job with completely different physics, and that difference shows up directly in driver behaviour.
| Topic | Hydraulic brake | Air brake | What it means for the driver |
|---|---|---|---|
| Energy source | Foot force, boosted by a servo | Stored compressed air | Braking power depends on tank pressure, not how hard you press |
| Readiness after start-up | Ready the instant the ignition is on | Pressure has to build first | Never move the vehicle before the warning clears |
| Pedal feel | Firm and linear against force | Soft, position-sensitive | Braking severity tracks how far you move the pedal, not how hard |
| Response lag | Almost none | However long it takes air to travel the lines | Following distance in a long combination opens up sooner |
| Effect of a small leak | Pedal goes soft, braking is lost fast | Compressor can compensate for a while | Leaks creep in; listen for sound and watch the pressure trend |
| Park brake | Mechanical cable or electric actuator | Spring-applied chamber, released by air | Brake applies itself automatically once air runs out |
| Normal sounds | System runs silent | Purge and governor sounds are normal | Learning the sounds is the first diagnostic tool |
| Moisture behaviour | Hydraulic fluid draws moisture from air | Moisture condenses into water in the tanks | Draining and dryer care are the driver's job |
Why Doesn't Pressing the Pedal Harder Help?
In a hydraulic system, extra force on the pedal produces extra brake pressure directly. In an air system, the pedal only sets the position of a valve; once that valve is fully open, the highest pressure the system can deliver is already applied, and pushing harder adds nothing. In a panic stop, the correct response is to move the pedal quickly and firmly to the required position and let ABS do its job, not to try to force the pedal through the floor. For the same reason, the "pump the pedal" habit taught for hydraulic brakes is actually harmful in an air system: every pump spends reserve air from the tanks.
Waiting for Air Pressure to Build: What Happens Before You Move?
The first minutes after start-up are not idle waiting time — they are the system building itself up. While the compressor is filling the tanks, a low-pressure warning lamp stays lit or a buzzer sounds; that warning is telling you the reserve needed for safe braking is not there yet. Moving off before it clears risks running out of reserve on the first hard stop, with the park brakes applying themselves in the middle of traffic.
Build-up time varies with the vehicle, compressor capacity, tank volume and leak level, but it generally stays under a few minutes. What matters is not the absolute figure but the vehicle's own normal. A noticeable stretching of that time is the earliest warning of all — it shows up before any fault code does — and it points to one of two things: a growing leak, or falling compressor output. For the signs of an ageing compressor, the drop in air delivery, oil-carryover behaviour and replacement criteria, the air brake compressor guide is a detailed reference.
The wait is also a free diagnostic window: if the gauge shows two circuits separately, both should climb at roughly the same rate; a circuit that noticeably lags behind is where you look first for a leak or a valve problem.
The Park Brake Runs on Springs: Understanding It Correctly
On an air-braked vehicle, the park brake is not a lever pulling a cable tight. The cab control operates a valve: moving it to the park position dumps air from the spring brake chambers and lets the internal springs apply the brakes; moving it back to the drive position returns air, compresses the spring, and releases the brakes. That reversed logic has three practical consequences.
The park brake is only for a stationary vehicle. A spring brake has no modulation: applied while moving, it grabs hard and fully, with no way to graduate it. Using it to back up the service brake sharply increases jackknife risk, especially in a tractor-trailer combination. That said, if the service brake is lost completely, the park brake is the last resort for stopping the vehicle — used only when there is no other option, ideally on flat, clear ground.
The park brake alone is not enough on every gradient. A spring brake keeps holding even if air leaks away, but the spring's force starts to approach its limit above a certain slope and load. For long parking, hills and heavy loads, wheel chocks are the one certain way to remove that uncertainty.
Should You Apply the Park Brake Right After a Long Descent?
If a vehicle is going to be parked right after heavy braking, the correct practice is to let the brake groups cool before applying the park brake. Locking a hot drum or disc tightly under a still-hot brake creates mechanical stress as it shrinks while cooling. In winter, a wet, hot brake group can also freeze solid while parked, and moving the vehicle afterwards can tear the lining surface loose. In these conditions, it is safer to secure the vehicle with chocks and apply the park brake only after a short cooling period.
Pre-Trip Brake Inspection: Step by Step
The pre-trip check is the lowest-cost, highest-return safety practice a fleet can run. Done properly it takes only a few minutes, and it catches a large share of the problems that would otherwise turn into a roadside breakdown, while the vehicle is still at the yard. The sequence below is a general flow; the procedure and acceptance criteria in the vehicle's owner's manual take precedence.
- Park the vehicle on flat, safe ground, chock the wheels and leave the park brake applied.
- Start the engine and watch the brake warning lamps come on first, then go out once the system is ready. A lamp that never lights at all can mean the warning circuit itself is faulty.
- Time the pressure build-up. On a dual-circuit gauge, both needles should climb together; note it if build-up takes noticeably longer than the vehicle's known normal.
- Listen for the governor cut-out. If the release sound that should occur once pressure hits the upper threshold never comes, have the governor side checked.
- Shut the engine off, leave the ignition on, and watch pressure with the brake not applied. It should stay almost flat; a visible drop means a static leak.
- Hold the foot brake fully applied and watch pressure again. A small drop is normal from the extra volume brought into the circuit; a drop that keeps going points to a leak on the control side.
- With the ignition on, bleed pressure down gradually and confirm the low-pressure warning triggers at the threshold the manufacturer specifies. If the warning comes late or not at all, the vehicle does not leave the yard.
- Keep bleeding pressure down and watch for the point where the park brakes apply on their own; this confirms the final safety stage actually works.
- Restart the engine and bring pressure back to full. Remove the chocks, release the park brake, move a few metres at very low speed and confirm the vehicle stops without pulling or lagging.
- Stop, apply the park brake, and test that it holds by giving a light pull in low gear. If the vehicle moves, the park brake group goes to the workshop.
- If running with a trailer, confirm the air lines are connected, the gladhand seals are intact and the hoses run free; test the trailer park brake separately too.
- Walk around the vehicle and scan by eye: brake chambers, push rods, slack adjusters, hoses, fittings, disc and drum surfaces, lining thickness. Oil, rust-coloured water or dust streaks are the first sign of a leak.
- Open the tank drain valves and drain off any water; noticeable water every single day means the air dryer needs attention. Finally, log every finding in the vehicle logbook — a finding that isn't written down is as good as invisible to the next driver.
The steps most often skipped in this sequence are the fifth and the seventh. Skip the leak test and the problem stays hidden, because the system looks full sitting in the yard; skip testing the warning threshold and the driver never actually confirms that the circuit meant to warn them at the critical moment even works.
What Are the Pass/Fail Criteria in the Pre-Trip Check?
Running through the checklist is not enough on its own; you need to know what each step actually proves and which finding should keep the vehicle off the road. Because numeric thresholds vary by vehicle, the table below describes behaviour rather than figures; the acceptance limits themselves are read from the OE documentation.
| Check | Expected behaviour | Finding that keeps the vehicle off the road |
|---|---|---|
| Pressure build-up time | Within the vehicle's known normal, rising without interruption | Time noticeably longer, or one circuit lagging behind |
| Static leak test | Pressure holds steady, engine off, brake released | Visible drop in a short time, audible hissing |
| Applied leak test | Small, self-limiting drop while braking | Drop that keeps going, noise from chambers or valves |
| Low-pressure warning | Lamp and buzzer, no delay, at the specified threshold | Warning late, absent, or staying on constantly |
| Automatic park brake application | Self-applies at the set threshold as pressure falls | Fails to apply, or applies on one side only |
| Park brake hold test | Vehicle does not move under a light pull in low gear | Vehicle creeps forward, brake overpowered |
| Service brake stop test | Straight, smooth stop with no delay | Pulling to one side, delay, spongy feel |
| Brake chamber and push rod | Stroke within OE limits | Excessive stroke, marked difference between axles, bent rod |
| Hoses, lines and fittings | Free, not taut, dry connections | Chafe point, crack, wetness, loose fitting |
| Linings, discs and drums | Thickness above the limit, even surface | Below-limit thickness, heat cracking, oil contamination |
| Tank drains | Little to no water | Noticeable water every day, or an oily emulsion |
| ABS and EBS warning | Lights during the check, out once moving | Stays lit, or never lights at all |
Most of these findings are enough on their own to stop the vehicle leaving, but some are worth far more read as a trend. A build-up time that stretches a little further each morning, drain water that grows a little each week, or a stroke difference that keeps widening — these are the problems that advance quietly, bothering no one, until the day they show up on the road.
Standards and further reading
This subject is governed by the equipment rules for air-braked commercial vehicles. In the United States the federal air brake standard, FMVSS 121 (49 CFR 571.121) defines the reservoirs, protection and timing a compliant system must provide, and Europe applies the equivalent limits of UNECE Regulation No. 13. For further detail, see the illustrated reference guide at airbrakecompressor.com. Always confirm specific figures against the current regulation and the vehicle manufacturer service data.
Outside the United States the equivalent duties sit in national law. In the United Kingdom, regulation 18 of the Road Vehicles (Construction and Use) Regulations 1986 requires every part of the braking system to be maintained in good working order. In Canada, air brake systems fall under the Motor Vehicle Safety Regulations, which contain CMVSS 121.
Warning Signs on the Road: When Should You Stop?
The air brake system has a fixed vocabulary for talking to the driver: the gauge, the warning lamp, sound, and pedal feel. A driver who can read changes coming through those four channels catches a fault before it becomes an incident. In the table, "stop immediately" means stopping at the nearest safe point that can be reached without endangering traffic.
| Symptom | Likely meaning | What the driver should do |
|---|---|---|
| Pressure dropping slowly | Growing leak, compressor not keeping up | Cut brake use to a minimum, stop at the nearest safe point |
| Pressure dropping suddenly with the warning sounding | A line, hose or chamber has failed | Stop immediately; the margin to the park-brake threshold cannot be planned for |
| Compressor running continuously, pressure never reaching full | Leak, dryer fault, or falling compressor output | Continue only to the nearest point where you can be routed to a workshop |
| Pedal going deeper than usual | Maladjustment, excessive stroke, worn linings | Increase stopping distance, have it checked at the first opportunity |
| Brake pulling to one side | One wheel not holding, or dragging | Reduce speed, avoid hard braking, stop at a safe point |
| Dragging feeling with the brake released | Brake not fully releasing, exhaust problem | Stop and check wheel temperature; drag turns into heat |
| Burning smell, excess heat at a wheel or drum | Overheated brake group, seized mechanism | Stop immediately, let it cool, never pour water on it |
| No release sound after braking | Line not venting, valve problem | Confirm the brake has actually released; if you can't, stop |
| Continuous hissing at idle | Leak under the cab or in a circuit | Find the source before setting off; a growing leak accelerates |
| Trailer brakes locking early | Load-sensing, EBS, or coupling fault | Check the load and coupling, reduce speed |
| ABS warning staying lit | Sensor, wiring or module fault | Brakes still work but without lock-up protection; increase following distance and get it serviced |
| Brake fading progressively on a long descent | Heat-related fade, loss of friction | Bring in engine brake and retarder, stop and cool at a safe point |
Not every symptom on this list comes directly from the brake system; vibration, pulling and uneven wear can just as easily trace back to axle alignment, suspension or a wheel bearing. For working from symptom back to cause, measurement methods and the order in which to check things, the air brake fault diagnosis guide is the reference the workshop side should use. The driver's job is not to make the diagnosis — it is to pass the right symptom along in the right words.
When Pressure Drops: What Should the Driver Do, and Not Do?
A pressure drop is the single most critical emergency an air brake system can throw at a driver, because the countdown runs outside the driver's control. The right response comes from understanding the system's logic: the air that is left is finite, and every brake application spends from that same reserve. The goal is to get the vehicle to a safe point using as little braking as possible.
What to do. Lift off the throttle and bring in the engine brake and the retarder, if fitted — neither one spends any air. Switch on the hazard flashers, move to the right lane, and aim for the nearest safe point that will not block traffic. Brake with a single, controlled application wherever possible. Once stopped, apply the park brake, chock the wheels, set out a warning triangle and call for assistance.
What not to do. Pumping the pedal — applying and releasing it repeatedly — burns through remaining air faster than anything else. Pushing on with the thought "if I make it over this hill I'll reach a workshop" is what gets the park brakes applying themselves at the worst possible spot. Trying to use the park brake control as a graduated brake while moving carries a serious risk of swing or jackknife, especially with a trailer attached. And silencing the warning buzzer to keep driving removes the information, not the fault.
How Do You Narrow Down a Leak's Source in the Field?
Once the vehicle is safely stopped, narrowing down where a leak is coming from sharpens the call for a tow and the information handed to the workshop. With the engine off and things quiet, the hiss can usually be heard directly: a sound from the trailer gladhands points to a seal, from a hose points to chafing or a crack, and from around a chamber points to the diaphragm or a fitting. Listening for whether the sound changes with the park brake applied versus released also helps identify which circuit the leak is on. None of this is a repair, but it turns "the vehicle is losing air" into "there's a steady leak around the rear axle chamber," and that shortens the time it takes to fix it.
Brake Use on Long Descents and the Priority of Engine Braking
The most severe category of heavy commercial vehicle accidents happens on long descents, and in most of them there is no technical fault at all. The problem is the service brake being kept on continuously through the whole descent. The service brake converts kinetic energy into heat; used continuously, that heat cannot be shed from the friction surfaces fast enough, temperature climbs, and the friction coefficient falls. The result is a brake that grips less and less for the same pedal position. This is called brake fade, and its most dangerous feature is that by the time the driver notices it, it is usually too late.
The basic rule is this: on a descent, speed control is primarily the job of engine braking and the retarder, not the service brake. The exhaust brake, engine brake and, where fitted, a hydraulic or electric retarder dissipate energy without loading it onto the brake groups, and they can be used indefinitely. The service brake steps in only where those are not enough, in short, deliberate applications.
Before and During the Descent
A long descent is planned before you reach the top, not during it. Load weight, gradient, the length of the descent, weather and road surface, and the vehicle's retarding capacity are all weighed together to pick the right gear. The general rule is to select the same gear you would use to climb the same grade, or one lower. That gear is chosen at the crest, before the vehicle has picked up speed; once speed builds, dropping a gear gets harder, some automatic transmissions refuse it outright, and the service brake is all that's left.
Riding the pedal with light, continuous pressure is the most common and most damaging habit on a descent; constant contact heats the brake groups with no chance to cool. The alternative is intermittent, deliberate braking: apply the brake firmly once you drift a little above the target speed, release it completely once you drop below it, and give the groups time to cool in between. This produces less total heat and lets it dissipate. The retarder has its own limit worth knowing: because it acts through the drive axles, using a high setting on a slippery surface risks a slide, so dropping the setting is the right reflex on ice and snow.
What to Do When Brakes Overheat
Overheating announces itself through a burning smell, heat you can feel around the rim, a visible drop in braking effect and sometimes a thin haze of smoke off a drum. The only correct response is to stop at a safe point and wait for it to cool. Never pour water on a hot drum or disc; the sudden cooling warps and cracks the metal. During this wait, using chocks instead of immediately setting the park brake keeps a still-hot group from locking up.
A wrong descent technique is not the only cause of overheating. A brake that never fully releases, a sticking slack adjuster, or an incorrect stroke can keep friction going even in normal driving, concentrating the heat at a single wheel.
Winter Drain Discipline and Freeze Prevention
The air brake system's most insidious enemy is water. The air drawn from the atmosphere always carries some moisture; that moisture stays suspended in the hot air during compression, then condenses into liquid water in the bottom of the tanks as the system cools. In summer it drives corrosion and valve wear; in winter it turns directly into a safety problem — frozen water narrows a line, locks a valve, or disables a chamber.
Fighting this has three parts. The first is the air dryer: its desiccant cartridge captures moisture from the air and vents it periodically. The cartridge has a limited life; once saturated, it simply stops doing its job, and it gives no warning when that happens. Replacement follows whichever comes first, the manufacturer's time or mileage interval, and the interval should be shortened in dusty, humid or hot operating conditions.
The second is tank draining. Even with a dryer working properly, some water still collects in the tanks; opening the drain valves regularly is the simplest, most effective maintenance task that falls directly on the driver. Before the cold sets in, this should become a daily habit. Draining also doubles as a diagnostic: the amount and colour of the water tells you about the dryer's condition, and an oily discharge tells you the compressor is carrying oil into the system.
The third is heating and insulation. Some vehicles fit electric heaters on the dryer and drain valves; before winter, confirm these are actually working. Points where lines chafe or get pinched become more brittle in the cold, so they deserve priority attention in the pre-winter inspection. Trailer gladhand seals should also be checked at every coupling; a seal that has gone stiff and frozen produces a steady leak.
Once a freeze has already happened, there is not much a driver can safely do on the spot. Open flame, direct heat from a torch and adding foreign chemicals to the lines all cause lasting damage to seal and hose material. Bringing the vehicle into an enclosed, warm space and letting it thaw naturally is both the safe route and, in practice, the fastest one. A freeze itself is not a component failure — it is proof that drain discipline was skipped.
Air Discipline Between Tractor and Trailer
In a tractor-trailer combination, the most fragile point in brake safety is the air connection between the two units. It gets coupled and uncoupled on every single trip, which means there is a fresh opportunity to get it wrong every single trip. The gladhands normally come as a pair, supply and control, distinguished by colour and shape. A gladhand that is coupled wrong or left loose can mean the trailer brakes never work at all, or that they lock up on their own out on the road.
Three things get confirmed at coupling: that the gladhands are fully seated and locked, that the seals are intact and clean, and that the hoses stay free during manoeuvring, without stretching or rubbing. Trailer braking is then tested separately: with the trailer park brake applied, a light pull at very low speed should not move the combination. The order of uncoupling also matters: chock the trailer first, then disconnect the air lines. Doing it the other way round leaves the trailer braked on its own reserve for a while, but that reserve eventually bleeds down, and a parked trailer can then roll.
Load Condition and Brake Balance
In an air brake system, braking force is adjusted for the load riding on each axle, a job handled by load-sensing valves or by the electronic braking system. Full pressure applied to an empty trailer locks the wheels; too little pressure applied to a loaded trailer lets the trailer push the tractor. Getting the load distributed correctly is therefore not just a cargo question, it is directly a brake question. When load bunches toward the front or rear, shifts to one side, or turns out heavier than declared, the system ends up working from the wrong assumption. Unexpected pulling, early lock-up, or a combination that feels like it is pushing the tractor should all be checked against load distribution first.
Fleet Periodic Brake Inspection Schedule
Driver checks are the daily line of defence; if brake safety stops there, slow-moving wear will still slip through. On the fleet side, a written schedule is needed that spells out who does what, and how often. The framework below should be adapted to the vehicle's duty cycle, load weight, route gradient and the manufacturer's maintenance plan.
| Check | Frequency | Who does it | Purpose |
|---|---|---|---|
| Cab and walk-around check | Before every trip | Driver | Catch visible leaks, damage and warnings |
| Pressure build-up and warning test | First start-up of the day | Driver | Catch leaks and confirm the warning circuit early |
| Tank draining | Daily in winter, weekly otherwise | Driver | Remove water, monitor the dryer |
| Park brake hold test | Weekly | Driver or fleet technician | Confirm the spring brake still holds full capacity |
| Brake chamber stroke measurement | At scheduled maintenance | Technician | Track maladjustment numerically over time |
| Lining, disc and drum measurement | At scheduled maintenance | Technician | Compare thickness and surface condition against limits |
| Air dryer cartridge replacement | At the manufacturer's interval, checked before winter | Workshop | Keep moisture control working |
| Line, hose and fitting inspection | At scheduled maintenance and before winter | Technician | Find chafing, cracking and loosening |
| Compressor output and oil-carryover check | When build-up time lengthens | Workshop | Assess capacity and sealing |
| ABS and EBS fault code read-out | At scheduled maintenance | Workshop | Catch intermittent faults before a lamp lights |
| Brake performance test | Annually, before inspection | Authorised test facility | Document per-axle force and imbalance |
| Findings and action log | Every intervention | Fleet management | Enable trend analysis |
What makes a schedule valuable is not how many line items it has, but the discipline of actually logging what is found. If chamber stroke gets measured and recorded at every service, an upward trend becomes visible by the third reading, well before any limit is crossed. In the same way, a weekly log of pressure build-up time can flag a tiring compressor months ahead. In a fleet that keeps no records, every failure is a surprise. In a fleet that does, most failures turn into a scheduled maintenance item instead.
Driver and Fleet Discipline for Air Brake Safety
Everything in this guide comes down to a handful of core habits. The list below is the minimum discipline that, applied in the cab and across the fleet, removes most air-brake-related incidents.
- Don't move before pressure is built. Moving the vehicle before the warning clears breaks the system's most basic rule.
- Learn the sounds. The governor cut-out, dryer purge and post-braking release are all normal; them disappearing or becoming continuous is the first warning.
- Never skip the leak test. Assuming there is no problem just because the tanks look full is the most common mistake.
- Don't pump the pedal. Repeated applications drain the reserve; brake with a single, deliberate application instead.
- Select the descent gear at the crest. Once speed builds, the option is gone.
- Use engine braking and the retarder as the primary means of slowing down. The service brake is a backup, not a system for continuous use.
- Never cool a brake group with water. Sudden cooling causes permanent damage; the correct method is to stop and wait.
- Drain the tanks. Daily in winter, regularly the rest of the year; the amount of water tells you how the dryer is doing.
- Use the park brake only on a stationary vehicle and never skip chocks on a slope.
- Check the trailer connection every single time: gladhands locked, seals intact, hoses free.
- Don't tamper with a spring brake chamber. The spring energy inside it can be fatal if dismantled by anyone unauthorised.
- Write down what you find. An observation only passed on verbally gets lost by the next shift; a written finding makes it into the maintenance plan.
Used correctly, the air brake system is one of the most reliable systems on a heavy commercial vehicle: it warns itself, secures itself, and announces its faults not silently but through sound and the gauge. Learning to read that language is the driver's and the fleet's responsibility. When a vehicle ends up in the workshop for a brake problem, it is usually not because a part reached the end of its service life, but because warnings were ignored for days beforehand. The order stays the same: first confirm the system is ready, then listen for what shows up on the road, then stop at the right time and in the right place. In every case, the current OE service documentation for the vehicle's engine and chassis code takes precedence over the general benchmarks given here.
How does an air brake system work?
An air brake system uses compressed air instead of hydraulic fluid to transmit the driver's braking demand. The engine-driven compressor charges the reservoirs; a governor stops charging at the upper pressure limit and restarts it when pressure falls. Between compressor and reservoirs, an air dryer removes moisture and oil so the valves downstream stay dry. When the driver presses the pedal, the foot brake valve meters air to relay valves, which admit reservoir air directly into the brake chambers. Each chamber converts that pressure into a push-rod force that applies the caliper or the S-cam drum brake. Spring brakes work the opposite way: a powerful spring applies the park brake, and air is needed to hold it released — so a loss of pressure applies the brakes rather than releasing them.
What is an air brake test and why is it required?
An air brake test is a standard pre-trip sequence that proves the system holds pressure, warns on loss, and applies the spring brakes before pressure becomes unsafe. Its stages check build-up time to the governor cut-out, leak-down rate with the engine stopped and the brakes applied and released, the point at which the low-pressure warning activates, and the point at which the spring brakes set themselves. In commercial driver testing the sequence is examined because it is the only way a driver can confirm, without tools, that the safety chain is intact. Exact pressure limits and permitted leak-down rates are set by the vehicle's OE documentation and the applicable national regulation.
| Component | Function | Typical failure sign |
|---|---|---|
| Compressor | Charges the system with compressed air | Slow pressure build-up; oil carry-over downstream |
| Governor | Stops and restarts charging at set limits | Compressor never unloads, or cuts out too early |
| Air dryer | Removes moisture and oil before the reservoirs | Water in the tanks; icing in cold weather |
| Multi-circuit protection valve | Splits supply into independent circuits | One leak drains the whole system |
| Foot brake valve | Meters driver demand into the service circuits | Delayed or uneven brake application |
| Relay valve | Speeds application by admitting reservoir air locally | Slow release; brakes drag after the pedal returns |
| Brake chamber | Converts air pressure into push-rod force | Audible leak; long push-rod stroke |
| Spring brake | Applies the park brake mechanically | Will not release; applies while driving |
| ABS modulator | Prevents wheel lock during braking | ABS lamp stays on; wheel locks under braking |
Shop this part: Brake System
In-depth technical guide: For fault diagnosis, step-by-step replacement and service intervals: Four-Circuit Protection Valve: Faults, Diagnosis & Replacement
Tags
Frequently Asked Questions
- How does an air brake system work?
- The system works in a four-stage chain. An engine-driven compressor compresses air, an air dryer removes moisture, the conditioned air is stored in tanks split across independent circuits, and pressing the pedal moves the foot brake valve, which sends that air out to the circuits in proportion to pedal position. Relay valves boost the signal on its way to the brake chambers; the diaphragm inside each chamber turns pressure into push force, which works the shoes through the slack adjuster and S-cam on a drum brake, or the pads through the caliper on a disc brake. Releasing the pedal vents the line air quickly, and that is the release sound you hear right after braking.
- What is the basic difference between air brakes and hydraulic brakes?
- In a hydraulic system, the energy that does the work is the driver's foot force, boosted by a servo. In an air system, the pedal produces no force at all; it only controls how much of the already-stored compressed air is let into the circuit. That difference has three practical results: the vehicle has to wait for pressure to build before it can move, braking severity tracks how far the pedal travels rather than how hard it is pressed, and pushing harder once the valve is fully open adds nothing. The park brake also works in reverse, applied by releasing air rather than by adding it.
- Why shouldn't you drive off before air pressure builds up?
- The first minutes after start-up are the system building itself up. While the low-pressure warning is lit, the reserve needed for safe braking is not there yet. Moving off before the warning clears risks running the reserve dry on the first hard stop, with the spring-applied park brakes engaging themselves in the middle of traffic. Build-up time varies by vehicle, but what matters is the vehicle's own normal, not an absolute number; a noticeable stretching of that time is the earliest sign of a growing leak or falling compressor output.
- What does a pre-trip air brake inspection involve?
- The vehicle is chocked and parked with the brake applied while the engine starts, and pressure build-up and the governor cut-out are timed. The engine is then shut off to watch for a static leak with the brake released, and the same check is repeated with the foot brake held to check for a leak on the applied side. Pressure is then bled down gradually to confirm the low-pressure warning fires at the correct threshold, and further to confirm the park brakes apply automatically. Service brake and park brake hold tests follow at low speed, then a walk-around checks chambers, push rods, hoses, fittings, discs and linings, the tanks are drained, and every finding is logged.
- How do you tell if there's an air leak in the brake system?
- The most reliable method is the leak test: with the engine off and the brake released, pressure should stay nearly flat; with the brake applied, only a small, self-limiting drop should occur. A drop that keeps going is a leak. On the road, the signs are a compressor that runs more often and longer than usual, pressure that never reaches full, build-up time that stretches out, and a continuous hiss at idle. Stopping the vehicle in a quiet spot with the engine off usually lets you hear the leak directly; a sound from the trailer gladhands points to a seal, from a hose to chafing or a crack, and from around a chamber to the diaphragm or a fitting.
- What should a driver do if air pressure drops on the road?
- The air that is left is finite, and every brake application spends from that same reserve, so the goal is to reach a safe point using as little braking as possible. Lift off the throttle and bring in the engine brake and retarder, since neither spends air. Switch on the hazard flashers, move to the right lane, and brake with a single, controlled application to the nearest safe point that will not block traffic. Once stopped, apply the park brake, chock the wheels, set out a warning triangle and call for help. Pumping the pedal burns through the reserve fastest of all, and trying to push on to reach a workshop is what causes the park brakes to apply at the worst possible spot.
- How should the brakes be used on a long descent?
- On a descent, speed control is primarily the job of engine braking and the retarder, not the service brake, because they dissipate energy without loading the brake groups and can be used indefinitely. The gear is selected at the crest, before the vehicle picks up speed, and the general rule is the same gear used to climb the grade, or one lower. The service brake is then used with deliberate, intermittent applications rather than light, constant pressure: apply firmly once speed drifts above the target, release fully once it drops below, and let the groups cool in between. On slippery surfaces, drop the retarder setting.
- Should you pour water on overheated brakes?
- No. Pouring water on a hot drum or disc causes sudden cooling that warps and cracks the metal, and can leave the part permanently unusable. The correct approach is to stop the vehicle on flat, safe ground and let the brake groups cool on their own. Using chocks rather than immediately applying the park brake during that cool-down keeps a still-hot group from locking up tight. A burning smell, heat around the rim and reduced braking effect are the signs of overheating; if the heat is concentrated at a single wheel, look for a brake that is not fully releasing or a sticking slack adjuster.
- Why does water collect in the air tank, and how often should it be drained?
- The air drawn from the atmosphere always carries moisture. That moisture stays suspended during compression and then condenses into water at the bottom of the tanks as the system cools. In summer it drives corrosion and valve wear; in winter it freezes, narrowing lines and locking valves. The air dryer captures most of it, but its cartridge has a limited life and stops working with no warning once saturated, which is why tank draining is essential regardless. It should be done daily in winter and regularly the rest of the year. Draining doubles as a diagnostic: the amount of water reflects the dryer's condition, and an oily discharge means the compressor is carrying oil.
- How does the park brake work in an air brake system, and when should it be used?
- The park brake runs on a spring-applied chamber. A powerful internal spring is constantly trying to apply the brakes; system air compresses that spring and holds the brakes off. Moving the cab control to the park position dumps air from the chamber and lets the spring apply the brakes, and the same thing happens automatically if pressure falls below a critical threshold, which is why a vehicle that runs out of air stops rather than losing its brakes. Because it has no modulation, the park brake is only for a stationary vehicle; applying it while moving grabs hard and fully, and jackknife risk rises sharply in a trailer combination. It can be used as a last resort if the service brake is lost completely, and chocks are essential on a slope or with a heavy load.
Related Articles
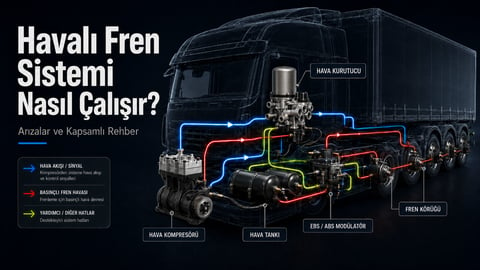
AIR BRAKE SYSTEMS IN HEAVY COMMERCIAL VEHICLES: WORKING PRINCIPLE, COMPONENT GLOSSARY AND COMPREHENSIVE FAULT-FINDING GUIDE
Air brakes on heavy commercial vehicles stage by stage: compression, drying, four-circuit storage and wheel actuation, plus a component glossary and fault guide.

What Is Brake Fade? Long-Descent Braking Strategy
What causes brake fade, and how do you use the engine brake, exhaust brake, and retarder on a long descent? A heat management guide for heavy trucks.
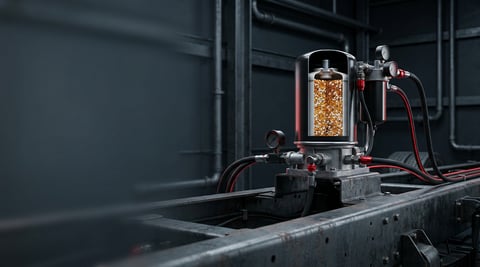
Air Dryer: Faults, Replacement & Maintenance Guide
How a truck air dryer's charge and purge cycle keeps moisture and oil out of the brake system, and what a hissing purge valve or water in the tanks means.


