Winter Air Brake Care: Freeze-Up and Moisture Guide
Winter care for truck and trailer air brakes: where moisture enters and collects, which symptoms mean freeze-up, and how to drain and clear it in the field.
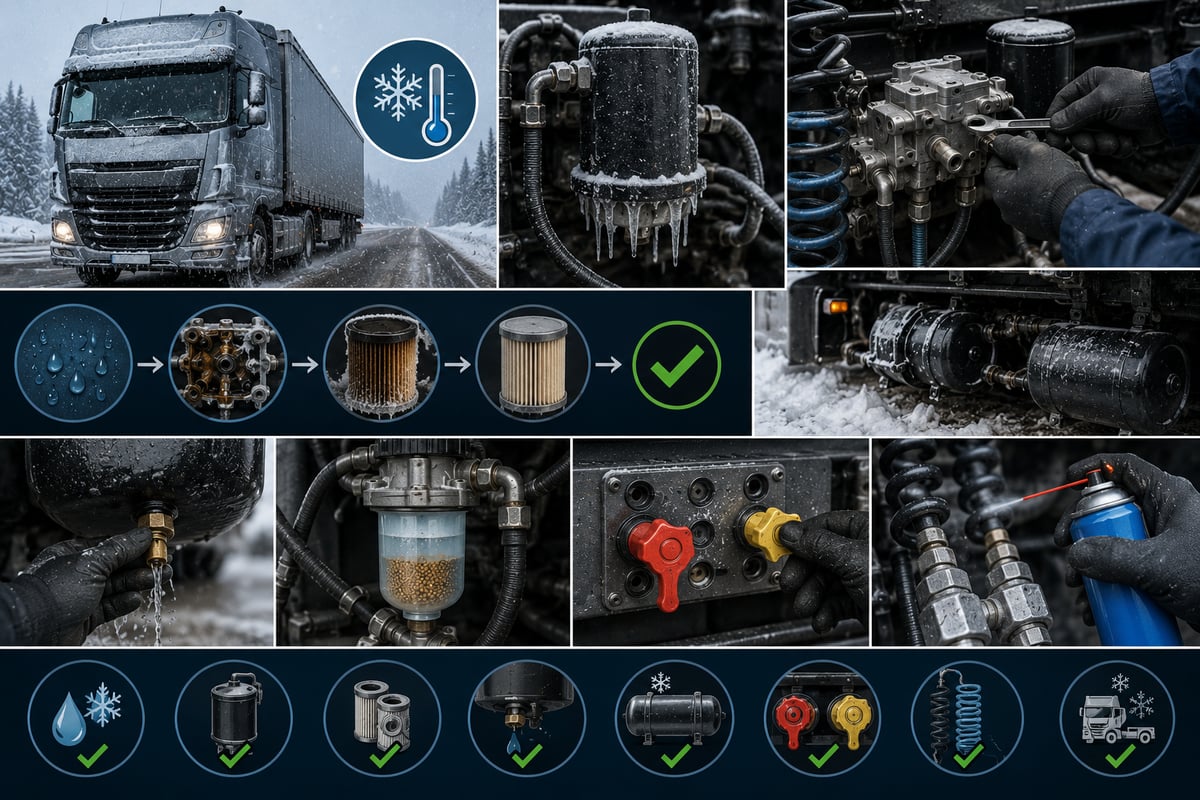
On a December morning, a tractor unit parked overnight answers the starter right away but refuses to move. The pressure gauge reads normal, the parking brake lever is released, yet the wheels stay locked. Half an hour later, once the engine has warmed up, the truck frees itself and gives no trouble for the rest of the day. The driver shrugs it off as "the cold acting up." In fact, the system said something quite specific that morning: moisture that had been building up unnoticed for months finally showed where it collects once the temperature drops. Most winter failures in air brake systems are not born in winter at all — they are moisture that accumulated quietly all year becoming visible in the cold. This guide does not cover general brake maintenance; it focuses only on cold-weather behaviour, the journey moisture takes through the system, and how to prepare for winter.
What Actually Changes in an Air Brake System When Temperatures Drop?
An air brake system is an energy chain: it draws in atmospheric air, compresses and stores it, then converts that stored pressure into mechanical clamping force. The operating principle is identical in summer and winter; what changes is the physical state of the water the air is carrying. Above freezing, that water simply sits at the bottom of the system as a harmless-looking liquid and, over the long term, causes corrosion. Below freezing, the same water becomes a solid that seals off millimetre-wide passages, glues valve pistons into their bores, and blocks the transmission of a control signal.
The outcome can be summed up in one line: winter does not create a new fault in an air brake system — it turns existing moisture into a brake-performance problem. The overall operating principle, circuit layout and year-round maintenance points are covered in our guide to air brake systems, working principle and maintenance; this guide deals only with the behaviour that changes once temperatures fall.
Cold produces four effects at once, which is exactly why it is hard to diagnose. First, cooler air can hold less moisture and drops what it cannot carry inside the system. Second, rubber seals, diaphragms and bellows stiffen; a stiffened seal cannot maintain the same seal quality, so micro-leaks that were invisible before become noticeable. Third, compressor oil and valve grease lose fluidity, so moving parts run under higher friction. Fourth, the compressor stays under load longer; growing leaks and extra air consumers make it cycle more often, which pushes more hot, moist air into the system.
The last point is winter's most insidious feedback loop: more leaks mean more compressor running time, more running time means more moisture entering the system, more moisture creates new freeze points, and new freeze points create fresh leaks and blockages. The purpose of winter preparation is to break this loop before it starts.
Where Does Moisture Get Into the Air Brake System? The Basic Physics of Condensation
The source of the water in the system is no mystery: the water vapour already present in the atmospheric air the compressor draws in. Air can hold a certain amount of water vapour depending on its temperature; the temperature at which it is holding the maximum it can is called the dew point. Once the temperature drops below the dew point, the excess moisture can no longer stay as vapour and turns into liquid droplets. In an air brake system, this happens twice, for two different reasons.
The first condensation happens immediately after compression. As the compressor compresses the air, both its pressure and temperature rise; because the compressed air occupies a smaller volume, its moisture concentrates and the dew point shifts upward along with the pressure. As long as the air leaving the compressor is still hot, the moisture stays as vapour, but as it travels down the discharge line and cools, it leaves droplets on the first cold surface it meets. That is why the compressor discharge line is the single wettest point in the whole system.
The second condensation happens while the vehicle is parked. Air loaded into the tanks during the day cools overnight and drops part of its moisture onto the tank wall; this is why draining after an overnight park routinely brings out more water than draining during the day. The wider the gap between day and night temperature in winter, the more this condensation adds up.
Operating conditions decide how much moisture is involved. Humid climates, coastal routes and driving straight after a wash all generate more water. Frequent stop-start city work and site duty keep the compressor on load a larger share of the time. Extra consumers such as air suspension, air-operated doors and tipper controls draw far more air out of the same system — and every extra litre of air drawn is a fresh dose of moisture entering.
This leads to the core idea behind winter preparation: it is not possible to stop moisture entering the system, because moisture arrives together with the air itself. What can be done is to capture it before it spreads through the system, remove by regular draining what cannot be captured, and intercept what remains before it has a chance to freeze rather than dealing with it afterwards.
Where Does Moisture Collect in the System? Cold Surfaces and Low Points
Water does not spread randomly through the system. It follows two simple rules: it condenses where it cools, and it collects where gravity carries it. Put these two rules together and the map of likely freeze points can largely be predicted in advance. The table below summarises the areas where moisture most often collects in a heavy commercial vehicle's air system and how each behaves in winter.
| Area | Why moisture collects there | Result in cold weather |
|---|---|---|
| Compressor discharge line | Hot, moist air cools here for the first time | Ring of ice on the inner wall, narrowing the flow path |
| Dryer inlet and housing | Separated water collects in the housing before being purged | If the purge valve freezes, water stays behind and the cartridge saturates |
| Wet tank (first air tank) | The largest water-collection volume in the system | Ice layer at the bottom, frozen drain cock |
| Lower section of circuit tanks | Gravity carries water to the bottom of the tank | Automatic drain valve freezes, drainage stops |
| Low points and U-bends in lines | Water collects at the lowest point of a line's slope | Line blockage, that circuit builds pressure late |
| Around the four-circuit protection valve | Small volumes and dead spots at circuit transitions | One circuit fails to fill, warning light stays on |
| Brake valve and relay valve bodies | Residual moisture in the control line stays inside the housing | Sticking piston, brake that releases or applies late |
| Spring brake (parking brake) line | Control pressure travels through a low-volume line | Parking brake fails to release, or releases late |
| Trailer coupling heads and coiled hoses | The connection point is exposed to the outside — snow and mud get in | Coupling seal freezes, trailer brakes stop working |
The order of the table is itself a diagnostic tool. If the problem sits before the first tank, symptoms show up across the whole vehicle; if it sits in one circuit, symptoms show up only on that circuit's axle. If the front brakes are normal but the rears release late, the freeze point is most likely that circuit's relay valve or line. If the tractor is fine but the trailer brakes are dragging, the search should start at the coupling heads.
Signs of Air Brake Freeze-Up in Cold Weather: What Is the System Telling You?
Freezing behaves differently from a mechanical failure: the part itself is not broken, only temporarily blocked. That is why the symptoms come and go with temperature. A symptom that is present in the morning cold and gone by afternoon is, almost without exception, a sign of freeze-up. The same symptom persisting on a warm day points to a mechanical fault instead — that is the first distinction to make in the field.
The most common symptoms and the mechanisms behind them are as follows. Slow pressure buildup points to a partial ice restriction between the compressor outlet and the dryer: the compressor runs, the gauge climbs slowly, and the system stays under load for a long time. Late brake release — the vehicle keeps dragging after the pedal is lifted — suggests the exhaust path in the control line or relay valve is partly blocked with ice: air can get in but cannot get back out. A parking brake that will not release points to an ice plug in the spring brake control line: air cannot reach the chamber, so the spring force is never relieved. A circuit that never fills at all means a full blockage at the four-circuit protection valve or at that circuit's inlet.
Two less obvious but genuinely dangerous symptoms complete the list. The first is one-sided brake grab: one wheel on an axle brakes normally while the other applies late, and the vehicle pulls to one side under braking. The second is an intermittently flickering warning light, caused by a frozen drain or a partly closed passage that keeps pressure hovering around the threshold. In both cases the vehicle should not be driven — both mean the brake balance has been lost.
Which valve does which job, and which failure symptom points to which valve, is covered in more detail in our guide to truck air brake valves — types, functions and typical fault tables. In a winter diagnosis, knowing the valve layout makes it much easier to guess where the ice has settled.
Symptom, Likely Freeze Point, and Field Response
The table below brings together the most common symptoms on cold mornings, the area each one points to, the temporary field response that can safely be applied, and the permanent fix needed to stop it recurring. The field responses in the table are not meant to get the vehicle moving — they are meant to confirm the fault and get the vehicle to a workshop safely.
| Symptom | Likely freeze point | What to do in the field | Permanent fix |
|---|---|---|---|
| Pressure builds very slowly | Compressor discharge line or dryer inlet | Let the engine idle, observe the line without forcing heat on it, check for leaks | Clean the discharge line, inspect the dryer and cartridge, correct the line's routing |
| Brake pedal releases late | Relay valve exhaust path or control line | Chock the vehicle, build to full pressure, apply the brake repeatedly and observe | Strip and clean or renew the valve, eliminate the water source in the line |
| Parking brake won't release | Spring brake control line or hand brake valve | Chock the vehicle securely, wait for it to release in a heated enclosed area if possible | Locate the low point in the line, review the drain and drying chain |
| One circuit never fills, warning stays on | Four-circuit protection valve or circuit inlet | Do not move the vehicle, record pressure in the other circuits | Check the protection valve, fully dry the affected circuit |
| Air comes from the drain, no water | Drain cock or automatic drain valve frozen shut | Do not force the drain, try again once the system has thawed | Renew the drain valve, consider a heated type if needed |
| Trailer brakes don't work or won't release | Coupling heads, coiled hose, trailer relay valve | Disconnect the couplings, check seals and clear away snow and ice | Renew coupling seals, keep dust caps fitted, add the trailer line to the drain schedule |
| Vehicle pulls to one side under braking | Line to one wheel or the ABS modulator | Do not take the vehicle out, compare the response on both sides | Clean the relevant line and modulator, fully dry the system |
| Compressor stays on load, won't unload | Dryer purge line or pressure regulator | Avoid prolonged running because of overheating risk | Check the regulator and the dryer's purge path |
| Symptom every morning, gone by afternoon | System-wide moisture buildup | Keep a daily drain log, note the volume of water | Renew the dryer cartridge and apply a full draining programme |
The last row of the table is the most important one. A freeze-up that repeats at a single point is a local defect at that point; a freeze-up that rotates between different points tells you the whole system has a moisture problem. In the second case, replacing valves one by one is a waste of time — the fix is to go back to the dryer and to drain discipline.
How Does the Air Dryer Behave in Winter? The Limits of the Cartridge
The air dryer is the only active component responsible for capturing moisture entering the system, and it is what decides how well the system copes in winter. Its logic is straightforward: moist air from the compressor passes through the desiccant material inside the cartridge and loses its moisture there, and dry air continues on to the tanks. When the compressor switches to unloading, the moisture held in the cartridge is purged out along with the returning dry air. In other words, the dryer does not destroy the water — it captures it and releases it at regular intervals.
This cycle breaks down in three ways in winter. Cartridge saturation: a cartridge past its service life cannot hold moisture any more, and what it fails to hold passes straight through to the tanks, where it freezes. Blocked purge path: the cartridge holds the moisture but cannot discharge it, so it keeps working while already saturated. Frozen purge outlet: moisture that collects in the muffled outlet open to the atmosphere freezes and blocks the path — this produces the same result even on a vehicle with a perfectly sound dryer.
It is worth remembering that cartridge life is used up by the volume of air processed, not by mileage. A vehicle that covers few kilometres but consumes a lot of air can wear out a cartridge faster than a long-haul tractor. Urban delivery trucks, air-door buses, tippers and trailers with air suspension all fall into this group. Cartridge selection, how to judge service life, and expected winter behaviour are covered in more detail in our guide to air dryer cartridges and moisture management; knowing the cartridge's age alone prevents a large share of winter faults.
Pre-winter dryer inspection comes down to answering three questions. When was the cartridge last changed, and how much air has the vehicle processed since then? Is there an audible burst of air from the dryer purge when the compressor switches to unloading? Does water come out when the first tank is drained? If the answer to the third question is yes, the dryer is not doing its job, and the system needs attention regardless of cartridge age.
Standards and further reading
This subject is governed by the equipment rules for air-braked commercial vehicles. In the United States the federal air brake standard, FMVSS 121 (49 CFR 571.121) defines the reservoirs, protection and timing a compliant system must provide, and Europe applies the equivalent limits of UNECE Regulation No. 13. For further detail, see the illustrated reference guide at airbrakecompressor.com. Always confirm specific figures against the current regulation and the vehicle manufacturer service data.
Inspection practice differs by country. In the United Kingdom the defect definitions and the pass or fail criteria for heavy goods vehicles are set out in the DVSA HGV inspection manual; in South Africa the underlying instrument is the National Road Traffic Act 93 of 1996.
Tank Draining Discipline and Automatic Drain Valves
Even on a vehicle with a properly working dryer, moisture still builds up in the tanks; a dryer is not an absolute barrier, it is a filter whose efficiency changes over time. Tank draining is therefore the highest-return job of the whole winter routine: it takes a few minutes, needs no equipment, and removes most of the water directly.
Draining should follow a set order. First, let the system build to full pressure, because what makes draining effective is the velocity of the air rushing out. Then start with the first tank — the wet tank closest to the compressor — and work through the other circuit tanks in turn. Watch what comes out of each tank: clear water, an oily foam, or a dark emulsion each point to a different problem. Clear water is normal moisture buildup; an oily or greyish emulsion means the compressor is passing oil and the dryer cartridge may be saturated with it — that calls for a separate inspection.
There is no single correct draining interval; the right frequency is set by how much water actually comes out. The method is simple: drain daily for several days in a row and log the volume each time. If almost no water comes out, the interval can be stretched; if a noticeable amount comes out every time, shorten the interval and look at the dryer side. This measurement should be taken in autumn, because measuring after the first frost is already too late.
Automatic drain valves take this job out of the driver's hands, discharging the water sitting at the bottom of the tank on every unloading cycle or under set conditions. They need attention at two points in winter. First, the valve outlet can be blocked by road grime and ice; a blocked valve simply stops working, and no one notices. Second, having an automatic drain should not be treated as a reason to skip manual checks — it should be verified by hand a few times over the winter to confirm it is genuinely doing its job. On vehicles with heated drain valves, the heater circuit's fuse and connection should be checked before winter.
Antifreeze and Alcohol-Based Additives: Why They Need Caution
The oldest way to stop freezing is to inject an alcohol-based substance into the airflow to lower the freezing point of the water inside the system. Purpose-built alcohol evaporator units have been used for decades and are still fitted to some vehicles. But this is not as simple as "add some additive and the problem goes away" — used incorrectly, it can damage the system permanently rather than protect it.
The first and most important rule: on a system fitted with an air dryer, an alcohol-based additive must not be used unless the manufacturer explicitly approves it. Alcohol can affect the moisture-absorbing desiccant in the cartridge and reduce its holding capacity. The result is that, while trying to prevent freezing, you disable the dryer instead — damage that may go unnoticed for a year and come back far worse the following winter.
The second rule concerns material compatibility. The seals, diaphragms, O-rings and hoses in the system are made from specific rubber compounds and are not resistant to every fluid. An unsuitable alcohol, or a general-purpose antifreeze, can swell rubber, harden it, or strip its lubricant, leaving moving parts inside a valve to run dry. Coolant antifreeze made for the engine's cooling system does not belong in the air system — the two systems use different materials and operate under different conditions.
The third rule concerns quantity, and this is not a place to guess. The correct additive type, mixing ratio and injection point are set by the product and procedure the vehicle manufacturer approves. Quoting a general ratio can be both unnecessary and hazardous across different systems at once.
Pre-Winter Preparation: A Step-by-Step Checklist
Winter preparation is a job that takes a few hours when done before the first frost; done after the first frost, it turns into fault-chasing. The sequence below is a practical programme that can be applied to heavy commercial vehicles ahead of the cold season. Each step stands on its own, but keeping the order matters, because each step affects the outcome of the next one.
- Run a leak check. With the engine off and the system at full pressure, watch the pressure drop over a set period; then repeat the measurement with the brake applied. Any leak that will grow in the cold adds to the compressor's load and to the moisture entering the system. Check the acceptable limits in the vehicle's OE service manual.
- Fully drain every tank and examine the fluid. Note the volume, colour and consistency. If an oily emulsion appears, inspect the compressor and dryer side separately.
- Confirm the air dryer cartridge's age and that it is working. Find the last change date from the records, listen for the purge sound, and inspect the purge outlet visually. Renew before winter if in doubt.
- Manually trigger the automatic drain valves to test them. A valve that is not working or is blocked stays silently disabled all winter. On heated types, also check the heater supply circuit.
- Inspect the compressor and the discharge line. Check the discharge pipe for dents, cracks or an incorrect gradient — an incorrect gradient lets water flow back and collect at a low point. Check belt tension and any sign of oil leakage.
- Check lines and hoses for gradient, chafing and stiffness. Aged, hardened hose cracks in the cold. Sagging lines that form U-bends create water pockets and should be corrected where possible.
- Renew or clean coupling heads, seals and dust caps. The trailer connection is the point that gets dirtiest and freezes most often in winter; without a cap fitted, the connection picks up snow, salt and mud.
- Review the brake mechanisms and their adjustment. Check automatic slack adjusters, chamber stroke and lining condition. A frozen mechanism causes far more trouble in a poorly adjusted system.
- Add auxiliary equipment lines to the programme. Air suspension, air doors, tipper and cab suspension lines also carry moisture and belong on the winter checklist.
- Log everything in the vehicle file. Cartridge change date, volume of water drained, and leak-test results. This record turns next winter's preparation into something based on data instead of guesswork.
The Driver's First Ten Minutes on a Cold Morning
Winter preparation ends in the workshop, but winter safety is in the driver's hands every single morning. What to do on a cold morning is a short, fixed sequence, and none of it needs special equipment.
Start the engine and do not move the vehicle until the system has built to full pressure. Pressure taking longer than normal to build is the first thing worth noting. Next, check whether the parking brake releases normally; if there is resistance, do not force it. Then, in a clear, open area, apply and release the brakes a few times at low speed; the response should be equal on both sides. These three checks will reveal a frozen system before the vehicle is even moving.
Two winter-specific habits should be added to this. First, avoid hard braking for the first few kilometres; cold linings and cold drums can respond differently than expected on the first few applications, and the risk of wheel lock-up is higher on icy or snowy surfaces. Second, visually check the trailer coupling and kingpin before setting off; a coupling seal that has frozen overnight can cause the trailer brakes to apply late.
On the road, two symptoms mean the vehicle should be stopped: a brake that fails to release after being lifted, and a vehicle that pulls noticeably to one side under braking. Both indicate the brake balance has been lost; continuing on the assumption that it will warm up can push lining and drum temperature to a dangerous level.
Precautions While Parked and Overnight
Most freeze-ups happen while the vehicle is parked, not while it is running, because that is when the system goes through its longest cooling period. A handful of things done in the evening change the whole picture the following morning.
The single most effective step before parking is draining the tanks at the end of the day. That is exactly the moment when the moisture that entered during the day has settled at the bottom of the tank; taking it out while it is still liquid, rather than letting it freeze overnight, is the simplest fix. Draining a warm vehicle is far easier than fighting a frozen drain cock.
The second precaution concerns use of the parking brake. A spring-brake parking brake engages under spring force once the air is released, and is normally the safe choice. However, if the lining is wet and dirty and the temperature then drops sharply, the lining can freeze onto the drum or disc surface. After a wash or heavy mud work, driving a short distance to dry the brake surfaces before parking is worthwhile. Where necessary and where the manufacturer allows it, wheel chocks on level ground add extra safety.
The third precaution is choosing where to park and closing off connections. A wind-sheltered spot should be preferred where possible; if the trailer is being uncoupled, the coupling dust caps must always be fitted, because an open coupling head fills with snow and ice overnight.
Trailer and Coupling Lines: Winter's Weakest Link
On the tractor side, air travels largely through protected lines between the cab and the chassis. On the trailer side, the picture is different: air passes through coiled hoses sitting in the open gap between the two units and through coupling heads that are fully exposed to the outside. This transition point is the most vulnerable part of the system in winter.
There are three sources of trouble here. The coupling heads themselves: a coupling with an aged or dirty seal both leaks and freezes. The position of the coiled hoses: a hose that sags, sits in the spray from a wheel, or rubs against a sharp edge is quickly damaged. And the trailer's own air system: the trailer has its own tank, relay valve and park valve, and draining these is often forgotten.
The common mistake on the trailer side is that the draining programme only covers the tractor. Meanwhile, a trailer tank that is never drained while the tractor is drained regularly becomes a shared source of moisture and causes problems on the tractor side too. Trailers should be treated as separate vehicles in the winter programme.
There is a simple rule for coupling heads: every coupling that is disconnected gets capped. An uncapped coupling head picks up snow, salt water and mud in just a few hours; that mixture enters the system the moment it is connected and travels all the way to the valves. A dust cap is the cheapest winter precaution there is. Before connecting, the seal face on both ends should be clean and dry.
Winter Inspection Frequency and General Reference Intervals
The table below summarises how often winter checks should be carried out and what to look for. The intervals given are general reference points; for exact schedules, the vehicle's OE service manual and the fleet's own operating conditions are the authority.
| Check | Recommended frequency | What to look for |
|---|---|---|
| Tank draining | Set by the volume of water that comes out, shortened in winter | Volume, colour and consistency of the fluid |
| Pressure buildup observation | Every cold morning, before moving off | Longer-than-normal buildup is a sign of partial blockage |
| Parking brake release check | Every cold morning | Resistance, delay, one-sided release |
| Coupling head and seal check | Every trailer connection | Snow, ice, mud, seal condition and dust cap |
| Automatic drain valve verification | A few manual tests over the course of winter | Whether the valve is actually discharging water |
| Leak test | Before winter and mid-season | Rate of pressure drop, compared against OE limits |
| Dryer cartridge condition | Before winter, based on service record | Last change date, air volume processed, purge sound |
| Hose and line inspection | Before winter and mid-season | Stiffening, cracking, chafe marks, sag and water pockets |
| Trailer air tank draining | Same schedule as the tractor | Water collected in the trailer tank |
| System operating pressure | Periodic check | Roughly in the 8-12 bar range for heavy commercial vehicles; exact value is set by the OE manual |
| Freezing point of water | Fixed physical threshold | Pure water freezes at 0°C; water inside the system solidifies below this threshold |
The last two rows are deliberately placed together. System pressure is a design value that varies by manufacturer; the freezing point of water does not change. The entire logic of winter preparation is to accept that this threshold will be crossed somewhere in the system, and to remove the water before it gets there.
Making Winter Preparation Permanent: Records, Training and Fleet Discipline
Winter preparation is not a one-off task; it is a routine that gets repeated and recorded. Preparation with no record starts from zero every year — which cartridge was changed and when, how much water came out of which vehicle, and which symptom repeated on which vehicle all get forgotten. Yet these three pieces of data are enough to predict which vehicles in a fleet carry winter risk.
The record can be simple: cartridge change date, the volume of water from the autumn drains, the leak-test result, and the date and symptom of any freeze-up. These records start to mean something in the second year: if the same vehicle shows the same symptom every winter, the problem is not the season — it is a defect specific to that vehicle.
Driver discipline matters just as much as workshop discipline. Draining at the end of the day, capping the coupling heads, watching the pressure buildup time each morning, and not moving a vehicle with a suspect symptom all require no equipment — they are habits. Building these four habits is the single biggest factor in reducing winter breakdowns.
Finally, every fault that appears in winter is a diagnostic opportunity. A frozen parking brake points to the low point in a line; a circuit that fills late flags the condition of that circuit's protection valve; a symptom that is there in the morning and gone by afternoon is a direct measure of how much moisture has built up in the system. These signs arrive with the cold and disappear by spring; noted down before they disappear, they make next winter's preparation far easier. In every case, the current OE service documentation for the vehicle's make, model and chassis code remains the authority for inspection intervals, approved products and acceptance limits.
A plan that keeps the draining habit alive all year turns winter preparation into part of a routine; our preventive brake maintenance schedule and checklist guide sets that plan out item by item.
To see how the dryer families differ and what to look at when choosing a cartridge, our guide to the heavy-duty truck air dryer and cartridge replacement covers the subject family by family.
Shop this part: Brake System
Tags
Frequently Asked Questions
- Where does water get into an air brake system?
- The only source of water is the water vapour already present in the atmospheric air the compressor draws in. Compressing the air shrinks its volume, which concentrates the moisture, and as the air cools that excess moisture turns into liquid droplets. That is why the most water forms in the compressor discharge line and in the first tank right after it. A second round of condensation happens while the vehicle is parked: air loaded into the tank during the day cools overnight and drops its moisture onto the tank wall. Humid climates, stop-start work and extra air consumers such as air suspension all increase the total moisture entering the system.
- What are the signs of air brake freeze-up in cold weather?
- The most common signs are pressure building much more slowly than normal, the brake releasing late after the pedal is lifted, the parking brake failing to release, one circuit never filling, and the warning light staying on. Two more dangerous signs are the vehicle pulling to one side under braking and the warning light flickering on and off. The key test: if the symptom appears in the cold of the morning and disappears once the day warms up, it is almost always freeze-up; if it persists on a warm day too, look for a mechanical fault instead.
- How often should air tanks be drained in winter?
- There is no single correct number; the right frequency is set by how much water actually comes out. Drain daily for a few days in a row and log the volume. If a noticeable amount comes out every time, shorten the interval and check the dryer side; if almost nothing comes out, the interval can be stretched. This measurement should be done in autumn, before the first frost. Always drain with the system at full pressure, starting with the first tank closest to the compressor. The exact interval is set by the vehicle's OE service manual.
- What should I do if the parking brake won't release on a cold morning?
- This usually points to an ice plug in the spring brake control line, or to frozen brake surfaces. Do not force the vehicle to move — in a partly released system, the brake can apply on one side and not the other. Chock the vehicle on level ground, build the system to full pressure, and, if possible, let it thaw in a heated, enclosed area. If it keeps happening, the permanent fix is finding the low point in the line and reviewing the draining and drying routine.
- Can air tanks still collect water even with a working air dryer fitted?
- Yes. A dryer is not an absolute barrier — it is a filter whose efficiency drops over time; a cartridge past its service life cannot hold moisture, and what it fails to hold passes straight to the tanks. On top of that, the dryer's purge path can get blocked, or its outlet to the atmosphere can freeze shut, and in either case the dryer keeps running while already saturated. That is why tank draining should never be skipped even on a vehicle with a dryer. If water keeps coming out of the first tank, the system needs attention regardless of the cartridge's age.
- Can antifreeze or alcohol-based additives be used in an air brake system?
- On a system fitted with an air dryer, an alcohol-based additive should not be used unless the vehicle manufacturer explicitly approves it — alcohol can affect the desiccant in the cartridge and leave the dryer unable to do its job. Coolant antifreeze made for the engine's cooling system does not belong in the air system either, since the two systems use different materials. Unsuitable fluids swell, harden or strip the lubricant from rubber seals and diaphragms. If an additive is genuinely needed, use only the product the manufacturer approves for the air brake system, applied exactly by its procedure.
- Why does the brake pedal release late?
- If the vehicle keeps dragging after the pedal is lifted, the exhaust path in the control line or relay valve is likely partly blocked: air can get in but cannot get back out. In winter the most common cause is an ice plug at that point. If the symptom disappears once the day warms up, it is freeze-up; if it persists in warm weather, a sticking mechanical part or an aged seal inside the valve is the more likely suspect. Either way, the vehicle should be checked before it is driven — a brake that releases late overheats the lining and drum.
- What checks should be done on an air brake system before winter?
- A set sequence works best: a leak check, a full drain of every tank with the fluid examined, confirming the age and function of the air dryer cartridge, manually testing the automatic drain valves, inspecting the compressor and discharge line, checking hoses for sag and stiffness, renewing coupling heads and seals, reviewing the brake mechanisms and their adjustment, and adding auxiliary equipment lines to the programme. The final step is logging everything done in the vehicle's file.
- Why do trailer and coupling lines cause more problems in winter?
- Air on the tractor side travels largely through protected lines, while on the trailer side it passes through coiled hoses sitting in the open gap between the units and through coupling heads that are fully exposed. A coupling head picks up snow, salt water and mud; an aged seal both leaks and freezes. The trailer also has its own tank, relay valve and park valve, and draining these is often forgotten. Trailers should be treated as separate vehicles in the winter programme, and every disconnected coupling should always be capped.
- Is it safe to drive a frozen air brake system to thaw it out?
- No. In a partly frozen system the brakes can apply on one side and not the other, the parking brake can engage unexpectedly, or an applied brake can fail to release and overheat the lining and drum to a dangerous level. The vehicle should stay parked until the symptom is fully gone and the system builds to full pressure and releases normally. Thawing should be done on level, secure ground with the vehicle chocked, ideally in a heated enclosed space.
Related Articles
Air Dryer: Faults, Replacement & Maintenance Guide
How a truck air dryer's charge and purge cycle keeps moisture and oil out of the brake system, and what a hissing purge valve or water in the tanks means.
Brake Chamber: Faults, Replacement & Maintenance Guide
Service and spring brake chambers on trucks and trailers: diaphragm-leak and stroke diagnosis, why caging is mandatory before removal, and safe replacement.
How to Read an Air Brake Diagram: Circuit Guide
How do you read an air brake system diagram? Symbol language, line colours, port codes, circuit split, trailer lines and fault-tracing, step by step.


