Truck Wheel Hub: Faults, Replacement and Maintenance Guide
How to spot truck wheel hub bearing noise, heat and seal leaks, set bearing endplay correctly, replace the hub step by step and extend its service life.
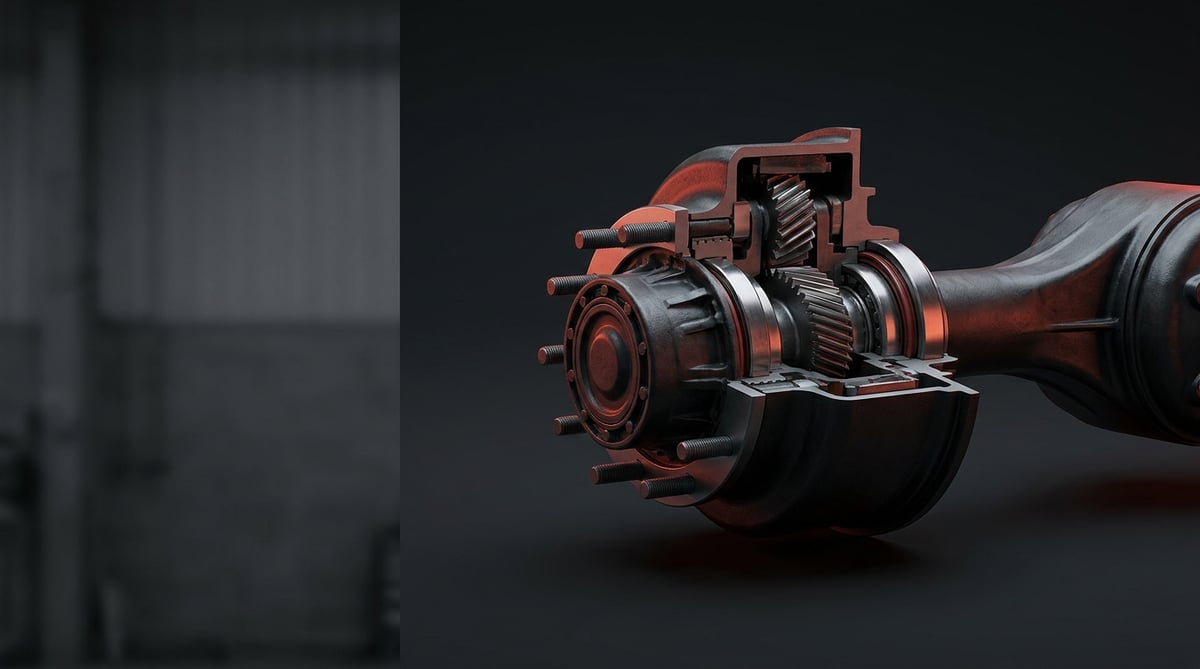
If a tractor unit's front wheel starts to hum, if an oil trace shows up on the inner face of a trailer rim, or if one wheel feels noticeably hotter than the others during a break, the issue is no longer the tyre or the brake — it is on the wheel hub side. The wheel hub is a silent component; by the time it starts making noise, the damage has usually already progressed. This guide explains, from a workshop point of view, what the hub does, why bearing endplay is so critical, how to read a leaking seal, the discipline required when removing and refitting, and the maintenance habits that extend service life.
What Is a Wheel Hub / Axle Hub? Function and Operating Principle
The wheel hub (axle hub) is the cast or forged body on a heavy commercial vehicle that connects the wheel to the axle end, rotates on a set of tapered roller bearings inside it while carrying the vehicle weight and road loads, and carries the brake drum or disc together with the ABS tone ring. In heavy commercial applications, wheel hub bearing adjustment clearance is typically held within a band of 0.025–0.15 mm; with correct adjustment and regular lubrication, a service life of over 500,000 km can be achieved.
The same component is known by several names in the field and in catalogues: wheel hub, axle hub, hub assembly, in Turkish catalogues porya, in German catalogues Radnabe. They all belong to the same group; regardless of the name used to search for it, the selection criteria are identical: axle type, axle code and OE reference number.
The wheel hub's operating principle looks simple, but the load table is heavy. The hub rotates on two tapered roller bearings seated on the axle spindle. The bearings are fitted facing each other — one inner, one outer — so that together they carry both the vertical wheel load and the lateral force generated in a corner. The wheel rim is bolted to the studs on the outer face; in drum systems the drum is centred on the hub, in disc systems the disc is bolted to the hub. On ABS-equipped vehicles the toothed tone ring is either pressed onto the hub or rotates with the hub within the brake group.
The inside of the wheel hub is a sealed lubrication volume: the hub cap seals the outer side and a radial shaft seal seals the inner side. Lubrication is provided either by grease or by an oil bath arrangement. An oil bath arrangement has a cooling advantage, but when the seal leaks the consequences are more severe because the oil reaches the brake lining directly. Three things determine bearing life, and all three are decided on the workbench: correct adjustment clearance, clean and sufficient lubrication, and sound sealing.
Classic hub with adjustable tapered roller bearings
This is the traditional arrangement used on the majority of heavy commercial vehicles. The inner and outer tapered roller bearings are fitted separately, the clearance is set by hand with the axle nut and locked with a retaining element. The advantage is that it can be serviced; the disadvantage is that the result depends entirely on the discipline of the technician making the adjustment. Bearing tolerance classes are generally defined according to the ISO 492 family; however, the valid adjustment value for a specific axle must be confirmed not from the standard text but from the relevant OE catalogue and service manual.
Pre-set (unitised) hub bearing assembly
On newer axles, the two bearing rows, the spacer ring and the seals are combined into a single cartridge at the factory. Preload is set in production; no adjustment is made in the field, only the specified torque is applied. The risk of assembly error drops, but in return the unit is replaced as a whole. Which arrangement an axle uses is determined not by guesswork, but by the axle code on the axle plate.
Sealing and signal elements
Within the wheel hub group, the seal, the cap and the ABS ring may look like auxiliary parts, yet a significant share of failures starts here. Radial shaft seals generally correspond to the lipped seal definition in the ISO 6194 family; a scratch-free running surface on the ring where the seal lip presses directly determines service life. The ABS tone ring is the input for the anti-lock braking system covered by ECE R13: if a ring tooth is broken, the system reads that wheel incorrectly. Standard references are indicative; part-specific values must be confirmed from the relevant OE catalogue.
The ABS ring on the hub is only the input of the anti-lock chain; our heavy vehicle air brake ABS system guide shows how modulators, valves and warning lamp logic interact.
Components and auxiliary elements
- Hub body: cast or forged main body; carries the wheel studs and the brake group.
- Inner and outer tapered roller bearings: the paired set that carries vertical and lateral load together.
- Bearing outer races (cups): pressed into the hub as an interference fit; renewed as a set together with the bearings.
- Radial shaft seal: provides oil/grease sealing on the inner side; renewed at every removal.
- Hub cap and its gasket: closes the outer side and carries the level window in oil bath arrangements.
- Axle nut, lock washer and retaining element: the locking chain that fixes the adjustment clearance.
- Wheel stud and nut: connects the wheel to the hub; the fastening system is generally defined in the DIN 74361 family.
- ABS tone ring: the toothed ring that generates the wheel speed signal.
| Hub / axle arrangement | Lubrication | Bearing adjustment | Characteristic service note |
|---|---|---|---|
| Classic adjustable tapered roller hub (tractor/truck front axle) | Grease or oil bath | Adjusted in the field (clearance band 0.025–0.15 mm) | Adjustment discipline determines life; torque wrench and dial gauge essential |
| Driven rear axle hub (drum brake) | Usually shared with differential oil, or separate grease | Adjusted in the field | Axle shaft and flange gasket are assessed together |
| Disc brake hub (front and rear) | Grease or oil bath | Adjustable or pre-set depending on arrangement | Disc run-out depends on the hub face; do not close up without measuring run-out |
| Pre-set (unitised) hub bearing cartridge | Grease-filled at the factory, lifetime | No field adjustment, torque only | The unit is replaced complete; individual bearings are not renewed inside it |
| Trailer / semi-trailer axle hub | Mostly oil bath | Adjusted in the field | Temperature monitoring is critical because it runs long distances without stopping |
How can a wheel hub / axle hub failure be identified?
Wheel hub failures announce themselves through three channels: noise, heat and leakage. The table below matches the symptoms most frequently seen in the field with their probable causes and the verification method.
| Symptom | Probable cause | Check / verification |
|---|---|---|
| Hum or growl rising with speed; noise falling as speed drops | Fatigue, pitting or loss of lubrication on the bearing surfaces | Lift the vehicle and turn the wheel by hand, listening for noise and roughness; listen at the hub body with a stethoscope |
| Vibration in the steering, noise changing with cornering direction | Excessive bearing clearance or loss of preload | Hold the wheel at the 12 and 6 o'clock positions and rock it; measure axial clearance with a dial gauge |
| Oil/grease trace on the inner rim face and on the brake group | Inner seal leaking, scored seal seat or damaged cap gasket | Clean the area and check again after a short run; distinguish whether the leak comes from the hub or from the axle flange |
| One wheel clearly hotter than the others; the hub centre cannot be touched by hand | Excessive bearing preload, low oil level or damaged bearing | Compare hub temperatures of the wheels on the same axle with an infrared thermometer |
| Oil on the brake lining, brake pull or a sudden drop in lining life | Oil leaking from the hub seal reaching the drum/disc surface | Remove the drum and inspect the lining surface visually; check the seal lip and the running ring |
| ABS warning lamp, especially at low speed or under braking | Tone ring tooth broken/dirty, ring loose, or bearing clearance has disturbed the sensor gap | Read which wheel the fault code belongs to; inspect the ring visually and check the sensor signal with an oscilloscope |
| Wheel nuts loosening repeatedly, darkening at the stud roots | Deformation on the hub stud face, damaged rim seating face, or torque procedure not applied | Dimensional check of the wheel studs and the hub seating face; re-check with a torque wrench |
Clearance or preload? Order of manual check and measurement
Both extremes are errors in wheel hub bearing adjustment. Excessive clearance lets the wheel move, disturbs disc run-out and makes the bearing work under impact; excessive preload keeps the bearing permanently under pressure, heats it and breaks down the oil film. The field sequence is this: lift the vehicle safely, hold the wheel at the 12 and 6 o'clock positions and rock it, then move on to measurement. A clear clearance felt by hand is always excessive; however, feeling nothing does not prove the adjustment is correct — you also feel nothing when preload is excessive. That is why the decision is made with a dial gauge.
Diagnosis by heat: comparative measurement
On the wheel hub, the difference matters far more than the absolute temperature. During a road break, measure the hub temperature of the wheels on the same axle with an infrared thermometer; if there is a consistent and repeatable difference, the hotter side is suspect. To separate out heat coming from the brake, take the measurement after a straight stretch where the brake has not been used. The most common mistake in the field is to blame a hot wheel directly on the brake; in fact a binding brake and an over-preloaded hub produce a similar temperature picture.
Isolating the source of a leak
A leak coming from the wheel hub and one coming from the axle shaft flange gasket are frequently confused in the field. The correct method is to clean and dry the area completely and, after a short loaded drive, to trace where the wetting starts: if the trace starts at the seal line, the hub seal is at fault; if it starts around the flange bolts, the flange gasket is. On oil bath hubs, a continuously dropping level in the hub cap also confirms a leak.
If you are looking for an entry-level account of the bearing behaviour behind these signs, the guide what is a wheel hub, its bearing failure and symptoms offers an introductory frame.
Further reading
For a plain-language technical overview of this subject, see the reference article on Wikipedia. Always confirm specific figures and procedures against the vehicle manufacturer service data.
How is a wheel hub / axle hub replaced? Step by step
- Secure the vehicle: Park on level, solid ground, apply the parking brake, chock the other wheels, take the axle load with lifting equipment and set it down on stands. Disconnect the battery isolator if ABS components will be touched.
- Remove the wheel, brake group and sensor: Slacken the wheel nuts by one turn while the vehicle is still on the ground, then take the wheel off. On a drum system remove the drum; on a disc system remove the caliper and suspend it; never let the caliper hang from the brake hose. Clean around the ABS sensor, then twist it free from its bore and secure its cable safely; a sensor pulled by force will break at the body.
- Open the hub cap and locking elements: Remove the hub cap and, on oil bath arrangements, drain the oil into a clean container. Remove the split pin, lock washer and axle nut in the correct removal sequence. Do not plan to reuse the locking elements that have been removed.
- Pull the hub and clean the area: Draw the hub off the axle spindle without dropping the outer bearing. Clean the spindle surface, the seal running ring and the bearing seats with a clean cloth and a suitable cleaner. This job does not progress with dirt present: a single grain of sand left on the spindle will chew up the new bearing within the first kilometres.
- Inspect the removed parts: Look for pitting on the bearing raceways, bluing (a sign of overheating), cage deformation and scoring on the seal ring. If the bearing is damaged, renew the inner and outer set together with their outer races from the same set; also inspect the other wheel on the same axle.
- Verify the new part: Place the new hub side by side with the old one and compare stud count, pitch circle diameter (PCD), centre bore diameter, bearing seat dimensions and the tooth count of the tone ring. On a unitised cartridge, do not open the packaging until the moment of fitting; if the grease is contaminated, the unit is lost from the start.
- Seat the races, bearings and the new seal: Press the outer races fully into their seats with a suitable pressing tool; do not drive them in with an old race or a chisel. Pack the bearings with the specified grease/oil so that the gaps between the rollers are completely filled — grease smeared on the surface does not lubricate. Fit the new seal without tilting it, with the lip facing the oil side, and apply a thin film of oil to the lip.
- Adjust and lock the bearings: Slide the hub onto the spindle, fit the outer bearing and the axle nut. The general procedure is to tighten the nut to the seating torque specified by the manufacturer while continuously rotating the hub, then slacken the nut and bring it to the specified final value, and verify the clearance with a dial gauge. The measurement is taken by pushing the hub in and out with the dial gauge tip aligned with the axle centreline. There is no adjustment on a unitised cartridge, only the specified torque is applied. Once adjustment is complete, fit a new lock washer and retaining element.
- Close up, fill with oil and apply the torques: Fit the hub cap with a new gasket and, on oil bath arrangements, top up the level to the marker line. Fit the brake group and push the ABS sensor into its bore until it touches the ring. Fit the wheel and tighten the wheel nuts in a crosswise sequence, in stages and with a torque wrench, to the manufacturer's value.
- Test and re-check the torque: Before lowering the vehicle, turn the wheel by hand and check for noise and friction. After a short test drive, compare the hub temperature with the other wheel and check for leaks and ABS warnings. Always repeat the wheel nut torque check after the first 50–100 km.
What are the most common mistakes in wheel hub / axle hub replacement?
- Driving the bearing outer race in by hammering: A seat surface hammered with a chisel or an old race gets crushed; the race does not seat fully and the clearance measurement is wrong from the outset.
- Replacing only the damaged bearing: The inner and outer bearings have seen the same load and the same mileage; when only one side is renewed, the new bearing quickly falls to the condition of the old one.
- Just smearing grease on the surface: Lubrication happens between the roller and the race; an assembly made without filling the cage means a dry start.
- Using the wrong grease or the wrong oil: When greases with different soap bases are mixed, the consistency breaks down and the lubricating property is lost; grease is not put into an oil bath hub, nor oil into a grease-packed hub.
- Fitting the seal tilted or the wrong way round: A seal fitted backwards leaks from day one; a seal seated crooked leaks within a few thousand kilometres.
- Forcing the tone ring or leaving it dirty: Metal swarf and grease trapped between the teeth corrupt the signal and generate fault codes; a ring that has been forced works loose.
- Tightening the wheel nuts out of sequence and not repeating the torque check: Without crosswise, staged tightening the rim seats crooked; if the check after the first 50–100 km is skipped, the loosening that follows bedding-in goes unnoticed.
- Leaving an oil-soaked brake lining in place: The seal is renewed, but if the oil-soaked lining is not replaced, the brake performance and pulling problem continues.
Wheel hub / axle hub technical values and check points
Wheel hub figures given below are general reference ranges commonly encountered on heavy commercial vehicle axle groups. The axle manufacturer, axle capacity, brake type and bearing arrangement change these ranges; for exact data, the current OE service manual matching the axle code is authoritative.
| Parameter | Typical range (general reference) | Note |
|---|---|---|
| Bearing axial adjustment clearance (endplay) | 0.025–0.15 mm | Measured with a dial gauge; a narrower band may be defined by the axle manufacturer |
| Pre-set (unitised) cartridge preload | Set at the factory, not adjusted in the field | Only the specified torque is applied; no clearance measurement is expected |
| Hub surface temperature (normal operation) | 30–60 °C above ambient temperature | Brake use raises the reading; comparison is made after a brake-free stretch |
| Accepted temperature difference between wheels on the same axle | Generally below 15–20 °C | A consistent and repeatable difference is suspect |
| Hub surface temperature accepted as a warning threshold | Approximately above 100–120 °C | Oil/grease starts to degrade; do not continue without finding the cause |
| Brake disc run-out (measured on the hub) | Generally in the 0.05–0.15 mm band | Bearing clearance must be corrected before measuring |
| ABS tone ring tooth count | Commonly 80–100 teeth | Tooth count is system-specific; a broken tooth corrupts the signal |
| ABS sensor fitting gap | Sensor is pushed in until it touches the ring | The working gap forms by itself during the first rotations; it is not set by hand |
| Oil volume of an oil bath hub | Approximately 0.3–0.6 litres | The level is given by the marker line on the hub cap |
| Fastening point | Typical torque band (general reference) | Application note |
|---|---|---|
| Wheel nut (M22x1.5 class heavy commercial application) | 550–650 Nm | Crosswise and staged tightening; re-check after the first 50–100 km |
| Axle nut — seating (while rotating the hub) | Approximately 130–250 Nm | Applied so the bearings seat fully; not the final value |
| Axle nut — final tightening after slackening | Approximately 30–80 Nm or a procedure angle | Value and method are axle-specific; the clearance is then verified with a dial gauge |
| Hub cap bolts | 20–45 Nm | With a new gasket; crosswise tightening |
| Brake disc — hub fastening bolts | 200–300 Nm | Single-use in most applications; renewed |
- Has the bearing axial clearance been measured with a dial gauge, and is the value within the manufacturer's band?
- Is there any roughness, binding or irregular noise when the wheel is turned by hand?
- Are the inner seal line and the inner rim face dry — were they checked again after the test drive?
- On an oil bath hub, is the level at the marker line and is the cap gasket new?
- Has the hub temperature been compared with the other wheel on the same axle?
- Are the tone ring teeth complete and clean, and have the fault codes been read?
- Were the wheel nuts torqued in a crosswise sequence, and is the first 50–100 km check planned?
How is a wheel hub / axle hub maintained and its life extended?
The wheel hub is one of the longest-lasting groups on a regularly maintained vehicle; on a neglected vehicle it turns into one of the most expensive failures. Three factors determine its life: lubrication, sealing and correct adjustment. The most common hub failure in the field is not actually spontaneous bearing fatigue, but the gradual loss of lubrication following a leaking seal; in other words, most hub failures start with a preventable leak.
- Periodic oil/grease check: On an oil bath hub the level should be checked visually at every service; on a grease-packed arrangement, renewal should be carried out at the interval specified by the manufacturer.
- Closing a small leak before it grows: A thin oil trace on the inner rim face does not mean "nothing has happened yet"; from that point on the seal will only leak more.
- The habit of monitoring heat: Adding a hub temperature check to break inspections in long-haul fleets is the cheapest practice there is for preventing roadside breakdowns.
- Wheel nut torque discipline: After every job where a wheel has been removed, the torque check must be repeated within the first 50–100 km.
- Assessment together with brake work: When a drum or disc is replaced, the hub bearing clearance and seal condition must always be checked; the group is already open.
- Loading, tyre pressure and washing: Overloading combined with under-inflated tyres directly increases bearing load; directing high-pressure water at the seal line strains the sealing and carries water inside.
- Keeping records: When it is recorded which bearing set and seal were fitted to which wheel and when, the root cause of a recurring failure is found far more quickly.
In fleet operations, the most efficient approach is to think of the wheel hub not as a single part but as a set: renewing the bearing set, outer races, seal, cap gasket and locking elements at the same service is far more economical than the cost of lifting the vehicle again a few months later.
Related categories: Wheel Hub · Wheel Hub
Application and compatibility: Vehicle compatibility catalogue · Engine compatibility catalogue
Tags
Frequently Asked Questions
- How can wheel hub bearing noise be identified?
- The classic sign of a wheel hub bearing failure is a continuous hum or growl that rises with speed and falls as speed drops. The noise often changes with cornering: it becomes more pronounced when the vehicle's weight shifts onto the faulty side. To verify, the vehicle is lifted safely and the wheel is turned by hand while listening for roughness and noise; listening at the hub body with a stethoscope pinpoints the source.
- What should the wheel hub bearing clearance be?
- On heavy commercial vehicles, the axial adjustment clearance of the wheel hub bearing is held as a general reference within the 0.025–0.15 mm band and is verified with a dial gauge. Below the band means excessive preload, which heats the bearing; above it lets the wheel move and corrupts disc run-out and the ABS signal. On unitised cartridges no clearance adjustment is made in the field. The exact value must be taken from the current service manual for the axle code.
- What happens if the wheel hub seal leaks — can the vehicle still be driven?
- A leaking wheel hub seal starts two risks at the same time. The first is loss of lubrication: the bearing runs without a sufficient oil film, heats up and is damaged within a short time. The second is braking safety: oil reaching the drum or disc surface reduces the braking force at that wheel, the vehicle pulls under braking and the stopping distance grows. For this reason the vehicle should not be driven with a leaking seal; the seal and, if necessary, the oil-soaked lining must be renewed together.
- What causes a wheel hub to overheat?
- The three most common causes of wheel hub overheating are excessive bearing preload, insufficient lubrication and a damaged bearing; a binding brake is added to these. Because a binding brake and an over-preloaded hub produce a similar temperature picture, telling them apart matters: after a straight stretch where the brake has not been used, compare the hubs on the same axle with an infrared thermometer; a consistent and repeatable difference points to the hub.
- Can the ABS lamp come on because of a wheel hub fault?
- Yes, it can. Excessive wheel hub bearing clearance disturbs the relationship between the sensor and the tone ring; broken or dirty ring teeth, or a loose ring, also generate a signal fault directly. Once it has been read which wheel the fault code belongs to, the ring should be checked visually and the signal with a suitable instrument. Since the anti-lock braking system is mandatory equipment under ECE R13, this warning must not be postponed.
- How many kilometres does a wheel hub bearing last?
- The wheel hub has no fixed replacement interval; its life is determined by loading, road conditions, lubrication and assembly quality. A regularly maintained and correctly adjusted wheel hub bearing can give more than 500,000 km of service in heavy commercial use. By contrast, a bearing running with a leaking seal, packed with the wrong grease or over-tightened can reach the end of its life within a few tens of thousands of kilometres. Condition monitoring, not mileage, is what counts.
- Are both bearings replaced during wheel hub replacement?
- Yes, correct practice is to renew the inner and outer bearings as a set. The two bearings have seen the same load and the same mileage; replacing only the damaged one means the new bearing will soon drop to the level of its fatigued neighbour. The outer races pressed into the hub are also replaced with the same set; an assembly where the roller set and the race do not match cannot establish full surface contact.
- Are the wheel hub and the axle hub the same thing?
- Yes, these are different names for the same part. In the workshop it is called the "wheel hub", in technical catalogues the "axle hub" or "hub assembly", in Turkish documents "porya", and in German catalogues "Radnabe". In some regions other local pronunciations are used as well. The naming may change, but the part is the same: the hub body that carries the wheel on its bearings and holds the brake group and the ABS ring.
- How do I choose the right wheel hub?
- Vehicle make and model alone are not enough for selection; the same vehicle may use a different axle manufacturer and a different axle capacity. The axle code on the axle plate, the axle capacity, the brake type (drum or disc), the stud count together with the pitch circle diameter (PCD), the centre bore diameter and the presence of an ABS ring must all be assessed together. The most reliable route is to search the OE reference number on the old hub, confirm the matching VADEN part number, and then compare dimensions by placing the new and old hubs side by side.
- Why do wheel nuts keep coming loose?
- The most frequent causes of wheel nuts loosening are the absence of crosswise, staged tightening, working by feel instead of with a torque wrench, and not repeating the torque check after the first 50–100 km. Rust and paint residue on the rim seating face, damaged stud threads and deformation on the hub seating face are added to these. With repeated loosening, simply tightening the nut is not a solution; the studs, the rim face and the hub face must be inspected together.
Related Articles
What Is a Truck Axle? Axle Types and Wheel Hub Bearing Failure
What is a truck axle? A guide to heavy-vehicle axle types, 4x2-8x4 drive configurations, and wheel hub bearing failure, diagnosis and replacement.

ABS Brake System: How It Works, Warning Light and Faults
Learn how the ABS brake system works on heavy trucks, why the warning light comes on, how to diagnose sensor faults, and the correct replacement steps.
Engine Overheating in Heavy-Duty Trucks: Causes & Fixes
Learn why heavy-duty truck engines overheat, how to read the gauge, step-by-step diagnosis, and how coolant, water pump, thermostat, and fan clutch fail.


