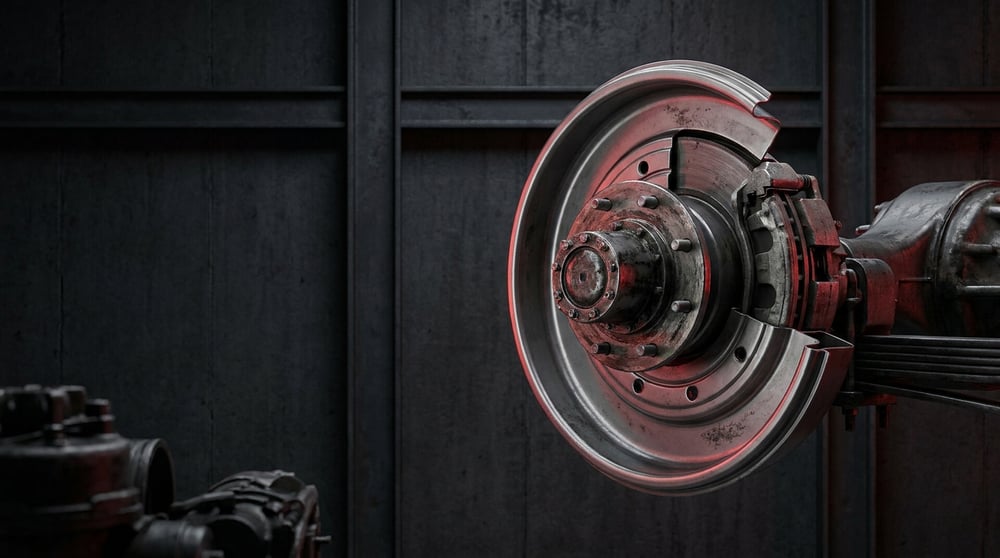
On a heavy commercial vehicle, most technicians never notice the brake dust shield until the drum or disc comes off — not until they see that rusty plate stuck to the axle flange, its edges worn thin as paper, one spot scraping the drum with a "screech." Dismissed in the field as a "trivial piece of tin," this part is actually the brake assembly's first line of defence: it stops water, mud, salt and road dust coming off the road before they can get between the pad and the disc/drum. This guide brings together the function, fault diagnosis, correct replacement and maintenance practices for the brake dust shield / dust cover used on tractor, truck, bus and trailer axles, in the language of the workshop floor.
This document was prepared by the VADEN technical team, drawing on heavy commercial vehicle brake-group service experience and OE-equivalent manufacturing know-how. The torque, thickness and clearance values given here are typical reference ranges; for exact figures, always refer to the OE service manual for the vehicle/axle. Last updated: July 2026.
What Is a Brake Dust Shield / Dust Cover? Function and Working Principle
A brake dust shield (dust cover, also called a splash shield) is a sheet-metal protective part mounted between the inner face of the brake disc or drum and the axle/hub, which protects the pad and friction surface from road water, mud, salt and dust, thereby improving brake performance and extending component life.
Its working principle is not mechanical but based on covering (barrier) action. While the vehicle is moving, the road water and coarse dirt thrown up by the wheel do not strike the friction surface directly, thanks to the screen formed by the dust shield; they are deflected and thrown outward. In disc systems, the shield also limits, to some extent, the transfer of the high heat generated during braking to the wheel bearing and hub area by radiation — in other words, it also acts as a heat barrier. In drum systems, the shield covers the drum mouth and reduces the ingress of pad dust and external dirt into the brake.
- Main body plate: Usually pressed from steel or stainless sheet 0.8–2.0 mm thick; formed into a dish shape to match the disc/drum profile.
- Mounting flange and holes: The centring-boss region that bolts to the axle end, bearing cap or caliper carrier.
- Deflecting bends (labyrinth edge): The edge form that throws water and dirt outward, approaching the disc edge with a specific clearance.
- Ventilation / cooling openings: Channels or holes left in some types to dissipate heat.
- Surface protection: Corrosion-resistant coating with galvanizing, geo-coating or high-temperature paint.
Difference Between Dust Shields in Disc and Drum Systems
On disc brake axles (modern tractor front/rear axles, buses), the dust shield sits as a circular plate close to the inner face of the disc, and the clearance between it and the disc is critically important. In drum systems, the shield functions more as a cover over the drum mouth and the S-cam mechanism. In both types the aim is the same: to isolate the friction surface from external factors.
Why It Is Not "Trivial"
When the dust shield is missing or damaged, pad life shortens noticeably, uneven corrosion and grooving form on the disc surface, and wet braking performance drops. On vehicles operating on salted roads in winter, a missing dust shield can lead to rapid corrosion in the bearing and hub area. In short, the part is cheap but the components it protects are expensive.
Type and Position Comparison
| Usage Position | Brake Type | Shield Function (primary) | Typical Material |
|---|---|---|---|
| Tractor front axle | Disc | Water/heat barrier, disc inner-face protection | Stainless / galvanized steel |
| Tractor–trailer rear axle | Disc | Dirt deflection, caliper carrier protection | Galvanized steel |
| Truck/bus rear axle | Drum | Drum mouth and S-cam protection | Painted / coated steel |
| Trailer axle | Drum / disc | Road salt and mud barrier | Galvanized steel |
Part number verification: The dust shield varies even within the same axle family according to disc diameter, right/left side and caliper brand. Before ordering, always confirm the vehicle's axle type (for example, the relevant axle manufacturer's type), disc diameter and OE part number. Do not select a part based only on the information that it "fits the truck"; mixing up right/left and front/rear is the most common cause of returns.
Fault Symptoms and Diagnosis
Dust shield faults usually reveal themselves through noise and visual signs. The table below summarizes the symptom–cause–check chain most frequently encountered in field diagnosis.
| Symptom | Possible Cause | Check / Verification |
|---|---|---|
| Continuous "screech / buzz" metallic rubbing sound while turning | Shield bent so it touches the disc/drum | Turn the wheel by hand and listen for the rubbing point; look for a shiny contact mark on the shield edge |
| Rhythmic rattle only when moving, not when braking | Mounting bolt loosened, shield is moving | Press the shield flange by hand to check for play; check bolt torque |
| Pads wearing out early, uneven wear | Shield missing/torn, dirt reaching the friction surface | Check for mud-salt build-up and grooving on the disc/pad surface |
| Heavy rust and grooving on the inner face of the disc | Dust shield broken off or perforated, holding water | Turn the disc and inspect the inner-face corrosion map |
| Slow / weak brake bite on wet roads | Water barrier function lost | Check shield edge clearance and integrity, and whether the deflecting bend is crushed |
| Shield visibly rusty, cracked or broken off | Corrosion/fatigue, stone impact | Visual inspection; gently prise the edges with a screwdriver and look for thinned areas |
| Suspected overheating in the bearing/hub area | Loss of heat barrier + water ingress | After a short drive, compare hub temperature with the other wheel |
Diagnosis by Sound
Dust shield noises are confused with the brake pad "squeal." To tell them apart, move the vehicle slowly; if the noise continues without pressing the brake, the cause is most likely the shield or another part rotating with the wheel. A brake pad wear-indicator noise, on the other hand, usually becomes pronounced when the brake is applied.
Visual Inspection
Even without removing the wheel, looking through the rim opening with a flashlight will often reveal the shiny rubbing mark, crushing or breakage at the shield edge. For a definitive diagnosis, the wheel must be removed and the shield inspected while turning it 360°. Thinned, blistered, rusted areas indicate the need for replacement.
Clearance Check
In a disc system, the clearance between the shield and the disc must be equal all the way around. If a feeler gauge or visual check shows the clearance closing at one point, the shield is bent; it is gently corrected with a suitable tool — not a sledgehammer — or replaced.
Replacement / Installation Steps
Personal protective equipment and safety: Secure the vehicle on level ground, chock it and place it on stands of adequate capacity; do not rely on the jack alone. Brake dust must not be inhaled — wear a mask and goggles, do not blow the dust off with compressed air, remove it with a damp cloth or brake cleaner. Shield edges are sharp; wear cut-resistant gloves. Before the operation, release the air tank pressure and set the parking brake according to the situation.
- Preparation and diagnosis confirmation: Make the vehicle safe, remove the wheel, visually confirm the fault (bent/broken/rusty shield) and verify that the new shield is the correct part for right/left and front/rear.
- Exposing the brake group: In a disc system, remove the caliper from the carrier and hang it up (do not hang it by stretching the hose); in a drum system, remove the drum.
- Separating the disc/hub group: In most designs the dust shield can only be removed after the disc or hub is taken off. Separate the disc hub/hub according to the OE procedure.
- Removing the old shield: Undo the mounting bolts/rivets. Apply penetrating oil to bolts seized by corrosion; if necessary, cut the bolt to remove it, and do not force the threads.
- Cleaning: Clean the flange seating surface, axle end and threads of rust and old gasket with a wire brush. The surface must be flat and clean; residue causes the shield to seat crookedly.
- Pre-positioning the new shield: Seat the new dust shield dry in place, check the hole alignment and that the centring boss is fully seated. Do not force it; if it does not align, it may be the wrong part.
- Fitting the bolts: Start new bolts, or bolts to OE specification, by hand. To prevent corrosion, use a suitable assembly paste if the manufacturer permits; do not smear random grease on the threads.
- Torquing: Tighten the bolts in a crossing sequence to the OE value with a torque wrench (see the table below for typical ranges; the exact value is in the service manual).
- Reassembling the disc/hub and brake group: Refit the hub/disc according to OE bearing preload and procedure, and mount the caliper/drum back in place.
- Clearance and free-rotation check: Turn the wheel by hand to verify that the shield does not rub the disc/drum at any point and that the clearance is equal all the way around.
- Fitting the wheel and testing: Tighten the wheel to the OE lug torque, carry out a low-speed test drive to check the noise and brake response, and bed in during the first brake applications.
Points to Watch (Common Mistakes)
Do not bend and force the shield just because it's "only tin." Using a sledgehammer to straighten the shield edge, or bending it randomly so it does not touch the disc, ruins the clearance and soon leads to rubbing noise again. A bent shield is either gently corrected with a suitable tool or replaced.
Do not mix up right/left and front/rear. Fitting a directional shield the wrong way round renders the deflecting bend useless and may even make it rub the disc. Take the old part you removed as a reference and compare it side by side with the new part.
- Forcing and snapping a corrosion-seized bolt; first penetrating oil and patience, then a controlled cut if necessary.
- Fitting a new shield without cleaning the flange surface; residue causes the shield to seat crookedly and creates a clearance error.
- Inhaling brake dust by blowing it off with compressed air; a health risk — always use a damp method.
- Removing the dust shield entirely and thinking "the problem is solved"; the noise stops in the short term but pad and disc life drops.
- Tightening by eye instead of using a torque wrench; a loose bolt causes rattle, over-tightening causes flange cracking.
- Using a cheap, insufficiently thick equivalent shield and encountering corrosion again in a short time.
Technical Values and Check Points
The values below are typical/general reference ranges for heavy commercial vehicle brake groups. They vary according to axle manufacturer, disc diameter and model year; the binding value is always the vehicle's service manual.
| Parameter | Typical Reference Range | Note |
|---|---|---|
| Shield material thickness | ~0.8–2.0 mm | Stainless/galvanized steel; depending on disc diameter |
| Shield–disc edge clearance | ~2–5 mm (equal all around) | As narrow as possible without rubbing |
| Brake group operating temperature | ~200–500 °C (peak higher under heavy braking) | Shield is a heat barrier; paint/coating must withstand this |
| System air pressure (brake circuit) | ~8–12 bar (≈116–174 psi) | Not directly related to the shield; for group context |
| Pad min. thickness (general) | ~2–3 mm depending on manufacturer | Check together when replacing the shield |
The mounting bolt torque varies noticeably according to where the shield seats (axle end, bearing cap, caliper carrier) and the bolt size. Typical ranges are below; the exact value must be taken from the OE manual.
| Connection | Typical Torque Range | Warning |
|---|---|---|
| Dust shield flange bolt (small, M8) | ~20–30 Nm | Crossing sequence, do not over-tighten |
| Dust shield / carrier bolt (M10) | ~45–65 Nm | OE value is the basis |
| Caliper carrier bolt (context) | High per OE + angle | Usually single-use, replace it |
Increasing the torque value just to make it "nice and tight" can crack the shield's thin flange; reducing it leads to rattle and loosening when moving. Always use a calibrated torque wrench and the OE value; if the bolt is single-use, replace it with a new one.
- Verify by turning by hand that the shield does not rub the disc/drum at any point around its circumference.
- Check that the flange seating surface is free of rust and residue.
- Confirm the direction (right/left) and that the centring boss is fully seated.
- Note that the bolts are tightened crosswise to the correct torque and that single-use ones have been renewed.
- Observe that the coating/paint is undamaged and that no area with the onset of corrosion remains.
Maintenance and Service Life
With the right material and installation, the dust shield is generally one of the vehicle's long-life components; it has no separate periodic replacement interval. However, it is a part that should be reviewed together at every brake service (during pad/disc checks). The main factors that shorten its life are corrosion (road salt), stone/impact damage, and rubbing fatigue caused by incorrect installation.
- At every pad/disc check, review the shield's integrity, edge clearance and bolt tightness.
- On vehicles operating on salted roads in winter, monitor corrosion more frequently; replace a shield whose coating has peeled off early.
- On off-road or construction-site vehicles, straighten or renew edges crushed by stone impact.
- When replacing the disc/drum, also check the dust shield; if it was damaged during removal, renew it at the same time.
- Extend corrosion life by choosing a galvanized/stainless equivalent.
In short, the dust shield provides protection out of all proportion to its low cost: when checked in time and replaced when needed, it noticeably extends the life of far more expensive components such as pads, discs and bearings. Even when it seems "problem-free," it is a part that should be added to the list at every brake service.
Frequently Asked Questions
Can the vehicle be used without a brake dust shield?
Technically the brake continues to work, but it is not recommended. Without the dust shield, pads and discs wear faster, brake bite weakens on wet roads and corrosion accelerates. Although there seems to be no problem in the short term, more expensive components are damaged in the long term.
The dust shield is rubbing the disc — what should I do?
First identify the rubbing point. If the shield is slightly bent, it can be gently corrected with a suitable tool to restore an equal clearance all the way around. If it is crushed, torn or rusted thin, it is more correct to replace it than to try to straighten it. Forcing it with a sledgehammer permanently ruins the clearance.
How often is the dust shield replaced?
There is no specific mileage interval; it is used until a fault (corrosion, breakage, crushing) appears. It is checked at every brake/disc service and replaced when needed. With the right material and installation, it is one of the vehicle's long-life parts.
Is it enough to paint and reuse a rusted dust shield?
High-temperature paint may be a temporary solution for surface rust, but if the shield has thinned, been perforated or its edges have broken off, paint is useless; the barrier function is lost. In that case it must be replaced.
Are the right and left dust shields the same?
On most disc systems the right and left differ because of the deflecting bends. Fitting one the wrong way round ruins the shield's function and may even make it rub. When ordering and installing, always confirm the direction information and the OE part number.
Does the dust shield really affect brake performance?
It does not affect brake pressure directly but affects the operating conditions. On wet and dirty roads it keeps the friction surface clean, providing a consistent brake response; when it is missing, a weakening can be felt on the first brake application, especially in rainy weather.
Is it essential to remove the disc or drum during replacement?
In most designs, yes; the dust shield cannot be removed without taking off the disc/hub or drum. For this reason, doing the dust shield replacement in the same session as the disc/pad service makes sense in terms of labour.
Is an OE-equivalent dust shield safe?
An equivalent produced from quality material to the correct size, thickness and direction specification is safe. What is critical is the part number match, material thickness and corrosion coating; an equivalent that meets these three points performs the same function as OE.
The VADEN ORIGINAL brake dust shield / dust cover product family is manufactured for heavy commercial vehicle axles to OE dimensions and direction specification, with corrosion-resistant material and correct flange geometry. By selecting the dust shield from our catalogue that matches your vehicle's axle type, disc diameter and OE part number, you can protect components such as pads, discs and bearings with the first line of defence.