Truck Radiator & Expansion Tank: Faults, Replacement & Care
Diagnose radiator and expansion tank faults on heavy trucks: overheating, coolant loss, pressure caps, correct replacement steps and safe technical values.
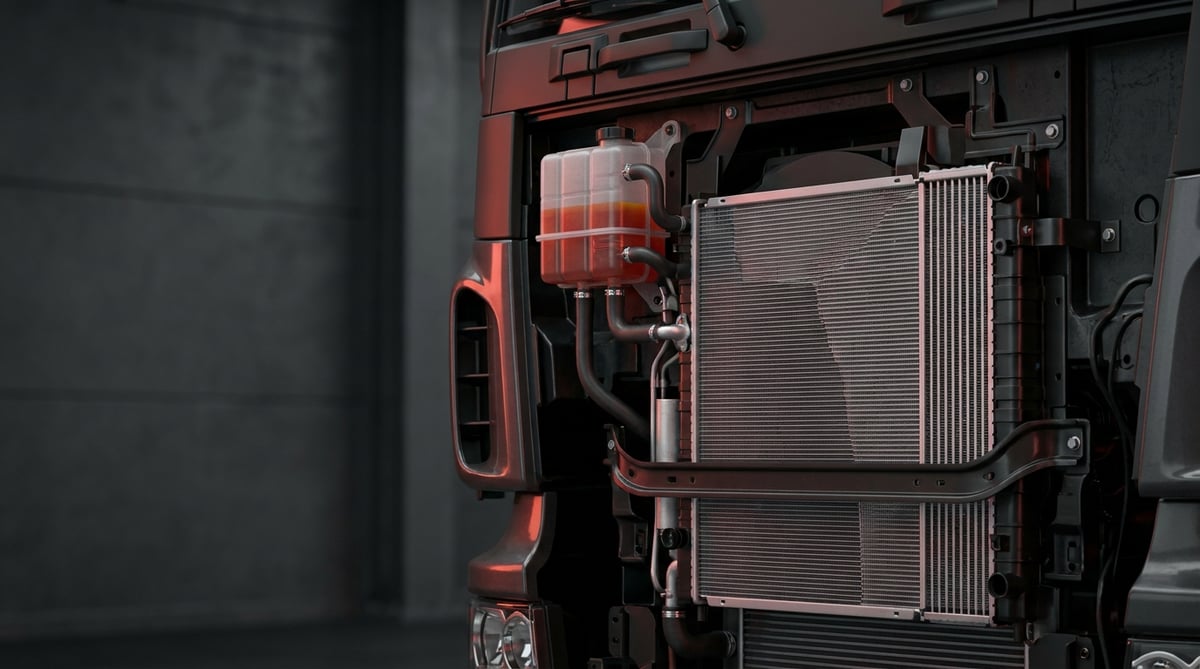
In a heavy commercial vehicle, most of the heat produced by the engine is expelled with the coolant; the component that releases this heat into the air is the radiator, while the vessel that lets the system breathe and balances its pressure is the expansion (coolant reservoir) tank. When a radiator weakens on a tractor unit during a long grade climb, or on a bus in stop-and-go city traffic, the result is not merely "the needle creeping up a little": overheating, cylinder head gasket damage, engine block warping and roadside breakdowns emerge as very expensive chain-reaction problems. This guide brings together the operating logic of the radiator and expansion tank for heavy diesel vehicles, along with fault diagnosis, correct replacement practice and safe technical values, in the language of the field.
What Is the Radiator and Expansion (Coolant Reservoir) Tank? Function and Operating Principle
The radiator is a heat exchanger that cools the coolant by transferring the heat of the hot coolant coming from the engine to the airflow; the expansion (coolant reservoir) tank is a pressurized vessel that accommodates the coolant as it expands with heat, prevents air from entering the system and balances the pressure. As the engine warms up, the coolant circulates within the block until the thermostat opens; when the thermostat opens, the coolant is directed to the radiator, cools as it passes through the core with the help of the fan and travel air, and is then pumped back to the engine by the water pump. The system is closed and pressurized; the pressure raises the coolant's boiling point, delaying evaporation even under high load. In heavy diesel applications, this unit works with the equivalent logic of Behr, Mahle and Nissens type radiators; the VADEN product family is also manufactured to replace these OE-type designs.
The cooling circuit is not a single part but a chain of interconnected components:
- Radiator core: The actual surface that releases heat to the air, formed by the water tubes and the fins/louvers between them.
- Side / top-bottom tanks: The vessels that distribute the coolant to and collect it from the core; in aluminum-plastic types they are plastic, in all-metal types they are brass/aluminum.
- Expansion / coolant reservoir tank: The vessel that receives the expanding coolant, serves as the fill and bleed point of the system, and carries a pressure cap.
- Pressure cap (radiator/tank cap): The cap carrying a pressure valve that opens at a certain pressure (typically ~1 bar) and a vacuum valve that draws coolant back as the system cools.
- Thermostat, water pump and fan: Support elements that manage coolant temperature and flow rate, carry the heat to the radiator and increase the airflow.
- Hoses, clamps and radiator mounts (rubber bushings): The parts that provide the connection, vibration isolation and correct assembly.
Why are the pressurized system and the cap critical?
The closed cooling circuit operates under pressure because pressure raises the boiling point of the coolant. While pure water boils at 100 °C at sea level, with ~1 bar of extra pressure and the correct antifreeze mixture the boiling point is pulled significantly higher; this way the engine runs without forming vapor even under high load. The pressure cap establishes this balance: when the pressure exceeds the design limit, the valve opens and releases the excess pressure to the expansion tank/atmosphere, and when the engine cools, the vacuum valve draws the coolant back to prevent air from entering. A weak or wrongly rated cap can lower the system's boiling point and cause overheating even on a sound engine — which is why, despite being an inexpensive part, it is a critical safety element.
The function of the expansion (coolant reservoir) tank
As the coolant heats up, its volume increases. The expansion tank accommodates this increase in volume, houses the air gap (expansion space) in the system, and is generally the highest point where filling and bleeding are performed. In heavy commercial vehicles this tank is often of the pressurized type and its cap is located directly on it; when it cracks or its cap leaks, the system cannot hold pressure, the coolant level drops and the engine starts to overheat. The tank material is generally reinforced plastic resistant to the heat and pressure cycle; over the years this plastic can become brittle and crack at the seams.
Material types: aluminum-plastic, copper-brass and all-aluminum
Most modern heavy commercial radiators have an aluminum core + plastic side tank (joined by mechanical crimping/gasket) structure; they are light and efficient, but the gasket at the joint between the plastic tank and the core becomes a leak point over time. Classic copper-brass (soldered) radiators are heavy but more suitable for repair (soldering) and are still preferred in some heavy-duty/older fleet applications. All-aluminum welded types, on the other hand, are used in heavy-duty applications requiring durability. The table below summarizes type selection as a guide.
| Radiator type | Structure | Strength | Weakness / caution |
|---|---|---|---|
| Aluminum core + plastic side tank | Mechanical crimping + gasket | Light, high heat transfer, low cost | Tank-core gasket line and plastic tank cracking are frequent faults |
| Copper-brass (soldered) | Soldered core + brass tank | Repairable (soldering), robust | Heavy, expensive to produce; solder fatigue can occur |
| All-aluminum (welded) | Aluminum core + welded tank | High durability, heavy duty | Difficult to repair; usually a complete replacement when damaged |
| Expansion/coolant reservoir tank | Reinforced plastic vessel | Light, integrated cap/level | Becomes brittle with heat cycling and cracks at the seam |
Fault Symptoms and Diagnosis
Most cooling system faults fall under three main headings: external leak (coolant loss), insufficient cooling/overheating and pressure/air problem. The critical point is this: the same symptom (for example, a continuously dropping coolant level) can originate from the radiator core, from a tank crack, from the cap, or from an internal leak. For this reason, diagnosis must be done by isolating the system with a pressure test before replacing any part.
| Symptom | Possible Cause | Check / Verification |
|---|---|---|
| Coolant level keeps dropping, green/red trace underneath | Core/side tank crack, gasket line leak, loose hose-clamp | Apply a pressure test (leak-down) on a cold engine; visually inspect the leak point and trace with fluorescent dye |
| Engine overheats but there is no external leak | Internal blockage/scale-deposit, air lock, weak cap, insufficient antifreeze ratio | Map the core surface temperature (cold zone = blocked); test the cap pressure; verify bleeding |
| Constant bubbling in the expansion tank / air from the hose | Cylinder head gasket leak (exhaust gas mixing into the coolant), air lock | Apply an exhaust gas (combustion) leak test; observe the pressure behavior without opening the tank cap |
| Heater (cabin) blows cold, engine warms up | Air lock (air pocket), low coolant level, blockage | Fill and bleed the system by procedure; check the level and cap |
| Coolant puddle in the parking area on a cold engine | Expansion tank crack, cap/seal leak, lower hose | Inspect the tank and seams under pressure; look for wetness and crusting |
| Temperature needle fluctuates, steam/odor at the outlet | Weak pressure cap, low level, incipient internal leak | Measure the cap with a test device; check the level and run a combustion test |
| Core fins dented/blocked, no air passing from the front | External mud/insect/salt blockage, damaged louvers | Hold the core up to the light from the front; clean from the outside with low-pressure air/water |
Distinguishing the external leak (coolant loss) symptom
A colored antifreeze trace and the crust left when it dries (crystallized residue) are the clearest signs of an external leak. However, a leak that evaporates on a hot engine may not be visible; therefore the most reliable method is to apply a hand-pump pressure test (leak-down) on a cold system. Pump the system up to a value close to the typical operating pressure and observe whether the pressure drops. If the pressure drops but there is no visible leak, the possibility of an internal leak (cylinder head/block) or in-core leakage comes to the fore. To locate the leak, adding fluorescent (UV) dye to the system and scanning with a UV lamp is very effective in the field.
Distinguishing the insufficient cooling / overheating symptom
If the engine overheats while there is no external leak, the culprit is usually a loss of flow or heat transfer: partial internal blockage of the core with scale/deposits, the radiator being covered with mud and salt on the outside, an air lock, a weak cap or a wrong antifreeze ratio. While the engine is running, scan the core surface (with a non-contact thermometer); distinctly cold-remaining zones indicate that those tubes are blocked and therefore coolant is not passing through them. Also hold the front surface up to the light and check airflow; a core blocked on the outside cannot cool even if it is clean inside.
Distinguishing the pressure and air (air lock / internal leak) symptom
Persistent bubbling in the expansion tank, the system forming air again after filling, or a change in the color/odor of the coolant is a serious warning: this may indicate that exhaust gas is mixing into the coolant from the cylinder head gasket. To confirm this, a combustion (exhaust gas) leak test is used; a color change in the test fluid indicates that combustion gas is mixing into the coolant. An air lock (air pocket), on the other hand, most often results from incorrect filling/incomplete bleeding and is remedied with the correct bleeding procedure; if it persistently recurs, an internal leak should be sought underneath.
Replacement / Installation Steps
The steps below are a general sequence for heavy diesel (truck/tractor unit/bus); always rely on the torque, capacity and procedure values in the vehicle's service manual.
- Secure and cool the system: Stop the vehicle on level ground, chock it, shut off the engine and wait for it to cool completely. Open the cap only after the system has cooled and the pressure has been released.
- Drain the coolant: Open the radiator lower drain plug (or the lower hose) and collect the coolant in a suitable container. If there is a block drain, use it as well. Open the top cap to ease draining.
- Mark the connections: Photograph and label the upper-lower hoses, expansion tank hoses, heater lines, oil cooler/transmission cooler lines if present, and the fan/shroud connections.
- Remove the hoses and clamps: Loosen the spring/screw clamps and separate the hoses. Do not force hardened hoses; if necessary, cut them off and replace them with new ones. Plug the open ports.
- Separate the fan shroud and supports: Remove the fan guard/shroud, the viscous fan or electric fan connections if present, and the radiator upper mounting/support elements.
- Remove the radiator: Carefully lift the radiator up off its rubber bushings (mounts). Do not rub the core and fins against other parts; use appropriate lifting for heavy types.
- Prepare and compare the new radiator/tank: Place the new part side by side with the old one and verify that the connection positions, core thickness, inlet-outlet diameters and mounting points match exactly. Remove the shipping plugs.
- Renew the mounts and bushings: Replace the radiator lower rubber bushings (mounts) if they are crushed/cracked. A mount with degraded vibration isolation cracks the joints of the new radiator in a short time.
- Position and connect the new radiator: Seat the radiator on its mounts and tighten the upper supports to the manufacturer's torque. Always use new hoses and new clamps; align the clamps with the hose neck mark and tighten them properly. Verify that the fan-shroud gap is equal everywhere and that the fan does not touch the shroud.
- Fill with the correct mixture: Prepare the antifreeze type specified by the manufacturer (e.g. a specification suitable for the engine such as long-life OAT/silicate-free) in the appropriate ratio (typically 50/50) and, if possible, with demineralized water, then fill slowly. The wrong type or ratio leads to corrosion and deposits.
- Bleed the air and run a pressure test: Use the bleed screw/point if present; open the heater valve. Start the engine and warm it until the thermostat opens, top up the level and completely expel the air lock. Then, on a cold system, verify all connections and the cap for leaks with a hand-pump pressure test.
Points to Watch (Common Mistakes)
- Using the wrong antifreeze type/ratio: Mixing fluids of different chemistry (e.g. IAT with OAT) can lead to gelling and deposits; too low an antifreeze ratio weakens boiling and freezing protection together with corrosion protection. Always use the specification suitable for the engine and the correct ratio.
- Refitting an old/weak cap: A cap that does not hold pressure causes overheating even on a sound radiator. When replacing the radiator, test or renew the cap as well.
- Reusing a hardened hose and an old clamp: An aged hose and a loosened clamp will leak in a short time. When replacing, renew the hose and clamp together.
- Installing with a crushed mount: A degraded rubber bushing transmits vibration to the radiator and cracks the plastic tank/gasket line. Do not neglect the mounts.
- Force-cleaning the core surface: High-pressure water or a stiff brush flattens the thin aluminum fins and reduces heat transfer. Clean at low pressure and from the inside out.
- Replacing parts without measuring the leak: Before pinning overheating directly on the radiator, run a pressure test, a cap test and, if necessary, a combustion test; the real culprit is often the cap, an air lock or an internal leak.
Technical Values and Check Points
The values below are general/safe references for common heavy commercial vehicle cooling systems. Critical values such as cap pressure, operating temperature, antifreeze ratio and torque vary by vehicle and engine model; for the exact figure, always rely on the relevant service manual.
| Parameter | Typical / Safe Reference | Note |
|---|---|---|
| Pressure cap opening pressure | ~0.9–1.1 bar (~13–16 psi) | Varies by the manufacturer that designed the system; marked on the cap |
| Normal operating temperature (coolant) | ~82–95 °C | Varies with the thermostat and load |
| Thermostat opening start | ~79–88 °C | Varies by engine family |
| Warning/critical upper temperature | ~100–105 °C and above | When reaching this band, reduce the load and stop |
| Antifreeze / water mixture ratio | Typically 50/50 (approx. -35 °C protection) | Do not go outside the 40–60% band; adjusted to the climate |
| Pressure test (leak-down) hold | No significant drop at a value close to the cap pressure | Applied on a cold system |
| Expansion tank level | Between MIN–MAX when cold (usually lower-middle) | The level rises when hot; read it when cold |
The cap pressure (~1 bar), operating temperature and 50/50 mixture values above are consistent with the widely accepted general references for heavy commercial diesel cooling systems; the exact opening pressure is marked on the cap itself, and the antifreeze specification (e.g. ASTM/engine manufacturer approval) takes priority according to the vehicle manufacturer. The values may vary by region, climate and engine variant; the service manual and the information on the cap/label should always be taken as the basis.
Typical installation torque and connection tightening reference
The tightening values of the radiator support bolts, fan shroud and hose clamps vary by bolt size, class and connection type. The values below are only a general reference; for the exact torque, always use the vehicle manual.
| Connection (size / type) | Typical torque range | Note |
|---|---|---|
| M6 / 8.8 (shroud, small support) | ~8–10 Nm | Do not crush plastic/thin-sheet connections |
| M8 / 8.8 (radiator support) | ~22–25 Nm | General reference |
| M10 / 8.8 (main mount/foot) | ~43–48 Nm | General reference |
| Screw hose clamp | ~4–7 Nm (by feel by hand, not with a torque gun) | Over-tightening cuts the hose; align the clamp with the neck mark |
Quick check points in the field
- Watch the temperature needle/gauge while the engine is running; deviation and fluctuation from the normal band is an early warning.
- On a cold engine, verify the expansion tank level is between MIN–MAX; if it keeps dropping, look for a leak.
- Hold the front face of the core up to the light and check airflow and fin blockage; external blockage is a frequently overlooked cause.
- Measure the pressure cap with a test device; if the opening pressure is low or the vacuum valve does not hold, renew it.
- Squeeze the hoses by hand: if there is excessive softening, swelling or cracking, replace them. Review the clamp alignment and tightness.
Maintenance and Service Life
The service life of the radiator and expansion tank depends largely on two things: the chemical quality of the coolant and the cleanliness of the core. Both directly affect internal corrosion/deposits as well as external heat transfer. A routine that keeps preventive maintenance simple extends the life not only of the radiator but also of the thermostat, water pump and cylinder head gasket in the background.
- Daily / pre-trip: Check the level on a cold engine, watch the gauge, and visually check for leaks/wetness and blockage on the front face of the core.
- Periodic (during PM services): Measure the antifreeze concentration and condition (color, cloudiness, pH/protection); scan the hoses-clamps; test the cap; inspect the seams of the expansion tank under pressure.
- Coolant change: Renew the antifreeze within the manufacturer's interval (longer for long-life types, shorter for conventional) with the correct specification and ratio. Mixed/contaminated fluid causes corrosion and deposits.
- Core cleaning: Clean the front face at low pressure, from the inside out (mud, insects, salt, leaves). Take care not to flatten the fins; crushed louvers reduce heat transfer.
- Electrolysis/corrosion check: Poor chassis grounding and degraded antifreeze lead to electrolysis corrosion in aluminum cores. If in doubt, check the grounding and the antifreeze protection level.
If recurring leakage from the side tank gasket line, a crack in the plastic tank/reservoir, internal blockage with scale-deposits and irreparable fin damage on the outside are seen together, then it is time to replace the radiator. Partial repair (soldering/gluing) remains temporary in most heavy commercial applications; a complete replacement is generally more reliable and more economical overall. In this case, renewing the pressure cap, the upper-lower hoses and the worn mounts as well significantly extends the life of the new radiator. The thermostat and water pump in front of the radiator and the cylinder head gasket behind it are parts of the same system; to prevent a recurrence of the fault, evaluate these components together as well.
After correct diagnosis and a clean installation, the decisive factor is that the radiator and expansion tank you fit meet the cooling capacity, pressure resistance and dimensional compatibility of the OE-type design. The VADEN Cooling System product family — radiator, expansion/coolant reservoir tank, radiator pipe and mounts — has been developed as the equivalent of Behr, Mahle and Nissens type units in heavy diesel trucks, tractor units and buses, to meet the safe technical values and field expectations in this guide; it is enough to select the model suitable for your needs together with the vehicle and engine matching, evaluating it as a whole with the VADEN hose, cap and mount products.
Shop this part: Radiator
Related categories: Radiator · Expansion Tank · Pipe · Fan Ring · Radiator Wedge · Wiper Tank
Related technical guides: Engine Coolant Thermostat: Faults, Replacement & Care · Viscous Fan Clutch: Fault, Replacement & Maintenance Guide · Belt Tensioner: Failure, Replacement & Maintenance Guide
Application and compatibility: Vehicle compatibility catalogue · Engine compatibility catalogue
Tags
Frequently Asked Questions
- Why does the coolant level in the expansion tank keep dropping?
- The most common causes are an external leak (core/side tank crack, gasket line, loose hose-clamp), an expansion tank crack and a weak pressure cap. If there is no visible leak, there is a possibility of an internal leak (cylinder head gasket). To confirm, apply a hand-pump pressure test (leak-down) on a cold engine; if the pressure drops but there is no trace outside, an internal leak and a combustion test come into play.
- The engine overheats but there is no leak anywhere outside, what could be the cause?
- In this picture the culprit is usually a loss of flow/heat transfer: internal blockage of the core with scale-deposits, external coverage with mud/salt, an air lock, a weak pressure cap or a wrong antifreeze ratio. While the engine is running, scan the core surface with a non-contact thermometer; cold-remaining zones indicate blocked tubes. Be sure to have the cap tested as well.
- What is the function of the radiator cap (pressure cap), and does its failure heat up the engine?
- The cap holds the system pressure (typically ~1 bar), raising the boiling point of the coolant, and while cooling it draws coolant back with the vacuum valve to prevent air from entering. A weak cap that does not hold pressure can lower the boiling point and cause overheating even on a sound radiator. That is why, when replacing the radiator, test or renew the cap as well.
- Which antifreeze and mixture ratio should I use?
- Always use the antifreeze in the specification stated by the engine manufacturer; do not mix fluids of different chemistry (e.g. IAT with OAT). The mixture ratio is typically 50/50 and provides protection down to about -35 °C; it is adjusted within the 40–60% band according to the climate. Too low a ratio weakens both freeze/boil protection and corrosion protection. Use demineralized/pure water if possible.
- If the expansion (coolant reservoir) tank cracks, should I replace only the tank?
- If the tank alone is faulty (seam crack, cap seat leak), replacing the tank itself is generally sufficient. However, a tank crack is often a sign of aging plastic and repeated pressure cycling; also check the pressure cap and hoses of the same age. In the replacement, the correct type and the correct cap pressure are critical.
- How is air (an air lock) bled from the cooling system?
- After filling, open the heater valve, use the bleed screw/point if present, and warm the engine until the thermostat opens; top up the level during this time. When the thermostat opens, the circulating coolant carries the trapped air to the expansion tank. If the air lock persistently recurs, there may be an internal leak (combustion gas mixing) underneath; confirm this with an exhaust gas leak test.
- How should I clean the radiator core?
- Clean the mud, insects and salt on the front face with low-pressure water or air, blowing from the inside out if possible. High pressure and a stiff brush flatten the thin aluminum fins and permanently reduce heat transfer. For internal scale/deposit blockage, a correct coolant change and, if necessary, a system flush are applied.
- Should I repair the radiator or replace it completely?
- The decision depends on the type of damage. On copper-brass radiators a spot soldering repair may be possible; on aluminum-plastic types, however, a plastic tank crack and gasket line leak usually cannot be repaired permanently. In heavy commercial use, a complete replacement is generally more reliable and more economical overall; it gives the longest life when renewed together with the cap, hoses and mounts.
Related Articles
Engine Coolant Thermostat: Faults, Replacement & Care
Heavy truck engine coolant thermostat guide: stuck-open vs stuck-closed faults, diagnosis, correct replacement, torque values and maintenance tips.
Viscous Fan Clutch: Fault, Replacement & Maintenance Guide
Heavy-duty viscous fan clutch guide: how it works, fault symptoms, diagnosis, correct replacement steps and safe technical values for trucks and buses.
Water Pump: Faults, Replacement & Maintenance Guide
Heavy commercial vehicle Water Pump: fault symptoms, step-by-step replacement and maintenance. VADEN ORIGINAL technical guide.


