Air Dryer Purge Valve: Faults, Replacement and Maintenance
Learn how the air dryer purge valve works, spot leaking and freezing symptoms, follow safe step-by-step replacement and keep the air brake system dry.
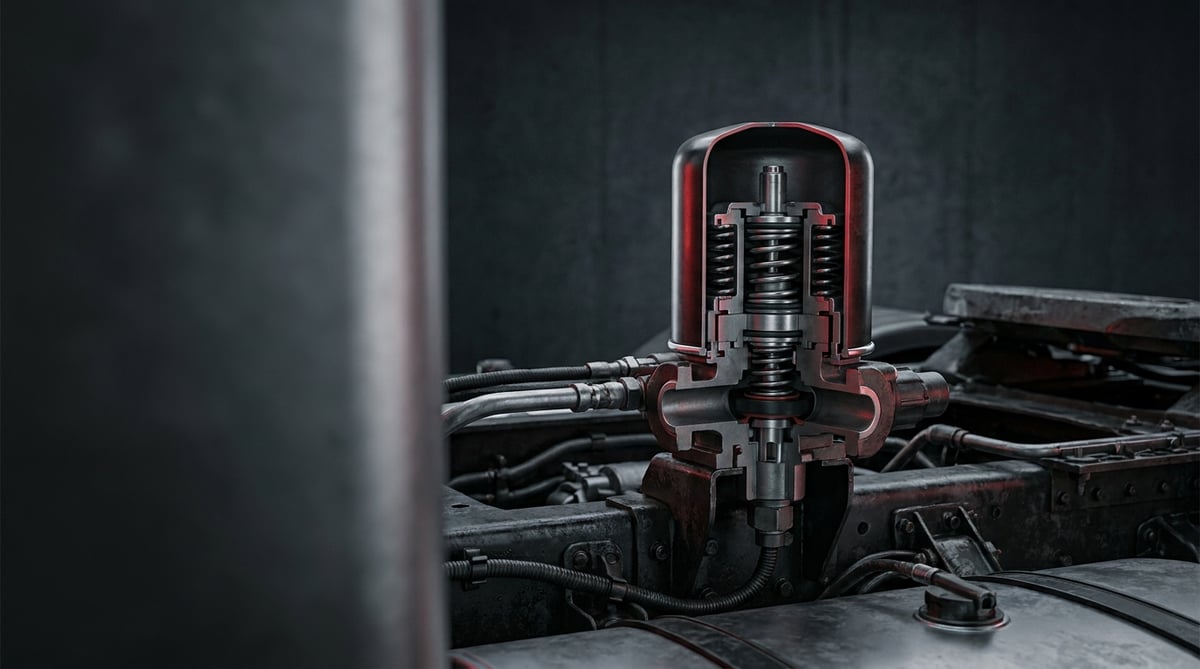
If you see a puff of white vapour and a few drops of water under the air dryer when you start the vehicle in the morning, that is normal; but if the purge never stops, the compressor refuses to cut out, or no water comes out at all in winter, something in the circuit is wrong. On a heavy commercial vehicle, the air dryer purge valve is one of the smallest yet hardest-working parts of the air brake system: it is the only door through which condensate, oil vapour and dirt leave the system. This guide explains, from the workshop foreman's and service technician's point of view, what the valve does, which symptoms indicate a fault, the correct diagnostic sequence, the discipline of removal and refitting, and the maintenance habits that extend its service life.
What Is an Air Dryer Purge Valve? Function and Operating Principle
The air dryer purge valve is a pressure-controlled discharge element that expels condensate, oil vapour and dirt collected in the air dryer housing and the air reservoirs of an air brake system. In systems typically operating between 7.5 and 12.5 bar it opens on every governor cycle, performs a purge lasting a few seconds and closes again; in many applications it contains a 24 V heater element that prevents freezing.
The air dryer purge valve is the final link in the chain that removes moisture from the air compressed by the compressor. Temperature rises as the compressor compresses the air; as that air cools inside the dryer, the water vapour it carries condenses and the desiccant granules in the dryer cartridge absorb the moisture. When system pressure reaches the governor cut-out value, the governor sends a control signal to the dryer; at that moment the purge valve opens and the water-oil mixture collected under the dryer is blown out in a short, sharp blast, assisted by dry air returning from the cartridge. The sound of that short blast is the familiar hiss known in the field as "the dryer let go", and in a correctly working system it is heard once per cycle.
The role of the valve is more critical than it looks. Water left in the system freezes inside the valve and the lines in winter and locks up the brake circuits; in summer it creates corrosion and seal swelling on the internal surfaces of brake valves, air treatment units and brake chambers. The performance and safety requirements of commercial vehicle brake systems are defined within the framework of ECE R13, while the classification of moisture and oil content in compressed air is covered by the ISO 8573-1 family. Standard families such as EN 286-2 are referenced for the manufacture and strength requirements of air reservoirs. These standards provide the general framework; which revision and which class apply to a particular vehicle must be verified from the relevant OE catalogue and the vehicle manufacturer's documentation.
What happens during the regeneration cycle?
The air dryer purge valve is not a simple "tap" on its own but the controlled element of the dryer's regeneration (self-renewal) cycle. When the governor reaches cut-out pressure the compressor is unloaded and the dryer purge port opens. The dry air stored in the regeneration reservoir above the cartridge passes back through the cartridge in the reverse direction, picks up the moisture from the desiccant and expels it to atmosphere through the open purge port. In this cycle the purge port typically remains open from a few seconds up to about half a minute; the duration varies with the application, the dryer type and the regeneration volume. If the valve does not close in time the system cannot build pressure; if it never opens the cartridge cannot regenerate and the saturated desiccant starts passing moisture through to the reservoirs.
Why do heated (heater element) versions exist?
The air dryer purge valve is supplied in a heated version for cold-climate applications. The purge port is the coldest point open to the outside air and always contains some water; when the temperature drops below zero this water freezes and blocks the port. The heater is an element usually fed with 24 V that only switches on at low temperature thanks to its internal thermostat or PTC device. A correctly working heater does not prevent the valve from freezing as a whole but supplies just enough heat to keep the purge port clear. A heater failure shows itself in winter as "the vehicle will not hold air" or "the brakes do not release in the morning", and the valve itself is usually blamed.
Components and auxiliary elements
- Valve body: aluminium or composite body; screwed into the dryer or the reservoir flange.
- Diaphragm / piston and spring: the moving group that opens under control pressure and closes under spring force.
- Sealing elements (O-ring, gasket): provide the air seal between the body and the seating face.
- Purge port and strainer: the point where water and dirt leave; may include a mesh that traps coarse particles.
- Heater element and connector: usually 24 V; controlled by thermostat or PTC.
- Manual drain pin or ring: the element on reservoir-type drain valves that allows manual draining by pushing sideways.
- Connection thread and sealing tape/washer: metric or imperial thread depending on the application; the sealing method depends on the thread form.
| Type | Control method | Typical operating pressure | Characteristic service note |
|---|---|---|---|
| Automatic purge valve on the dryer (non-heated) | Governor control signal | 7.5–12.5 bar | Short blast on every cycle; temperate climate application |
| Automatic purge valve on the dryer (24 V heated) | Governor control signal + thermostatic heater | 7.5–12.5 bar | Standard in cold climates; heater and connector checked separately |
| Automatic water drain valve on the reservoir | Reservoir pressure and internal balance | 7.5–12.5 bar | Expels condensate from the reservoir in systems without a dryer or as a support function |
| Manual (pin / ring type) drain valve | Push or pull by hand | 7.5–12.5 bar | Manual draining during periodic maintenance; complements the automatic valve |
| Integrated purge inside an air treatment and pressure regulating unit | Internal unit control | Depends on the unit operating band | Handled with the unit service kit rather than as a separate part |
How do you recognise an air dryer purge valve fault?
Air dryer purge valve faults fall into two main field behaviours: no purge at all and continuous leakage. The first shows itself as water accumulating in the reservoirs, the second as a compressor that never cuts out. The table below matches the symptom presented by the vehicle with its probable cause and the verification method used in practice.
| Symptom | Probable cause | Check / verification |
|---|---|---|
| Continuous air leak from the purge port, compressor never cuts out | Valve not seating; dirt, wear or aged O-ring on the seating face | Apply soap solution to the port and watch for bubbles; check separately while pressure is building and while it is held |
| Dryer never purges, no cycle sound is heard | Control line blocked, no governor signal, or valve stuck internally | Charge up to governor cut-out pressure and measure control line pressure with a gauge |
| Plenty of water and grey-black emulsion when draining the reservoirs | Purge not working, cartridge saturated; also oil carry-over from the compressor | Drain each reservoir manually in turn; compare the quantity and colour of the liquid |
| Brake system does not release on winter mornings, purge port iced up | Heater element or supply circuit faulty; frozen condensate in the port | Measure supply voltage at the connector terminals and heater resistance (when cold) |
| System pressure builds slowly, compressor run time increases | Partial leak at the purge port or delayed valve closing | Measure the build-up time from empty to operating pressure and compare with the OE value |
| Oily, foamy liquid coming from the purge port | Compressor passing oil, dryer cartridge saturated with oil | Inspect the cartridge and the purge port outlet; check the compressor delivery line |
| Regeneration blast lasts too long or repeats | Valve not closing fully, spring or diaphragm fatigued | Time the cycle with a stopwatch and monitor its repeatability |
| Dampness, corrosion or white blistering around the valve body | Loss of seal at the thread connection, cracked body or electrolytic corrosion | Clean and dry the area, then repeat the soap test under pressure |
| Water in the front reservoir but not in the rear ones (or vice versa) | Restriction in the drain line, reservoir inclination or position problem, blockage at a single point | Map the water distribution by draining reservoir by reservoir manually |
Verifying leaks with the soap test
The fastest diagnosis of an air dryer purge valve is still the soap test. Once the system has been charged to operating pressure the engine is stopped and soapy water is applied to the purge port. A bubble that keeps growing means a leak; a bubble that stops within a few seconds after the cycle may simply be normal purge residue. Repeat the test both while the system is charging and while pressure is steady: some valves leak only at high pressure, others only at low pressure. The most common misjudgement in the field is mistaking the dryer's normal blast on each cycle for a fault; the distinction is made by listening to whether the sound is periodic or continuous.
Build-up time and pressure drop test
Hidden leaks caused by the air dryer purge valve show up most clearly in the build-up time and pressure drop test. The system is drained and the time to reach operating pressure is measured and compared with the value given by the vehicle manufacturer; if the time has increased there is either a leak in the circuit or a loss of compressor efficiency. The engine is then stopped and, without using the brakes, a defined period is waited out while the drop on the gauge is monitored. If the drop exceeds the acceptance limit, the leak point is narrowed down valve by valve. The accepted drop limit is vehicle-specific and must be taken from the service manual.
Electrical check of the heater circuit
On heated versions of the air dryer purge valve, the second stage of diagnosis is electrical. With the ignition on, supply voltage is measured at the connector terminal; if there is no voltage, the fuse, relay and wiring harness are traced. If voltage is present, the resistance of the heater is measured when cold: an open circuit (infinite resistance) means a failed heater, while very low resistance means a short circuit. In some applications the heater only becomes conductive at low temperature; on these types, verify from the OE documentation whether the part has a PTC characteristic before evaluating the measurement result.
How is an air dryer purge valve replaced? Step by step
- Secure the vehicle: Stop the engine, apply the parking brake, chock the wheels and make sure the vehicle cannot move. Remember that the spring brake (parking brake) chambers remain mechanically locked; the vehicle stays braked when pressure is released, but chocks are still mandatory.
- Release system pressure: Drain all air reservoirs in turn through their manual drain valves and confirm visually on the gauge that pressure has reached zero. Trust the measurement on the circuit, not the dashboard indicator. Do not loosen any connection before pressure is released.
- Disconnect the electrical connection: On heated types, switch off the battery isolator and remove the heater connector by pressing its locking tab. Do not pull the connector off by the cable; a broken tab causes poor contact later and freezing problems in winter.
- Clean the area: Free the area around the valve, the thread zone and the dryer base from mud, salt and oil using compressed air and a clean cloth. A single grain of sand entering the air brake system means damage to the seating face of subsequent valves.
- Remove the old valve: Use a correctly sized open-end or socket spanner; do not grip the body with pliers. If the thread is seized, apply penetrating fluid and wait, rather than forcing it with heat. When loosening, support the mating body (the dryer base or reservoir flange) so that the torque is not carried by the housing.
- Inspect the removed part and the seat: Look for scoring, corrosion, damaged threads or cracks on the seating face. Check the quantity and colour of the liquid coming from the old valve: plenty of water indicates cartridge saturation, oily emulsion indicates oil carry-over from the compressor. If there is oil in the system, replacing the valve alone will not solve the problem.
- Verify the new valve: Place the new part alongside the old one; thread diameter and pitch, body length, purge port direction, heater connector type and, where fitted, the manual drain pin must match exactly. Even a single detail that does not match shows the part is wrong; do not force it into place.
- Prepare the sealing element: Use the sealing method required by the application; on types sealed with a gasket or O-ring always fit a new element, and on tapered-thread types apply the appropriate sealing material exactly as described by the manufacturer. Do not let sealing material overrun the first turns of the thread; a piece that breaks off will enter the system.
- Fit by hand and torque: Start the valve by hand first; if it binds in the first turns the thread does not match, so back it out and check. Then tighten with a torque wrench to the value specified by the manufacturer. Overtightening strips the thread in the aluminium seat and can lead to complete replacement of the dryer housing.
- Refit the electrical connector: On heated types, push the connector in until it locks and secure the cable route away from the exhaust and moving parts. Positioning the connector opening facing downwards is a small but effective habit that prevents water collecting inside it.
- Charge and test: Start the engine and charge the system to operating pressure. Listen for the purge blast at the moment of governor cut-out, then apply soap solution to the port to confirm there is no leak. Measure the build-up time, stop the engine and repeat the pressure drop test, and check that the heater circuit is receiving voltage. After the test drive, check the area once more with a dry cloth.
What are the most common mistakes when replacing an air dryer purge valve?
- Replacing only the valve and ignoring the root cause: If oily emulsion comes from the purge, the real problem is on the compressor side; the new valve will soon end up in the same condition.
- Not assessing the dryer cartridge at the same time: In a system running with a saturated cartridge the purge valve is constantly exposed to water and its service life is shortened. If the cartridge interval has passed, it should be dealt with in the same service.
- Entering winter without checking the heater: A failed heater that goes unnoticed in summer will strand the vehicle at the first frost. Heater checking should be part of seasonal maintenance.
- Using too much sealing material: Paste or tape overrunning the thread breaks off and enters the system, causing seating faults in downstream valves.
- Relying on "feel" instead of a torque wrench: Thread tolerance is tight on dryers with aluminium housings; overtightening strips the thread and undertightening leaks.
- Positioning the purge port facing upwards: Water and dirt cannot be expelled, they collect in the port and the risk of freezing increases.
- Fitting an extension hose to the purge port: An extension hose of the wrong diameter or with bends creates back pressure, weakens the purge and creates a freezing point. If an extension is required, an OE-approved solution must be used.
- Abandoning the manual draining habit: Giving up periodic manual draining of the reservoirs just because an automatic valve is fitted delays the detection of a fault.
- Skipping the post-replacement test: If the vehicle is handed over without a build-up time and pressure drop test, a hidden leak will appear on the road a few days later.
Air dryer purge valve technical values and check points
The values given below for the air dryer purge valve are general reference ranges commonly encountered in heavy commercial vehicle air brake systems. These ranges vary with the vehicle manufacturer, dryer type, emission generation and climate package; for exact data, always consult the current service manual matching the vehicle's engine and chassis code.
| Parameter | Typical range (general reference) | Note |
|---|---|---|
| System operating pressure (governor band) | 7.5–12.5 bar (110–180 psi) | Cut-out and cut-in values are vehicle-specific |
| Governor cut-out to cut-in differential | Approximately 0.5–1.5 bar | If the band narrows, the compressor cycles frequently |
| Regeneration (purge) duration | From a few seconds up to 30 seconds | Depends on dryer type and regeneration volume |
| Heater supply voltage | 24 V (12 V in some applications) | The wrong voltage burns out the heater |
| Heater rating | Approximately 30–150 W band | Varies with the application; the OE value governs |
| Heater switch-on temperature | Approximately below +5 °C | Depends on the thermostat/PTC characteristic |
| Operating temperature range | Approximately −40 °C to +80 °C | Temperature at the dryer outlet may be higher |
| Acceptable static pressure drop | Defined by the vehicle manufacturer | The limit is taken from the manual; no generalisation is made |
| Dryer cartridge replacement interval | Approximately 1–2 years or a mileage-based interval | Shortens with duty intensity and climate |
| Connection point | Typical torque band (general reference) | Application note |
|---|---|---|
| Purge valve on the dryer housing | 20–40 Nm | Overtightening strips the thread in the aluminium seat |
| Automatic drain valve on the reservoir | 25–45 Nm | Varies with thread form and sealing method |
| Manual drain valve (pin/ring type) | 15–30 Nm | The torque band is lower on small bodies |
| Dryer housing mounting bolts | Manufacturer-specific | Tightened in stages and in a crosswise sequence |
- Is the purge port clear, or is there dirt, ice or residue inside it?
- Is the blast sound heard at governor cut-out, and is it periodic?
- Are there continuous bubbles at the port once the system is holding pressure?
- Is the liquid from the reservoirs clear water or oily emulsion?
- Is supply voltage present at the heater connector and the expected resistance present in the heater?
- Is there corrosion, dampness or any sign of cracking around the valve body?
- Does the build-up time from empty to operating pressure exceed the manual value?
- Has the dryer cartridge replacement interval been exceeded?
How is an air dryer purge valve maintained and its service life extended?
There is no single interval that determines the service life of an air dryer purge valve; what matters is how clean the air feeding the system is, whether the cartridge is replaced on time and whether the purge port is physically protected. In a system with regular cartridge maintenance, a compressor that does not pass oil and a purge port kept clear, the valve gives no trouble for years. Conversely, a valve working beneath a compressor delivering oily air will start to leak within a few months as its seating face becomes contaminated.
- Cartridge discipline: Replace the dryer cartridge at the interval given by the manufacturer; intensive duty, humid climates and short-distance work shorten this interval.
- Periodic manual draining: Drain the reservoirs by hand regularly even if an automatic purge is fitted. The quantity of liquid that comes out is the cheapest diagnostic data available about the condition of the system.
- Monitor the compressor: Oil coming from the purge is a warning about the compressor, not the dryer. A valve replacement carried out without solving the oil carry-over will not last.
- Winter preparation: Check the heater element, the connector and the cable route before the cold season. This check prevents a large share of the air system faults most frequently experienced in winter.
- Protect the purge port: Shield the port from mud, salt and material thrown up during levelling work; do not disturb its downward-facing position.
- Washing discipline: When pressure washing, do not aim the lance directly at the purge port or the heater connector; water entering causes freezing and corrosion.
- Monitor air quality: If the intake filter is blocked or the compressor is overheating, the amount of moisture and oil carried to the dryer increases; the problem is solved at the head of the chain.
- Follow-up after any work: Repeat the leak check within the first few hundred kilometres after any job that touches the air system.
In fleet operations, the most efficient approach is to plan the air dryer purge valve not on its own but as part of the dryer group. When cartridge replacement, purge valve inspection, verification of the governor setting and reservoir draining are carried out in the same service, the vehicle does not have to be taken off the road a second time and total downtime falls noticeably. A ten-minute heater and leak check before winter is the cheapest insurance against freezing-related breakdowns on the road.
Tags
Frequently Asked Questions
- What does an air dryer purge valve do?
- The air dryer purge valve expels condensate, oil vapour and dirt collected in the air dryer housing and the reservoirs of an air brake system. It opens when the governor reaches cut-out pressure, blows the accumulation out to atmosphere with a short, sharp blast while the dryer cartridge regenerates, and then closes. Without this purge the water stays in the system; in winter it freezes and locks the circuits, and in summer it causes corrosion and seal damage in the valves.
- The dryer leaks air continuously, is the purge valve the cause?
- In most cases yes, but a distinction has to be made. A short blast heard once on every governor cycle is normal; a continuous leak indicates that the purge valve is not seating. The most common cause is dirt on the seating face or an aged sealing element. Since a governor fault or a problem with the check valve inside the dryer can produce similar symptoms, the leak point must be confirmed with a soap test.
- Why does an air dryer purge valve freeze in winter?
- The purge port is the coldest point of the air system open to the outside and always contains some water. When the temperature drops below zero this water freezes and blocks the port; the system cannot purge and the pressure balance is disturbed. That is exactly why heated versions exist. If freezing occurs in winter, the supply voltage and resistance of the heater should be measured first, then the position and cleanliness of the purge port checked.
- Oily liquid comes from the purge valve, what does that mean?
- Dark, foamy, oily emulsion from the purge shows that the compressor is passing oil into the system. The dryer cartridge saturates quickly in the presence of oil and loses its moisture-holding capacity; the seating face of the purge valve then becomes contaminated and leakage starts. In this situation, replacing only the valve is a temporary fix; the compressor and the delivery line must also be assessed.
- Can an air dryer purge valve be repaired or cleaned and reused?
- With light contamination, removing the valve and cleaning its seat and seating face may solve the problem temporarily. However, if there is wear or corrosion on the seating face or fatigue in the diaphragm or spring, cleaning will not give a lasting result. The air brake system is a safety system; when in doubt, the valve is renewed. If there is damage in the thread area, the dryer housing must also be checked.
- When should an air dryer purge valve be replaced?
- There is no fixed replacement mileage for an air dryer purge valve; replacement is decided by the symptoms and the inspection result. Continuous leakage, complete failure to purge, body corrosion, heater failure and loss of seal in the thread area are all grounds for replacement. In practice, many workshops inspect the valve during the same service as the dryer cartridge replacement and renew it in that service if its condition is doubtful.
- Is it essential to fully depressurise the air system to replace the purge valve?
- Yes, it is essential. A valve loosened under pressure can fly off together with its body, and the escaping air, water and oil mixture can cause serious injury. The dashboard reading is not sufficient proof; because check valves sit between the circuits, one circuit can remain full while another is empty. Every reservoir must be drained one by one and confirmed with the measurement taken on the circuit itself.
- What is the difference between a heated and a non-heated purge valve?
- The difference lies in the measure taken against the risk of freezing. The non-heated type works purely on pressure control and is used in temperate climate applications. The heated type contains a heater element integrated in the body, usually with a 24 V supply; thanks to its thermostat or PTC characteristic it switches on only at low temperature and prevents the purge port from freezing. The two types are not interchanged blindly: fitting a non-heated valve in place of a heated one means freezing in winter, and using a heater at the wrong voltage means an electrical failure.
- How do I select the correct air dryer purge valve?
- Vehicle model alone is not enough for selection. The chassis and engine code, the OE number on the dryer housing, the diameter and form of the connection thread, whether a heater is fitted and, if so, its supply voltage must all be assessed together. In the VADEN catalogue the search can be carried out on the basis of this data: you can search the OE reference number of the old part directly to reach the matching VADEN part number, or work through the vehicle and application based listing. Before fitting, placing the new valve alongside the old one and comparing the thread, body length, port direction and connector type is the safest final step.
- Why does the compressor still run frequently after the purge valve has been replaced?
- The most common reason is that there is another leak in the system besides the valve. Replacing the purge valve solves one point; if leaks from brake chambers, hoses, connection fittings or the governor persist, the compressor will continue to cycle frequently. The second possibility is that the governor cut-out pressure has drifted. Carrying out a build-up time and static pressure drop test after replacement narrows down which circuit the remaining leak is in.
Related Articles
Four-Circuit Protection Valve: Faults, Diagnosis & Replacement
Four-circuit protection (distributor) valve on heavy trucks: how it works, fault symptoms, per-circuit gauge diagnosis, replacement steps, torque values and maintenance.
Compressor Repair and Gasket Kit: Faults, Replacement, Care
A field guide to diagnosing air compressor gasket failure, choosing the right kit scope, preparing surfaces, torquing correctly and extending seal life.

Single vs Twin-Cylinder Air Compressor: Choice & Fitment
Learn how to match single or twin-cylinder air brake compressors to your truck: flow demand, drive and cooling interfaces, fault diagnosis, replacement steps.


